THE NIBBLE BLOG: Products, Recipes & Trends In Specialty Foods


Also visit our main website, TheNibble.com.

TIP OF THE DAY: Pavlova Dessert

If you’ve ever seen meringue like shells in a bakery and wondered what they are: They’re Pavlovas.

The Pavlova is one of the most popular desserts in Australia, where it’s commonly known as a Pav. The dessert is named after the legendary Russian ballerina Anna Pavlova, who toured Australia and New Zealand in 1926 and 1929.

Both countries claim to have invented this dessert, and have made it their national dessert. New Zealand may have the edge: Published recipes of fruit-filled meringue shells existed there without the name Pavlova.

According to chef Herbert Sachse of the Hotel Esplanade in Perth, Australia, the Pavlova was born at the hotel 1935. According to hotel legend, it was named at a meeting at which Sachse presented the cake. Either the hotel licensee, the manager or Sachse remarked, “It is as light as Pavlova,” who had been a guest of the hotel during her 1929 tour.

Years later, Sachse stated in an interview that he sought to improve the Meringue Cake recipe that he found in the Women’s Mirror Magazine, which was contributed by a New Zealand resident.*
 
*Source: Linda Stradley, What’s Cooking America.


pavlova-ciaoSamin-230

A Pavlova and the ingredients to make it. Photo courtesy CiaoSamin.com.

 
The Pavlova consists of a meringue base topped with fresh fruits. Most people buy the meringue shells at bakeries, but ambitious bakers can make their own (the recipe is below).

In addition to individual meringue shells, the meringue can be shaped into one large family-style shell, or into cake layers that are alternated with fruit for a spectacular effect (photo below). This type of cake is also called a Swedish Midsummer Meringue Layer Cake. And the meringue is the same recipe used to make individual meringue cookies.

Then, all you have to do is cut up your favorite fruits and add them to the shell. You can customize your Pavlova with:

  • Liqueur. If you want to exert more effort, you can marinate the fruits in wine or liqueur.
  • Topping. Add an optional topping: crème fraîche, mascarpone, raspberry purée, whipped cream.
  • Garnish. Garnish with chocolate curls or candied orange peel, or something as simple as a mint leaf.
  •  
    While the desert is light and airy for summer, and the red, white and blue colors are spot-on for July 4th. The toppings can be tailored to every season:

  • Fall: Assorted nuts (raw or candied), dried fruits garnish on the plate.
  • Christmas: Brandied fruits, candied fruits, crushed peppermint plate garnish.
  • Valentine’s Day: Strawberries and cream, candied rose petals plate garnish.
  • Spring: Apricots, nectarines, figs; edible flowers to garnish.
  • Summer: Seasonal fruits garnished with shaved coconut, lemon mint, lemon verbena or spearmint.
  • Anytime: Mousse or Strawberries Romanoff.
  •  
     
    RECIPE: PAVLOVA MERINGUE SHELL

    This recipe (the first photo, above) is courtesy Samin Nosrat of CiaoSamin.com, via Good Eggs. She has many wonderful recipes. This one has a touch of Indian flavor: rosewater, rose petals and cardamom. If you don’t have those ingredients, we’ve provided substitutions in the preparation steps.

    Samin serves the Pavlova with fresh-brewed mint tea: Steep fresh mint leaves in boiling water.


    pavlova-swedish-midsummer-meringue-cake-http-_www.thedomesticfront.com_swedish-midsummer-strawberry-meringue-layer-cake_230
    A Pavlova Cake is called a Swedish Midsummer Cake in—you guessed it— Sweden. Here’s the recipe. Add blueberries for a July 4th red, white and blue theme. Photo courtesy Kate of TheDomesticFront.com.
     

    Ingredients For The Meringue

  • 1/4 teaspoon cream of tartar
  • 2 1/4 teaspoons cornstarch
  • 3/4 cup granulated sugar
  • 3 ounces (about 3) large egg whites at room temperature
  • Pinch of salt
  • Pinch of saffron, ground in a mortar and pestle and dissolved in 2 tablespoons boiling water, cooled (substitute: water only)
  •  
    Ingredients For The Topping

  • 1 cup each sliced strawberries, raspberries, blueberries and blackberries, kept separate
  • 4 tablespoons rosewater
  • Dried rose petals (you can use rosebud tea) for garnish
  • 1/2 teaspoon ground cardamom
  • 2 cups heavy cream, chilled
  • 1/4 cup granulated sugar, plus 1/4 cup granulated sugar
  • Preparation

    1. PLACE the rack in the middle of the oven and preheat the oven to 250°F. Line a large baking sheet with parchment paper. Stir the cornstarch into the sugar in a small bowl.

    2. WHIP the egg whites, cream of tartar and salt in the large bowl of a heavy-duty mixer, fitted with the whisk attachment. Start on low, increasing incrementally to medium speed until soft peaks/trails start to become visible, and the egg white bubbles are very small and uniform, approximately 2 to 3 minutes.

    3. INCREASE the speed to medium-high, slowly and gradually sprinkling in the sugar-cornstarch mixture. A few minutes after these dry ingredients are added, slowly pour in the saffron tea. Increase the speed a bit and whip until the meringue is glossy and stiff peaks form when the whisk is lifted, 4 to 5 minutes.

    4. SPOON the meringue into an 9-by-6-inch oval on a baking sheet lined with parchment paper or a silicon liner. With the back of a spoon, create an indentation in the middle of the mound for holding the filling once the meringue is baked.

    5. PLACE the baking sheet in the oven. Reduce the oven temperature to 225°F. Bake for 50-60 minutes, or until the meringues are crisp (dry to the touch on the outside) and white (not tan-colored or cracked). The interior should have a marshmallow-like consistency. Check on the meringue at least once during the baking time. If it appears to be taking on color or cracking, reduce the temperature 25 degrees and turn the pan around.

    6. GENTLY LIFT the meringue from the baking sheet and cool on a wire rack. It will keep in a tightly sealed container at room temperature for up to a week, barring any humidity. While the meringue is baking…

    7. MACERATE the berries. In separate dishes, macerate each type of berry for at least 30 minutes with 1 tablespoon of rosewater (substitute orange liqueur or plain water) and 1 tablespoon sugar. This draws out their juices.

    8. ADD the cardamom (substitute: 1 teaspoon vanilla or orange extract or orange liqueur) and 1/4 cup sugar to the cream and whip to soft peaks.

    9. ASSEMBLE: Place the meringue on a serving dish and spoon in the whipped cream. Spoon the juicy berries atop the cream. Top with crushed dried rose petals (substitute: chopped pistachio nuts or mint leaf). Serve with fresh mint tea.

    Leave off the whipped cream and you have a cholesterol-free dessert with far fewer calories than a cake.
     
    WHAT IF THE COOKIE CRUMBLES?

    Don’t despair if your meringue cracks. If you can’t use it/them for a shell, simply create a “parfait” in a sundae dish or bowl, along with the berries and whipped cream.

    Or, use the same ingredients create a Pavlova version of an English Trifle.


    Comments off

    JULY 4TH: Star-Shaped Sandwich Skewers

    We loved this idea from Smucker’s, which uses its creamy Jif peanut butter and seedless strawberry jam to make these charming sandwiches.

    You don’t have to use PB&J: Any sweet or savory spread will do. You can make some very sophisticated combinations for adults.

    Prep time is 15 minutes.

    You can also make these into regular-size sandwiches with a jumbo star cookie cutter.
     
     
    RECIPE: STAR-SHAPED SANDWICH SKEWERS

    Ingredients For 1 Serving

  • 3 slices white or whole wheat bread
  • 1 tablespoon creamy peanut butter
  • 1 tablespoon seedless strawberry jam
  • Large fresh strawberries, halved
  • Seedless green grapes
  • Skewers
  •  
    Variations

    Beyond PB&J, you can use more sophisticated spreads. For example:

  • Chicken mousse pâté and fig jam
  • Cream cheese and raisins
  • Goat cheese and beets
  • Tapenade and julienne of carrots and celery
  •   star-sandwich-skewers-smuckers-230
    July 4th lunch or snacks. Photo courtesy Smucker’s.
     
    Try more sophisticated breads, too, like brioche, date nut bread, Irish soda bread, olive bread or walnut bread.
     
    Preparation

    1. CUT 10 shapes from bread using 2-inch star-shaped cookie cutter.

    2. SPREAD peanut butter (or ingredient of choice) on half the stars and jam on remaining stars. Press together to make five small sandwiches.

    3. THREAD the sandwiches, strawberry halves and grapes alternately onto skewer. Serve immediately.


    Comments off

    TIP OF THE DAY: Cedar Paper Grilling Wraps

    Cedar-Wrapped-Halibut-Fire&Flavor-230r
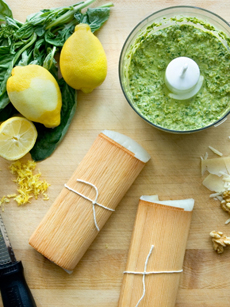
    Halibut wrapped in cedar grilling paper, for
    cooking on the stove top. It’s served with
    citrus pesto. Here’s the recipe. Photo
    courtesy Fire & Flavor.
      No grill? If you want an infusion of cedar flavor in your food, that’s no problem. Instead of a grill with cedar chips, get some cedar grilling papers.

    Made from a very thin, pliable slice of cedar, cedar grilling papers infuse a subtle but clear flavor while keeping food moist and tender.

    Wrap your favorite seafood, meats, vegetables, and fruits in Fire & Flavor’s All Natural Western Red Cedar Papers. One hundred percent all-natural western red cedar was chosen because it provides the best flavor and compliments the widest variety of foods.

    You can use the grilling papers indoors, in the oven, stove-top skillet or pannini press; or outdoors on the grill without the need for wood chips.

    A package of eight single-use grilling papers, 6″ x 7.25″, and 8 cotton strings for tying is $8.99 at FireAndFlavor.com.

    Cedar papers are easy to use and can be prepared in four easy steps: soak, heat, smoke, eat.

     
    FOUR EASY STEPS

    1. Soak
    Soak the grilling papers in a shallow dish for 10 minutes. Use a small bottle to weight down the papers to keep them fully submerged. Cedar grill papers only need to be soaked long enough to become pliable, but it’s fine to soak for several hours before use. You can also soak in tequila, wine and other liquids—details below.
     
    2. Heat
    Heat a grill, oven or skillet to 400°F or medium-high heat. Place the food face down in the center of a soaked cedar paper, parallel to the grain of the wood. Fold the paper’s edges toward each other until they overlap. Tie the paper together with cotton string (included with the papers) or butcher’s twine; or place them seam side down on the grill grate, skillet or pan.

  • Place citrus slices or other flavor infusions below the fillets before wrapping. This will push more of their flavor into the food above them.
  •  
    3. Smoke
    Smoke the wrapped food directly on the grill grates or in the grill pan. Cook fish for 3-4 minutes per side until food is done to your liking (close the lid if using a grill). During cooking, the cedar papers will blacken. This makes for great presentation.

  • Cedar paper can withstand high heat because the cooking times are usually short: 6-8 ounce chicken fillets can be cooked in less than 10 minutes.
  • Food will continue to conce removed from grill, so remove it from the heat a minute or two early. If unsure about the cook time, use recipe-suggested cook times.
  •  
    4. Eat
    Place the packets on plates or a platter, bring to the table and enjoy. Cedar wrapped foods will stay warm and moist for long periods of time.

  • Drizzle flavored oils, vinegars, or citrus juice on the foods right after unwrapping.
  •  

    PILING ON THE FLAVOR

    You can soak the papers in any liquid you like. Experiment with these soaking ideas from the Fire & Flavor Test Kitchen, and dream up your own.

  • Soak the papers in tequila. Then wrap shrimp, crab or lobster with some mango salsa. The acid of tequila and sweetness of the salsa pair perfectly.
  • Soak the papers in white wine. The subtle flavor of the fish will be enhanced with cedar notes. Wrap any white fish with asparagus or your favorite green veggie.
  • Soak the papers in red wine. Then wrap more flavorful fish like salmon, sea bass or red snapper with sliced lemon and thyme. The bold flavor of these fish withstands the influence of lemon and red wine.
  • Soak the papers in saké. Think beyond fish and meat to your favorite vegetables. Wrap mushrooms with goat cheese and your favorite spices.
  • Soak the papers in juice. Citrus juices like orange or lime add refreshing flavors. Wrap a spiced salmon fillet with salsa in “juiced” papers.
  •   salmon-cedar-paper-230
    Give cedar grilling paper as gifts to friends who cook. Photo courtesy Fire & Flavor.
     

    MORE COOKING TIPS

  • Nonstick Spray. Spray cedar papers with non stick spray before wrapping to prevent foods from sticking to the papers as they dry.
  • Indoor Grilling. Grill pans and panini presses with deep grill grooves allow for the best air circulation.
  • Best Flavor. Before closing the wrap, top fish with julienned vegetables and a spiced butter or rub. As the fish cooks, the flavors meld together with the smokey cedar.
  •   

    Comments off


    © Copyright 2005-2026 Lifestyle Direct, Inc. All rights reserved. All images are copyrighted to their respective owners.