THE NIBBLE BLOG: Products, Recipes & Trends In Specialty Foods


Also visit our main website, TheNibble.com.


TIP OF THE DAY: Peanut Butter Swirl Ice Cream

We became overly fond of Ben & Jerry’s new Banana Greek Frozen Yogurt with Peanut Buttery Swirls. But after we finished the two pints sent to us by Ben & Jerry’s, we couldn’t find the flavor locally.

Necessity being the mother of invention, we experimented with making our own PB swirl ice cream. To please our friend Rose, we also made some pints with Nutella.

It’s easy to do, just by softening a plain pint of your favorite ice cream or frozen yogurt, and adding the swirl.

PEANUT BUTTER OR NUTELLA SWIRL
ICE CREAM

Ingredients

  • 1/2 cup peanut butter or Nutella
  • 1/2 cup whipping cream
  • 2 tablespoons corn syrup
  • 2 pints vanilla frozen yogurt or ice cream (it is easier to work with two pints than one quart; you can try two different flavors to see which you prefer)
  • Optional: chopped peanuts or hazelnuts
  • Optional with peanut putter: 1 tablespoon sugar*
  •  
    When life gives you peanut butter, make PB swirl ice cream. Photo courtesy NuttysPeanutButter.com.
     

    *If you tend to like things on the sweet side, you may want to bring the peanut butter closer to the sweetness of the ice cream. We prefer the contrast, without the sugar.

    Preparation

    1. Combine the peanut butter, cream and corn syrup in a saucepan. Stir over low heat until smooth. Chill the mixture for an hour or longer.

    2. After the mixture is chilled, soften the ice cream on the kitchen counter until you can slide the contents out (use a knife to loosen the edges). Slice the ice cream horizontally into five circles.

    3. Repack the ice cream into the container, alternating the slices with spoonfuls of the peanut butter or Nutella mixture, along with a sprinkling of the optional nuts. Return to the freezer until ready to eat.

    How Many Frozen Desserts Have You Tried?

    Check out our Ice Cream Glossary to see what you’ve been missing.
      

    Comments off

    PRODUCT: Sophie Greek Yogurt, No Sugar Added & Delicious


    Sophie Yogurt, a new Greek yogurt brand,
    offers delicious flavors that have no added
    sugar. Photo by Elvira Kalviste | THE NIBBLE.

      We love Greek yogurt, plain or flavored.

    The problem with the flavors, however, is the sugar. We really like these brands, but not some 20 grams of sugar for a small portion:

  • Chobani: 6-ounce cups, 20-21 g sugar
  • FAGE Total: 6-ounce cups, 16-17 g sugar, 29 g for honey
  • Oikos: 5.3-ounce cups, 11-19 g sugar (most are 17-19 g, the vanilla has 11 g)
  •  
    Now, a team of nutritionists at EatStrong.com has come up with a product that the marketplace should embrace: thick, creamy 0% fat Greek-style yogurt with no sugar added. Sophie Yogurt has 5 g milk sugar per 5.3-ounce serving, plus 8 g sugar alcohol.

    What is sugar alcohol?

    Sugar alcohol is a natural sugar found in fruits and vegetables. The body absorbs it slowly and incompletely (it’s low glycemic). Erythritol, maltitol, sorbitol and xylitol are sugar alcohols you may have heard of. Here’s more information.


    Sophie Yogurt: Delicious Flavors

    While the company makes a plain Greek yogurt and Plain with Fiber, it is the fancy flavors that delight: Banana Cream Pie, Caramel, Chocolate, Strawberries & Cream, Vanilla Bean and White Chocolate Almond.

    The ingredients are primo. Banana Cream Pie, for example, uses real banana purée instead of a flavor extract.

    “Coming Soon” flavors include Lemon Chiffon, Passion Fruit, Pumpkin Pie and Sour Cherry Pie. Our only wish is that the company would make the line lactose-free, so the growing number of Americans diagnosed with lactose intolerance can also enjoy good yogurt.

    The line is all-natural, gluten-free and made with non-GMO milk. It will soon be certified kosher by OU.

    The company, which is based in New York, recently signed with a distributor. But the best way to find out if Sophie is coming to a store near you is to post an inquiry on the brand’s Facebook page.

    You can also check out the company’s website.

    Sugar Free Greek Yogurt Vs. No Sugar Added

    Sugar-free means the product contains no sugar. No sugar added means that the manufacturer has added no sugar; although fruit, milk and other ingredients contain natural sugar. Note that lactose (milk sugar) and fructose (fruit sugar) are natural sugars, which metabolize more slowly (are better for you) than refined sweeteners such as table sugar and high-fructose corn syrup.

    All milk and milk products contain lactose, also called milk sugar. Look at a carton of milk or plain yogurt and you’ll see how much sugar (lactose) is in a serving. In the case of milk, it’s 11 to 14 g of sugar per eight ounces. The same amount of plain Greek yogurt has about 9 g of sugar.

    All flavors of Sophie Yogurt have 5g of milk sugar (lactose), although no sugar is added.

    Why Milk And Yogurt Are Good For You

    1. PROTEIN. Milk and yogurt are good sources of high-quality protein.

    2. CALCIUM. Dairy products are rich in calcium, which is vital for healthy bones/skeleton. Most Americans do not get the recommended daily value of calcium.

    3. VITAMIN D.
    Dairy products are a major source of vitamin D, which is added by government mandate to the milk supply. Vitamin D is crucial for the absorption and metabolism of calcium and phosphorous. It is also an immune system regulator, and helpful for everything from preventing rheumatoid arthritis to healthy brain function in later years.
    Find more of our favorite yogurt brands, recipes, a yogurt glossary and other yogurt features.


    Comments off

    The Mother Sauces Of French Cuisine: Love Your Mother!

    What are the “mother sauces?” Today’s tip, from chef Johnny Gnall, explains them and sets you on the path to making each one. This article continues with part 2, the secondary sauces made from the mother sauces. If you have questions or suggestions for tips, contact JohnnyGnall@hotmail.com.

    When Georges Auguste Escoffier* laid the foundation for French cooking that would become so significant for modern cuisine, a cornerstone of that foundation was what he called the “mother sauces.”

    These five sauces are the basis for virtually every sauce in Escoffier’s arsenal, and their applications are no less relevant today.

    If you can perfect the five mother sauces, you can take them in any flavor direction you choose, from Asia to Africa to Scandinavia, simply by adjusting the flavors and seasonings you choose to add to them. The techniques are classic French, but the sauces themselves are versatile enough to work with whatever you’re cooking for dinner.

    Each mother sauce is comprised of two basic parts: a liquid and a thickening agent. Each sauce has its variations and additional ingredients, but the liquid and thickener are the important parts. So without further ado, allow me to introduce the five mother sauces.
    ________________

    *Escoffier, 1846-1935, was one of the most important figures in the development of modern French cuisine. A chef, restaurateur and culinary writer, Escoffier simplified and modernized the ornate haute cuisine style of the great French chef Antoine Carême (1784-1833). Escoffier’s book, Le Guide Culinaire, is still used as a major reference work by chefs and culinary students.
    ________________
     
     
    1. TOMATO SAUCE

    Tomato sauce (photo #2) is is probably the most familiar of the mother sauces, and one you have eaten with pasta or meatloaf more than a few times. To make it:

  • Begin by rendering 4 ounces of salty cured pork: bacon, pancetta, pork belly, whatever you have to work with. (You can skip this step and use olive oil to eliminate calories and cholesterol, but you won’t get the same roundness and depth of flavor in the finished product.)
  • Once the pork is rendered and crispy, add 2 cups of diced carrots and onions, season with salt and pepper, and sweat them until soft. Add a quarter cup of flour and stir to incorporate until you have a roux† consistency (see thickeners).
  •  
    [1] Eggs Benedict topped with hollandaise sauce (photo © American Egg Board).


    [2] Perhaps the most popular of the mother sauces in American cuisine: tomato sauce (photo © McCormick).


  • Next, add a quart of chopped tomatoes, a quart of water, and a tablespoon of tomato purée, then stir and simmer.
  •  
    The seasonings vary depending on whom you ask, but they usually include some combination of bay leaf, garlic, oregano, thyme or other herbs, plus some sugar (though purists may argue staunchly against this). Don’t forget to season your sauce with salt and pepper as you go, and taste it often as it simmers. If it needs more of something, add it!
     
    ________________

    †A roux, pronounced rue, is a paste made of softened butter and flour that is used to thicken sauces, soups, stews and ragouts.
    ________________


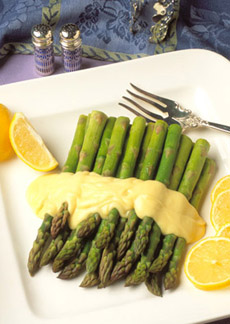
    [3] Asparagus with hollandaise sauce (photo © American Egg Board).


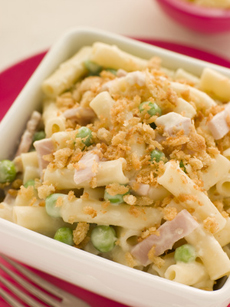
    [4] Rigatoni with béchamel sauce and breadcrumbs (photo Monkey Business | Fotolia).


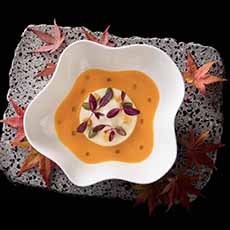
    [5] Velouté is a mother sauce that is also served as a rich soup. Here, a butternut squash velouté from Joel Robuchon (photo © L’Atelier Joel Robuchon NYC).


    2. HOLLANDAISE SAUCE

    You may know it best from Eggs Benedict at Sunday brunch (photo #1), but hollandaise (HOLL-un-days) is actually the basis for a number of sauces, Béarnaise being one of the more notable. As it is egg-based, it’s definitely the richest of the mother sauces, which also seems to make it the most luxurious. Hence, it is a favored presence in lavish or celebratory dishes.

  • To start, put together a double boiler, or bain-marie, by setting a metal bowl over a pot half full of water, set to a simmer (not a boil). The steam from the simmering water heats the bowl gently, allowing you to cook the eggs more slowly and carefully than you’d be able to do over a direct flame. If specificity is your thing, hollandaise is best cooked at just under 160°F; but as long as you use a bain marie, you don’t have to measure the temperature so precisely.
  • Combine 4 egg yolks and 2 ounces of white vinegar in the bowl and whip with a wire whisk until the eggs reach the “ribbon stage.” This means that when you pull your whisk out of the whipped yolks, they should fall back into the bowl in a smooth, gentle stream to form a temporary pile of what actually looks like ribbons (sort of like a good cake batter).
  • Once you have achieved ribbons in the yolks, it’s time to start adding the butter. Clarified butter is ideal, but not necessary; just make sure it’s melted, smooth, and warm but not hot (around 130°F). Then, start drizzling it in a few drops at a time, whisking as briskly as possible. Once you begin to have a thickened, velvety sauce, you can add the butter more quickly. But early on in the emulsification process the consistency is relatively fragile, and adding too much butter too fast will cause the sauce to break. If the eggs start to pull away from the sides of the bowl, it means that things are getting too dry: Take the sauce off the heat for a moment and whisk in a few drops of warm water until your sauce is rehydrated.
  • When you’ve added the last of the butter (feel free to leave a bit behind if you reach a thickness and consistency you’re happy with), season with salt, white pepper, hot sauce (like Tabasco) and lemon juice, in scant amounts of each or to your liking. Poach a couple of eggs and toast the English muffins and it’s Benedict time! (Try these recipes for Portabella Eggs Benedict and Corned Beef Hash Eggs Benedict.)
     

    3. BÉCHAMEL SAUCE

    A common start to many favorite cream soups, a béchamel (BAY-sha-mell) is relatively easy sauce to make.

  • Start with a half cup of butter and a half cup of all-purpose flour; incorporate the two together by stirring continuously over medium heat with a rubber spatula to make a white roux.
  • In a separate pot, heat a cup of milk with half an onion and a bay leaf; when it begins to simmer, whisk the heated milk into the roux until combined smoothly.
  • Let the sauce simmer, very lightly, for ten to fifteen minutes on low heat, then season with just a touch of nutmeg, salt and white pepper. Even the tiniest bit of nutmeg works brilliantly to complement the subtle sweetness of the milk; the flavor profile of this Mother Sauce has more complexity than you’d expect.
  •  
     
    4. VELOUTÉ SAUCE

    The simplest of the mother sauces, a velouté (vuh-loo-TAY) is a common start to dishes involving more delicate flavors and ingredients. If you’re eating fish with a sauce that’s not some variation of a buerre blanc, it’s likely that sauce started with a velouté.

  • Start by making a roux, just as with béchamel; then whisk in a white stock (usually meaning a stock with a base of chicken or fish, as opposed to beef, veal, etc.) until you reach creamy consistency.
  • Thickness and seasoning vary based on who’s cooking, but a neutral velouté typically contains no more than a pinch of salt and is the approximate consistency of whipping cream (in its natural, unwhipped state).
  •  
    Aim to base your white stock on the protein with which you plan to pair your finished sauce. So if you’re serving chicken, make a velouté out of chicken stock; with fish, use fish stock.
     
     
    5. ESPAGNOLE SAUCE

    Though also often called simply ”brown sauce,” espagnole (ESS-pon-yole) allegedly earned its name when Spanish cooks added tomatoes to a French veal-based sauce, and the improvement stuck. While it is slightly more complicated, espagnole sauce incorporates several of the procedural steps from previous mother sauces.

  • Espagnole begins with a mirepoix,‡ almost as if you’d skipped the salt pork step in the tomato sauce. The difference here is that the fat is butter (about 4 tablespoons per cup of diced mirepoix), and you should cook it over higher heat to give the mirepoix some color. Once it’s soft and getting brown, add flour (an amount roughly equal to the butter), stirring to incorporate until you have a roux consistency. Get the roux a few shades browner, and you have your base.
  • Now that you’ve achieved a dark mirepoix/roux mixture, whisk in a brown/dark stock, like beef or veal stock, exactly as in the procedure for velouté. Add some tomato paste (about a tablespoon per cup of mirepoix) and season with bay leaf, salt and pepper.
  • Let it all simmer for a while to break down the vegetables and let the flavors come together.
  • Espagnole is an ideal start for meaty gravies and can get quite rich the longer it cooks, due to the gelatin in the stock. Feel free to add water if your sauce gets too low or too thick for your liking, or you want to cook it for longer to extract more flavor.
  • ________________
     
    ‡Pronounced MEER-uh-PWAH, a combination of carrots, celery and onions.
    ________________
     
     
    WHAT NEXT?

    These five sauces are the basis of literally hundreds of variations, so it’s worth it to take the time to master them. Be patient as you cook them and pay attention to how they react during different steps, as this will give you clues on how to fix them if they aren’t coming along the way you expected.

    If your hollandaise breaks, for example, you can start it over and use the broken sauce in place of the original melted butter, adding it to new yolks. Just make sure to add it even slower at the beginning and whisk it even faster.

    Once you feel completely comfortable with these five “mothers,” it’s time to start adding ingredients, both to replicate classic sauces and to create new ones that reflect your interests. Add cheese to béchamel and It’s a mornay, a classic sauce.

    But what if you decide to add adobo chiles or chipotle paste to a béchamel?

    The sky’s the limit.
     
     
    CONTINUE TO PART 2, THE SECONDARY SAUCES

    Tomato sauce becomes Creole sauce, hollandaise becomes béarnaise and other transformations, here.
      

    Comments off

    PRODUCT: Sea Fare Pacific Tuna & Salmon Pounches

    Recently one of our team embarked on a two-week trip to India. Problem: She doesn’t like Indian food.

    We hooked her up with Sea Fare Pacific—sustainable, wild caught albacore tuna and salmon in lightweight, environmentally-friendly pouches.

    You don’t need to leave the country to enjoy the tuna and salmon, though.

    Sea Fare Pacific catches fish one at a time with a hook and line. The goal is to keep the earth and ecosystem safe, and to provide the highest-quality, omega-3 packed tuna with no mercury concerns. Unlike most supermarket brands, the fish is cooked only once to preserve its natural oils and flavors.

    The earth-friendly pouch keeps food fresher than a can, is lighter to tote and is more environmentally friendly. There’s no oil or water to drain—no messiness. Simply tear the seal and enjoy.

    The company was founded by Oregonian Mike Babcock, who aim to create a Pacific albacore tuna that tasted like his mother’s home-canned tuna. We haven’t tried Mom’s, but find Mike’s product to be excellent.

     
    Lightweight, environmentally-friendly packaging. Photo by Elvira Kalviste | THE NIBBLE.


    The tuna, in steak form, flaked for a salad. Photo by Elvira Kalviste | THE NIBBLE.
     

    Products

  • The tuna, mild and not “fishy,” comes in rectangular steaks that can be enjoyed whole or flaked. It is available in four flavors: Smoked, Sea Salt, Salt Free and Jalapeño.
  • The tuna and cold-smoked sockeye salmon are also sold in sport pouches.
  •  
    The challenge: Finding the tuna! As a new brand, distribution is in the early phases. Contact the company via the website or at 541.266.TUNA.
     
    Why does the tuna taste so good?

    The company points out that most brands of albacore tuna on the market are “twice cooked,” which causes the fish to lose most of its heart-healthy fats. Sea Fare Pacific products are cooked only once.


    Mercury In Tuna

    All tuna are not created equal, vis-a-vis mercury content.

    Albacore, often referred to as “chunk white” tuna, is one of the safest fish you can eat—provided it is caught in the U.S. Pacific or Canadian Pacific. The Seafood Watch project of the Monterey Bay Aquarium lists Albacore tuna caught in the US Pacific or Canadian Pacific as the “Best Choice.”

    These fish are younger and therefore have had less time to build up high levels of mercury. Most of the popular commercial brands use tuna imported from Southeast Asia, where the larger albacore tuna are much higher in mercury (and lower in omega 3s than their younger West Coast counterparts).

    “Chunk light” tuna is a blend of different species, and often includes meat from high-mercury bigeye tuna (along with less contaminated yellow fin). It’s best to avoid it.

    Do you know the different types of tuna?


    Comments off

    TIP OF THE DAY: 7 Uses For Flat Olive Oil (Non-Food Uses)

    Properly stored, olive oil will keep longer than other edible oils: up to two years. However, once opened, it is best to use the oil within 60 to 90 days. (Some varietals remain fresh much longer due to their acid structure, but this is a good rule of thumb.)

    So, buy the size that you need and use a Sharpie to mark the bottle with the date you opened it. And keep it away from light and heat.

    When oils turn rancid, they take on an unpleasant musty aroma and flavor, and are best poured down the drain. But if you find that the bottle has simply turned flat and you don’t like the taste, here are other uses for it, courtesy of OliveOilShop.com:

    1. Make Homemade “Lemon Pledge.” 
    Combine 2 parts olive oil and 1 part lemon juice in a bowl or a clean spray bottle. Using a circular motion and following the grain of the wood, apply or spray a thin coat onto the wood surface. Let it stand for 5 minutes, then use a clean, dry, soft cloth and buff to a deep shine.

    2. Remove Spots From Wood Floors & Furniture. If you have water or alcohol spots on polished wood or furniture, simply rub a little olive oil on the spot. Let it soak in, then gently rub off any excess oil.


    Olive oils from Terra Medi. Read our review.

     
    3. Remove Stuck-On Labels. Sometimes, adhesive-backed labels stick to counters and tabletops. Don’t try to scrape off the paper. Instead, dab a little olive oil on it, let the oil soak in for a few minutes and then remove the paper by rubbing it with your fingers.

    4. Remove Paint From Hair & Skin. If you’ve gotten spattered while painting, moisten a cotton ball some olive oil and gently rub it into skin or hair. It will act as a solvent to remove paint, and it is not harsh like turpentine and other chemical solvents.

    5. Preserve Gardening Tools. Clippers, pruning shears and trowels can benefit from leftover olive oil. Before putting the tools away, clean off any dirt or grime. Then lightly oil the tool with a small amount of olive oil on a cloth. The oil guards against dirt buildup and no rust, so your tools will last longer. Keep the bottle in your garage or tool shed; put it in a spray bottle or mister to prevent glass breakage.

    6. Lubricate Hinges. Before there was WD-50, there was olive oil. To lubricate squeaky hinges on doors, put a small amount of olive oil at the top of the hinge and let the drops of oil run down by moving the hinge back and forth. Wipe off the excess with a cloth. This also works on the oven door, refrigerator doors, tool box latch, plastic coolers and other latches.

    7. Hair Conditioner. Before commercial hair conditioners, women used olive oil. Measure 1/2 cup of olive oil. Wet your hair, then warm 1 tablespoon of olive oil at a time in your palms. Massage it into your scalp in a circular motion. Repeat until the entire scalp has been massaged. Rub the ends of your hair with the remaining oil. Then cover your hair with a plastic bag, secure with hair clip or bobby pins, and allow the oil to remain for 30-60 minutes. (If you have a heat cap, use it). Rinse and shampoo.

    25 More Uses For Olive Oil.


    Comments off

    The Nibble Webzine Of Food Adventures
    RSS
    Follow by Email


    © Copyright 2005-2024 Lifestyle Direct, Inc. All rights reserved. All images are copyrighted to their respective owners.