THE NIBBLE BLOG: Products, Recipes & Trends In Specialty Foods


Also visit our main website, TheNibble.com.


Baked Potato Tots & More Tater Tot Recipes

Tater Tots are so beloved that the term is used generically, although it’s a trademark of Ore-Ida, which invented the little potato bites in 1953. (The story is below.)

Everyone else can call them “potato tots.” These days, chefs reaching back to childhood are serving fresh-from-scratch versions.

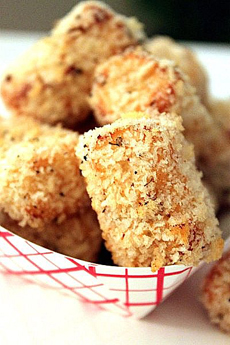
This variation, Baked Potato Tots, comes to us courtesy of PotatoGoodness.com and the blog, Mele Cotte. Prep time is 25 minutes, cook time is 1 hour 20 minutes and ready time is 1 hour 45 minutes.
 
 
BAKED POTATO TOTS RECIPE

Ingredients For 3 Servings

  • 2 medium Russet potatoes
  • 2 tablespoons unsalted butter
  • ½ to ¾ cup 0% Greek yogurt, warm
  • 1½ tablespoon grated Parmesan cheese
  • ½ teaspoon fine sea salt, plus extra to taste
  • 1 teaspoon freshly ground black pepper
  • 1 ½ cups unseasoned panko breadcrumbs
  • 1 teaspoon Italian seasoning
  •  


    A baked variation of the iconic Tater Tots (photo © PotatoGoodness.com).

     
    Preparation

    1. PREHEAT oven to 400°F. Line a baking sheet with parchment paper.

    2. SCRUB potatoes with a brush under running water; dry them off. Pierce each potato with a fork to prevent exploding. Bake the potatoes for about 1 hour, or until they are cooked through. When cool enough to handle but still hot, cut the potatoes in half and scoop the pulp out of the skins.

    3. RUN the potatoes through a ricer or food mill into a medium bowl. With a wooden spoon or spatula, stir in yogurt and 1 tablespoon of the cheese. Add ¼ teaspoon salt and ½ teaspoon pepper and stir just until blended.

    4. PLACE breadcrumbs in a shallow bowl or pie tin. Stir in remaining ½ tablespoon cheese, ¼ teaspoon salt, ½ teaspoon pepper, and Italian seasoning.

    5. USING a small scoop, form potato mixture into rounds that resemble a large marble or gumball. Roll in breadcrumbs, shaping the potato into a tot as you roll. Place each tot on a baking sheet 1 inch apart. Bake for 20 minutes, flipping over halfway through baking. Check after 20 minutes and continue to bake until browned and crisp. Serve hot.


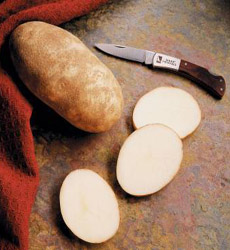
    The Russet potato (photo © Idaho Potato Commission).
     

    MORE POTATO TOT RECIPES

  • Baked Potato Tots
  • Gourmet Potato Tots
  • Hot Dog & Tater Tot Skewers
  • Jumbo Tater Tots With Jalapeños & Jack Cheese
  • Loaded Potato Tots
  • Potato Tot Casserole With Short Ribs, Mushrooms & Truffle Paste
  • Sweet Potato Tots
  • Tater Tots With Pickled Mustard Seeds
  •  
     
    ABOUT TATER TOTS

    Tater Tots are an American side dish made from deep-fried, grated potatoes. They are miniature croquettes: crisp little cylinders of hash brown-style potatoes. Tater is American dialect for potato, and “tots” came from their small size.

    Although the name may seem generic, Tater Tots is a registered trademark of Ore-Ida. Tater Tots were created in 1953 when Ore-Ida founders, brothers F. Nephi Grigg and Golden Grigg, were considering what to do with leftover slivers of cut-up potatoes from their signature French fries.

    They chopped them up, mixed them with flour and seasonings, and pushed logs of the grated/mashed potato mixture through a form, slicing off and frying small pieces. The Ore-Ida brand was acquired by H. J. Heinz Company in 1965.

     
    Find more delicious potato recipes at PotatoGoodness.com.
     
     
    DO YOU KNOW YOUR POTATOES?

    Check out the different potato types in our Potato Glossary.


    CHECK OUT WHAT’S HAPPENING ON OUR HOME PAGE, THENIBBLE.COM.


    Comments off

    FATHER’S DAY GIFT: Jalapeño Plant

    Here’s something fun for chile-loving dads who’d like to try their hand at gardening.

    You can look for a jalapeño plant at your local nursery, or give Dad the “ingredients” to grow his own.

    Combine a packet of seeds, a planter and soil, along with some fresh jalapeños to show Dad what’s in store in 62 days, the time it takes for the planted seeds to mature.

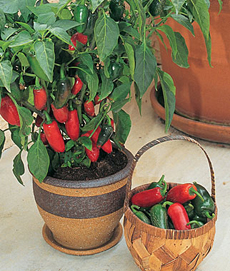
    The particular hybrid in the photo, a Burpee exclusive, is a very low heat jalapeño, enabling the savory jalapeño flavor to be enjoyed by non-heat foodies. Its name: False Alarm.

    These mild, tasty jalapeños are excellent for roasting, nachos, poppers, salads and salsas. “It’s the perfect little hardly-hot pepper for small gardens and containers,” says Burpee.

    Get the seeds at Burpee.com.

     
    Buy it full-grown or grow your own from seed. Photo courtesy Burpee.com.
     
    DO YOU KNOW YOUR CHILES?

    Check out the different types of hot chile peppers in our Chile Glossary.


    Comments off

    TOP PICK OF THE WEEK: Rabbit’s Garlic


    Rabbit’s Garlic is pickled garlic in five
    flavors, used here a canapé garnish, in
    hummus-carrot and mozzarella-tomato
    combinations. Photo by Elvira Kalviste |
    THE NIBBLE.
     

    We like garlic, but wouldn’t consider ourselves to be garlic lovers. Yet, we love Rabbit’s Garlic. The picked garlic is made in five flavors, each of which can be served at every meal from breakfast to dinner and snacks. We’re giving jars as Father’s Day gifts.

    The creator is a nurse named Bunny, called Rabbit by her husband. She had long been preserving fruits, meats and vegetables for family and friends until she was convinced to go commercial. Try her pickled garlic, and you’ll be glad she did!

    When Bunny started to add garlic cloves to season jars of dilly beans, everyone started to fight over the garlic cloves. Thus the first flavor of pickled garlic was born: Spicy Dill. The line now includes:

  • Chipotle Pickled Garlic
  • Habanero Pickled Garlic
  • Habanero Dill Pickled Garlic
  • Smoke Pickled Garlic
  • Spicy Dill Pickled Garlic
  • You’ll find many ways to use these delicious pickled garlic cloves. For starters:


  • Beer: Pop a clove into the bottle.
  • Bloody Mary or Martini: The Spicy Dill flavor is great as a Bloody Mary or Martini garnish.
  • Bruschetta: Mash the garlic cloves and spread on toasted bread.
  • Eggs: In omelets and scrambles, in deviled eggs and as a garnish.
  • Garlic Butter/Garlic Bread: Mash the garlic cloves with softened butter to spread on bread; toast under the broiler.
  • Garlic Mashed Potatoes: The smoke flavor is great for this. Mix sliced and smashed cloves into the mashed potatoes.
  • Salads: Add cut up cloves to egg, chicken, green, potato, macaroni, tuna and other salads.
  • Snack and Relish: Straight from the jar, or serve them like pickles or olives as a snack. A reason to revive the relish tray!
  •  
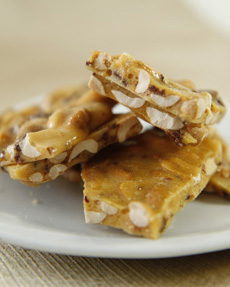
    Garlic brittle: really delicious! Photo by Elvira Kalviste | THE NIBBLE.
  • Marinade: Mash onto steaks and chops during grilling or add to the marinade for 1-2 hrs before cooking.
  • Meat Seasoning: Cut slits in the side of beef or pork roasts before cooking. The flavor is subtle but well worth trying.
  • Pasta Sauce: Add to your favorite pasta sauces, or toss with the pasta.
  • Sandwiches & Burgers: A memorable garnish.
  •  
    Bunny also sent us some garlic brittle: We tasted it gingerly, now we’re addicted!

    Get yours at RabbitsPickledGarlic.com.


    Comments off

    Heirloom Produce Part 1, Heirloom Cucumbers


    Charming lemon cucumbers. Photo courtesy
    Burpee.com.
      LEMON CUCUMBERS

    It’s a lemon…no, it’s a cucumber. We spotted these unusual cukes and the ones in the photo below on the Burpee Seeds website.

    Imagine the surprise and delight when you serve a new and different twist on an everyday vegetable—or rather, fruit (see what makes something a fruit or a vegetable below).

    The only question with these cute cukes is, how to serve them? Slicing them into discs or a julienne deprives diners of experiencing a round, yellow cucumber.

    We like the idea of presenting the entire cucumber as an appetizer on a bed of mesclun or a bed of sliced and vinaigrette-marinated red onions. Serve a dressing or dip on the side: vinaigrette, yogurt-dill-garlic dip, salsa, or another favorite.

    Alternatively, we’d bake them whole, like a potato. As with a potato, be sure to pierce the skin three times with a fork, to allow steam to escape.


    Bake the cucumbers with the skins on, in a pan filled with 1/2 inch water at 350°F for 25 minutes. Use a cake tester or toothpick to test doneness and continue to cook as desired. You’ll have to experiment the first time you do it, based on oven variation and consistency preferences: You may want an al dente consistency or something softer to the tooth.

    Then, season as desired: with salt and pepper, dill, garlic, paprika, tarragon, or other favorite herbs or spices. We recommend fresh dill and fat-free plain yogurt with salt and pepper—which is one of the ways we enjoy a baked potato.

    Even raw, the round, lemon-yellow heirloom cucumbers are tender and sweet, excellent for salads as well as for pickling. They have a clean, crisp taste and are never bitter.

    Burpee says that the vines yield heavily and for a long time. With 65 days to maturity, you’ve got time to plant them this year. It’s a fun project, and you’ll be able to share the wealth with foodie friends and family.

    By the way, if these lemon cucumbers look like yellow squash to you, they’re botanical cousins. Both share the order Cucurbitales and the family Cucurbitaceae. They differ at the genus level: cucumbers belong to the genus Cucumis and squash to the genus Cucurbita.

    If you love cucumbers, head to the Burpee website to check out 32 different varieties of cucumber!


    CRYSTAL APPLE CUCUMBERS

    Do you prefer the look of apples to lemons? Try this heirloom oldie, the Crystal Apple cucumber, which was bred in New Zealand in 1934.

    The pale green fruits (yes, cucumbers are a fruit—see below) resemble Granny Smith apples, which themselves originated in New South Wales, Australia in 1868. And yes again, there was a Granny Smith: Maria Ann Smith, who propagated the cultivar from a chance seedling.

    The flesh is smooth, tender, and creamy; both the Crystal Apple and Lemon Cucumbers make a bright, scrumptious addition to salads.

    There are many varieties of heirloom cucumber. Look for them at farmers’ markets or get the seeds from Burpee and grow your own.

    Get your seeds at Burpee.com.
     
    While the charming appearance of unusual heirloom produce is a treat for foodies, it can also entice those who think they don’t like the vegetable to try something new.

     
    Crystal Apple heirloom cukes from New Zealand look like Granny Smith apples. Photo courtesy Burpee.com.
     
     
    THE DIFFERENCE BETWEEN FRUITS & VEGETABLES
     
    Fact: Your favorite vegetables may actually be fruits! Tomatoes are fruits, avocados are fruits, chiles and bell peppers are fruits, cucumbers and squash are fruits.

    Because they aren’t sweet, people tend to think of them (and classify them in recipes and produce departments) as vegetables. But by botanical definition, fruits carry their seeds on the inside.*

    So if someone tells you he doesn’t like vegetables, respond: “These are fruits!”

  • With fruits, the seeds, or pits, are contained in the fruit’s ovary sac. Otherwise said, fruits carry their seeds inside.
  • In most angiosperms (flowering plants that produce fruit), part of the flower develops into the fruit.
  • True vegetables have no “pit” or seed sac. Root vegetables, celery, lettuces, herbs, and the crucifers† are all legitimate veggies.
  • Like fruits, vegetable plants produce flowers before they produce their edible portions. These flowers have seeds.
  • If vegetable plants are not harvested, they will eventually go to seed, which means the seeds develop as the plant stops flowering.
  •  
    ________________

    *The only exception is the strawberry, and its seeds are not used for reproduction.

    †The anti-carcinogen cruciferous family Brassicaceae (also called Cruciferae), includes arugula, bok choy, broccoli, Brussels sprouts, cabbage, cauliflower, collard greens, cress, daikon, horseradish, kale, kohlrabi, mizuna, mustard, radish, rutabaga and turnips, among other vegetables.


    CHECK OUT WHAT’S HAPPENING ON OUR HOME PAGE, THENIBBLE.COM.


    Comments off

    TIP OF THE DAY: How To Grill The Perfect Steak


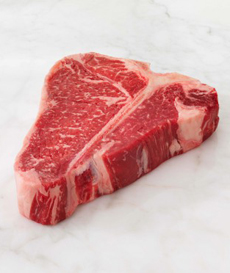
    Ready for the grill: a beautiful porterhouse steak from AllenBros.com.
      Chef Jan Birnbaum of EPIC Roasthouse in San Francisco enjoys a good steak on the grill. In fact, he designs his cookout menus so that he can cook everything outside!

    Here are Chef Jan’s tips for grilling the perfect steak.

    1. Don’t cook cold meat.

    Always allow meats to rest at room temperature for up to two hours, depending on the size of the meat. Meat directly out of a refrigerator is typically about 38°F.

    For best results, let it warm up a bit and put meat on the grill when it reaches an internal temperature of 50°-55°F degrees. Tempered meat produces a more desirable even-cooked color and texture, whether your goal is rare or medium.


    2. Sear first; then cook low, slow, and even.

    It’s best to start a steak over higher heat: The surface caramelizes and provides a better mouth feel and visual appearance, as well as a more assertive flavor. Then lower the heat so it will penetrate deeper, thus improving the chew and creating a more lush texture.

    Consider removing the meat from the heat altogether midway in cooking, and then return the it to the high direct heat to complete the cooking.

    3. Always rest the meat after grilling, before cutting and serving.

    The hot juices need to settle back into the flesh. Slice into hot meat and they’ll dribble out.

    Food continues to cook after it has been removed from heat. Once the meat is off the heat it may continue to rise in temperature another 10%. This process is known as endothermic energy.


    4. Cook chewier cuts at higher temperatures.

    From the most tender (filet mignon) to the most chewy cut (sirloin, for example), the tenderness and depth of flavor tend to be inverse to the texture of the meat. This is a function of how the animal used the particular muscle.

    Muscles that get more exercise produce meat that is less tender but with more depth of flavor. Cook these meats at hotter temperatures; rest them for less time and slice them thin. Muscles that are load bearing are more tender but less flavorful.

    5. Live fire is best.

    The smokey nuances of live fire are delicious on meat. The combination of wood flame and a coal bed enhances the complexity of the eating experience. Building the fire is key to achieve this effect. Chef Jan likes a combination of walnut, oak and a bit of mesquite charcoal.

     
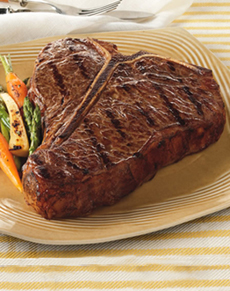
    The porterhouse grilled to perfection. Photo courtesy AllenBros.com.
     

  • The size of the fire will be based on the amount of food you have to cook; however, a mature developed fire beats a quick and immature fire. Don’t cook on flame: Cook on a developed ember bed.
  • Start the fire with paper and walnut. Walnut is lighter, less dense and burns easily with more flame; it also requires less oxygen to produce a vigorous flame. When the walnut has burned by 20%-40%, add a bit of mesquite charcoal. The walnut fire will enable the mesquite to catch well.
  • Once the mesquite has begun to establish itself, add a log or two of a heavier, harder wood such as almond, oak or pecan. By now the first wood has burned and developed the base of an ember bed, and the second wood is progressing.
  • Once the hard wood has begun to become part of the ember bed, you are getting a fire that’s ready to cook on. This process is likely to take up to an hour.
  •  
    6. Choose the proper tools.

    Chef Jan prefers a professional meat fork instead of tongs; it offers more control. This fork, from Taylor, has a built-in digital thermometer. Use the tip of the fork and pierce the meat as little as possible (the juices will run out of pierced meat).

    Fish spatulas are good for small delicate items like fish and vegetables. The bigger, heavier jobs are best for a steel hamburger spatula.
    MORE GRILLING TIPS

    Don’t freestyle it; learn the skills.
      

    Comments off

    The Nibble Webzine Of Food Adventures
    RSS
    Follow by Email


    © Copyright 2005-2024 Lifestyle Direct, Inc. All rights reserved. All images are copyrighted to their respective owners.