THE NIBBLE BLOG: Products, Recipes & Trends In Specialty Foods


Also visit our main website, TheNibble.com.


TIP OF THE DAY: Measure Ingredients Using The Right Measuring Cups

If you bake, take note:

Liquid and dry measuring cups are not interchangeable. Precision is especially critical in baking, which is an exact science. Variations can compromise the recipe, especially if it’s a fragile recipe like macarons and angel food cakes.

That’s why so many professional recipes are listed by weight (grams) instead of volume. The challenges of using the wrong type of cup to measure ingredients:

  • Measure a liquid ingredient in a dry measuring cup and you can either spill it or underfill it. While dry ingredients filled to the rim of the cup don’t spill when carried or raised to the bowl, liquids can easily be jostled by the motion and spill over.
  • Measure a dry ingredient in a liquid measuring cup and it will similarly be difficult to get an accurate amount, because you can’t level it.
  •  

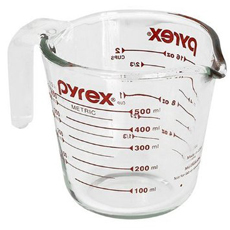
    The classic liquid measuring cup. Photo courtesy Pyrex.


    MEASURING WET INGREDIENTS

    Liquid measuring cups are see-through, either glass or plastic. A good liquid measuring cup has extra space between the topmost gradation mark and the rim, so with a full measure (e.g., one cup), the liquid won’t splash out when carried (see the photo above).

    Fill the cup until the top of the liquid meets the correct gradation line when viewed at eye level. Some people keep the cup on the counter and bend down to see the gradation and the meniscus. If you have a steady hand, you can lift the cup to eye level.


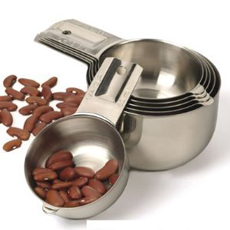
    Dry measuring cups. Metal measuring cups are
    preferable to plastic, which can warp in the
    dishwasher. Photo courtesy RSVP.
      READING THE MENISCUS

    Liquids in a container have a tendency to form a meniscus, the Greek word for crescent.* The meniscus is the curve in the upper surface of the liquid, caused by surface tension as it touches the wall of the container.

    When viewed from the side of a clear measuring cup, the meniscus looks like a line of liquid wrapped around the inside of the cup.

    The accurate measure is from the bottom of the meniscus line, not the top. The bottom of the meniscus should be touching the appropriate gradation line on the cup.

    *The Greek menískos,crescent, is diminutive of mene, moon.


    MEASURING DRY INGREDIENTS
    Using a dry measuring cup enables you to fill the ingredients to the rim, then level the ingredients for an accurate amount: Use a knife or metal spatula to scrape off the excess (scrape it onto a piece of wax paper so you can return it to the canister or package).

    If you want absolute precision, weigh dry ingredients. Put the ingredients in the measuring cup, having adjusted the scale to deduct the weight of the empty cup.

    Note that each ingredient has a different weight: One cup of sugar does not weigh the same as one cup of flour.

    Whether dry or liquid, it takes a wee bit more time to measure ingredients precisely; but the results are worth it.
      

    Comments off

    COOKING: Grilling Tips For Meat, Fish & Veggies


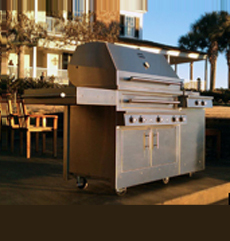
    What a beauty! Photo courtesy Kalamazoo
    Outdoor Gourmet.
      Memorial Day Weekend is the official launch of grilling season. We asked Kalamazoo Outdoor Gourmet, the inventors of the Hybrid Fire Grill (the only grill that can cook with gas, charcoal and wood), to share their top grilling tips.

    1. Prepare

    Marinate your food in advance. With tougher steak cuts, 24 hours is helpful. For fish, 30 minutes can suffice. With other meats and with veggies, begin marinating in the morning.

    Be sure to preheat your grill for 10-15 minutes before you add the food. Reduce sticking on the grill by oiling the hot grill rack with a vegetable oil-soaked paper towel. Hold the towel with tongs and rub it over the rack. NOTE: Easy as it may seem, DO NOT use cooking spray on a grill.


    2. Combine Direct and Indirect Heat

    Then, combining techniques creates the real magic of grilling. Sear a thick steak above a hot fire (direct heat) for a minute or two per side to brown it, and then move it away from the fire and close the hood (indirect heat). Let that steak coast up to temperature for 10 to 20 minutes more. You will be rewarded with a beautifully-browned exterior and succulent interior.

    The longer cooking time allows more of the inner marbling to render its flavor into the steak, without having to cook it past medium-rare.

    On a Kalamazoo Hybrid Fire Grill, you can use a wood fire to add even more flavor±—the zenith of grilling! Read more about direct and indirect grilling techniques at KalamazooGourmet.com.

    3. Break The Rules: Flip Your Food

    We’re not sure who came up with the rule that you can only flip your meat once. Some of the best steaks and chops we’ve ever made were flipped and moved frequently, particularly when using the combination of direct and indirect heat. (What you should not do is press on the meat with the flipper or other utensil, which presses juice out of the meat.)

    On a nice big bone-in ribeye, you can even score the outer flesh with a knife to increase the amount of surface area for browning. Turning your steak frequently lets each side take short breaks from the direct heat below. It’s also great for building up a beautiful crust without burning the outside of the meat. This tip works well when cooking thick cuts of beef, lamb and pork.


    4. Leave That Fish Alone

    Fish should not be flipped. If the food is sticking to the grill, it just isn’t ready to be turned.

    Let the fish cook until the sides start to release themselves from the cooking surface. You can help the cause by making sure you thoroughly preheat the grill.

    When the hood thermometer on a gas grill first reaches 500°F or 600°F, the grill grates may be lagging behind. Give them time to thoroughly heat up before you start cooking.

     
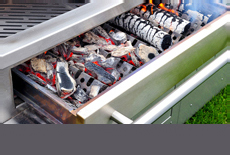
    Kalamazoo Hybrid Fire Grilling Drawer gives you the freedom to cook with gas, wood and charcoal, all on the same grill. Photo courtesy Kalamazoo Outdoor Goumet.
     

    5. Olive Oil and Veggies: It’s Just That Simple

    Asparagus, corn, green beans, mushrooms and zucchini all love a hot grill. Just give them a thorough coating of olive oil and a dusting of salt, and grill them directly above a hot fire.

    For asparagus and green beans, the Kalamazoo Outdoor Gourmet grillmasters recommend whisking a little lemon juice into the olive oil. It brightens the flavor and helps reduce any smoke from the olive oil.

    We’re hungry just thinking about it!

    Want to surprise Dad with a new grill for Father’s Day?
    Check out KalamazooGourmet.com.


    Comments off

    TOP PICK OF THE WEEK: Crispin Hard Apple Cider


    Crispin Original, our go-to hard apple cider.
    Photo courtesy Crispin Cider.
      For the upcoming trio of holidays—Memorial Day, Fathere’s Day and Independence Day—we’d like to recommend something festive to drink: sparkling Crispin Hard Apple Cider.

    Whether or not you’re currently a cider fan, we’ve got to evangelize over what we think is the most elegant of hard apple ciders.

    The naturally fermented line is made from the fresh pressed juice of Northwest apples—not from apple juice concentrate like many ciders. And there’s also pear cider, or perry, made from 100% pear juice; there’s no apple juice sneaked in to lower the cost of ingredients.

    It’s pure, clean cider: There is no added malt, grape wine or spirit alcohol, no added colorants, sorbate or benzoate preservatives.

    And unlike beer, which is made from grain, cider is 100% gluten free.

     
    But don’t take our word for it: Head to the store and pick some up. You can party hearty: Cider is less filling than beer. The Crispin line has an ABV of 5.3%…and a deliciousness index of 100%.

    Read the full review.


    Comments off

    PRODUCT: Keurig Vue Custom Brewing System

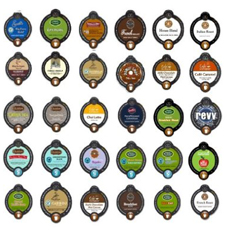
    The tag line of the Keurig Vue single-cup custom brewing system is “Brew Stronger. Brew Bigger. Brew Hotter.”

    We’d like to add: Brew Sustainably. The Vue cups (an improvement on K-cups) are made from recyclable #5 plastic (polypropylene). While it doesn’t matter to some people, we strive to do our small part to help the environment. Finally, with Keurig Vue, we can enjoy a K-cup-type system with the improved Vue cups.

    We’re excited about this appliance for other reasons, too, including the total control it gives you to customize your brew exactly as you wish:

  • Hot enough for you? The Keurig Vue lets you decide how hot you want your beverage. We like ours hotter than other single-cup systems and conventional coffee makers deliver.
  •  

    A great addition to the kitchen, a great gift. Photo courtesy Keurig.


  • Cold enough for you? You can brew iced coffee or iced tea directly from the machine into your glass. Terrific!
  • Large enough for you? The intuitive, color LCD touchscreen lets you customize brew sizes from 4 to 18 ounces, to accommodate everything from espresso cups to travel mugs.
  •  


    Vue cups: Take your pick! Photo courtesy Keurig.
     
  • Strong enough for you? Touch the screen to produce a more robust cup.
  • Looking for a great Father’s Day gift? Keurig Vue gets our vote.
  •  

    Keurig makes the biggest-selling line of single-cup brewing machines, and the capsules (K-cups and Vue cups) used to make coffee, tea and hot chocolate. As is common knowledge, it’s more costly to brew a single cup of coffee than a carafe of it; but with no hassle or mess, and perfect coffee every time, Americans have more than embraced single-serve.

     
    In fact, single-serve coffee is one of the fastest-growing segments of coffee sales worldwide. For busy people, no fuss or mess is a valued tradeoff for economy.

    Head over to Keurig.com to browse the options. Hopefully, there’s a Keurig Vue in your future.
      

    Comments off

    RECIPE: Easy Grilled S’mores

    Is there a more popular dessert than s’mores? You don’t need a campfire and a branch. Just:

  • GRILL in a covered grill, or
  • BAKE in the oven
  •  
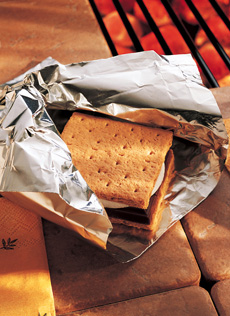
    This recipe from Reynolds Wrap makes it easy.

    EASY GRILLED S’MORES

    Ingredients For 4 Servings

  • 4 sheets (8×12-inches each) aluminum foil
  • 4 graham crackers, broken into halves
  • 2 (1.55 ounces each) chocolate candy bars, divided
    in half crosswise
  • 4 marshmallows
  •  
    Yum! Photo courtesy Reynolds Wrap.
     

    Preparation

    1. PREHEAT grill to medium or preheat oven to 450°F.

    2. FOR each s’more, top one graham cracker square with one chocolate bar half, one marshmallow and another graham cracker square. Repeat with remaining graham crackers, chocolate and marshmallows.

    3. CENTER one s’more on each sheet of foil. Turn up the foil sides. Double fold the top and ends to seal the packet, leaving room for heat circulation inside. Repeat to make four packets.

    4. GRILL 4 to 5 minutes in covered grill, or bake 4 to 5 minutes on a cookie sheet in oven
      

    Comments off

    The Nibble Webzine Of Food Adventures
    RSS
    Follow by Email


    © Copyright 2005-2024 Lifestyle Direct, Inc. All rights reserved. All images are copyrighted to their respective owners.