THE NIBBLE BLOG: Products, Recipes & Trends In Specialty Foods


Also visit our main website, TheNibble.com.


VALENTINE FOOD: Strawberry Banana Pancake Stack

Enjoy this special occasion pancake stack for Valentine’s Day, Mother’s Day or other occasion when taking the extra step makes a big hit with family and guests. The pancake “cake” is sliced into six wedges.

Prep time is 15 minutes, cook time is 30 minutes. Thanks to Hungry Jack Pancakes for the recipe.

RECIPE: STRAWBERRY BANANA PANCAKE
STACK

Ingredients For 6 Servings

  • 2 cups pancake mix
  • 1-1/3 cups milk
  • 1/4 cup vegetable oil
  • 2 large eggs
  • Butter flavor no-stick cooking spray
  • 2/3 cup creamy peanut butter*, divided
  • 2 ripe bananas, sliced
  •  


    A pretty pancake stack to share. Photo
    courtesy Hungry Jack.

  • 1/2 cup strawberry jam, divided
  • 2 cups sliced fresh strawberries, divided
  • Whipped cream or whipped topping
  • Pancake syrup
  •  
    *This recipe used Jif Whips Whipped Creamy Peanut Butter. We wanted to add a touch of chocolate, so used the companion product, Jif Whipped Peanut Butter & Chocolate Flavored Spread.


    jif-whips-chocolate-spread-230
    Jif Whips is made in creamy peanut butter
    and this chocolate peanut butter spread.
    Photo courtesy Jif.
     

    Preparation

    1. PREHEAT oven to 375°F.

    2. STIR pancake mix, milk, oil and eggs in large bowl until smooth. Let stand 3 minutes.

    3. COAT a griddle or large skillet with no-stick cooking spray. Heat over medium-high heat (375°). Make 7 large pancakes, seven inches in diameter, in batches, by pouring a scant 1/2 cup batter for each pancake onto hot griddle to form 7-inch circle. Cook until bubbles appear and edges are dry, about 1 to 1-1/2 minutes. Turn and cook an additional 1 minute or until golden brown.

    4. PLACE 1 pancake on oven-safe serving plate; spread with 1/3 cup peanut butter. Top with another pancake. Completely cover surface with banana slices. Top with third pancake; spread with 1/4 cup strawberry jam. Completely cover surface with 1 cup sliced strawberries, mounding strawberries near outside edge. Repeat all layers. Top with remaining pancake. Cover with foil.


    5. BAKE 5 to 10 minutes or until heated through. Insert 6 decorative wooden skewers into stack-up, if desired, to secure each wedge. Cut into wedges. Garnish with whipped topping, if desired. Serve with syrup.
      

    Comments off

    TIP OF THE DAY: How To Quickly Chill Wine Or Champagne

    If you forgot to put the Champagne in the fridge—or decide on a different bottle of wine than the one you’ve chilled—here’s how to get it cold, fast.

    Pop It In The Freezer

    Many people stick the bottle in the freezer. It works, but it isn’t the fastest way to chill wine. Cold air isn’t as effective as cold water, our next technique.

    Make A Water Bath

    This technique gets the deepest chill. Take a wine bucket, stock pot or other container that will allow at least half of the bottle to be covered with ice. Fill halfway with ice cubes; then add ice water or very cold tap water, filling the bucket to three-quarters full. Next, add salt to the water.

    (Why? It lowers the temperature of the water. As the salt dissolves, it requires energy to break the bonds between its ions. The water transfers some of its heat to do aid this process, and the entire solution cools down.)

    Stir the mixture to blend and add the bottle(s).


    champagne-230

    An ice water bath quickly cools a bottle of Champagne or other wine. Photo courtesy Champagne Council.


    This is the fastest way to chill a bottle of wine or Champagne. You might think that restaurants bring wine in an ice bucket to keep the wine chilled; but most restaurants lack the capacity to store their Champagne and white wine inventory on ice. So the water bath in ice bucket serves not just to keep the wine cold, but to chill it in the first place.


    rapid-ice-wine-cooler-230b
    Our go-to wine chiller is Rapid Ice. Photo
    courtesy Rapid Ice.
      Gel Sleeve: Our Personal Favorite

    Most homes don’t have the space or the need to keep an ice bucket. Ever since the first Rapid Ice Wine Instant Wine Cooler appeared on the market 30-plus years ago, we’ve been hooked. We always have two in the freezer.

    A plastic sleeve is quilted into several gel pockets. The sleeve folds flat and is easy to store in the freezer. Take it out, insert a bottle and the bottle will be chilled enough by the cold gel to drink in five minutes or so. The bottle can stay chilled for up to three hours.

    Rapid Ice is designed to fit over a standard 750 ml wine bottle, but you can get it over some Champagne bottles. However, there is also a Champagne bottle version.

    It takes up a lot less room on the table than an ice bucket!

    You can purchase Rapid Ice at wine stores, kitchen gadget departments and online. It’s about $12 for the wine version and about $15 for the Champagne version.

    Consider adding one to a wine gift.

     
    BONUS WAYS TO USE RAPID ICE

  • Chill beer.
  • Keep your water bottle cooler on a hot summer day.
  • Keep a pint of ice cream chilled at the table—or as you work your way through it in front of the TV.
  • Chill down dough or other ingredients.
  • Ice down your wrist or arm from injury or overuse of technology.
  •  
    There are many more uses, no doubt!
      

    Comments off

    VALENTINE RECIPE: Sweetie Pie Cherry Pie Pops: Pie On A Stick

    Our favorite baker, blogger Lauryn Cohen (a.k.a. Bella Baker), suggests pie pops for Valentine’s Day. You can also think of them as hand pies on-a-stick. First make the pie pastry, then fill it with from-stratch or store-bought cherry pie filling. Specialty companies like Chukar Cherries make high-end fillings.
     
     
    RECIPE: SWEETIE PIE POPS

    This is a three-step recipe.

  • First, make the pie crust.
  • Second, make the cherry pie filling (or use store-bought).
  • Third, create the pies-on-a-stick.
  •  
    Step 1: Ingredients For Flaky Pie Crust

  • 2-1/2 cups all purpose flour
  • 1 teaspoon salt
  • 3 tablespoons sugar
  • 1-1/2 sticks (12 tablespoons) unsalted butter, cold (or frozen) and cut into 48 small pieces
  • 1/2 cup vegetable shortening
  • 6-7 tablespoons ice water
  •  
    Plus

  • 24 six-inch lollipop sticks
  • Optional: “Sweetie Pie” tags or red or pink ribbons
  •  
    Preparation

    1. PLACE the flour, salt, and sugar in the bowl of a food processor and combine. Add the butter and shortening and pulse until the mixture resembles coarse peas or cornmeal. There will still be chunks of butter and that is fine.

    2. SPRINKLE the water, one or two tablespoons at a time, over the mixture and pulse a couple of times in between each addition. Test the dough by pinching it: If it holds together it is ready. If not, add some additional water until the mixture begins to clump together.

    3. REMOVE the dough from the food processor bowl and lightly knead it into two flat disks. Wrap each disk in plastic and refrigerate for at least 1 hour. The dough can be made and refrigerated up to 3 days ahead of time.

    4. REMOVE the chilled dough from the refrigerator. Sprinkle flour onto a clean work surface and, using a rolling pin, gently roll out, lifting the dough from underneath and sprinkling additional flour if the dough begins to stick slightly onto the work surface. Once the dough reaches 1/4 inch in thickness, use a 2- or 3-inch round biscuit cutter or a heart-shaped cookie cutter to cut shapes out of the pie dough.
     
    Step 2: Ingredients For The Cherry Pie Filling

    To save time, consider store-bought pie filling instead of making it from scratch. Look for a better brand from Whole Markets or another up-market store.

    Here is the from-scratch recipe:

  • 5 to 6 cups fresh pitted cherries in season*
  • 2 tablespoons lemon juice
  • 1-2 teaspoons lemon zest
  • 2/3 cup sugar
  • 3 tablespoons cornstarch
  • 1/4 teaspoon pure vanilla extract
  •  
    ________________

    *Out of season, use frozen cherries or buy prepared cherry filling.


    sweetie-pie-pops-bellabaker-230
    [1] Valentine pie pops (photo © Bella Baker [now closed]).


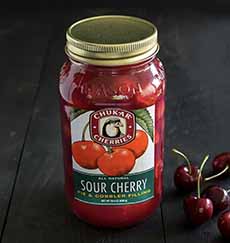
    [2] You can use prepared pie filling if you don’t want to make your own (photo © Chukar Cherries).


    [3] When fresh cherries aren’t in season, make pie filling from scratch with pitted canned cherries (photo © Oregon Fruit).

    Frozen Cherries
    [4] Or, use frozen sour/tart cherries (photo © Dole).

     
    Preparation

    1. COMBINE all ingredients except for the vanilla extract in a saucepan over medium heat. Bring to a boil, then reduce heat and continue to simmer for about 15 minutes.

    2. STIR in the vanilla extract, remove from heat, and cool before using.
     
    Ingredients For Egg Wash

  • 1 large egg
  • 1 tablespoon milk or cream
  •  
    To Make The Pie Pops

    1. PREHEAT oven to 450°F. Place half the dough circles or hearts onto a parchment-lined baking sheet. Place a 6-inch lollipop stick on top of each circle, pressing gently so it sticks into the dough circle, going about halfway up the circle.

    2. ADD about a teaspoon of filling to each dough circle or heart and place another dough circle or heart on top. Use the tines of a fork to carefully crimp together the edges of the dough. It is important to make sure that your dough is securely closed around the entire circle so that your filling does not leak out.

    3. MAKE egg wash: Beat egg and milk/cream until combined and brush on the top of each pie pop. Bake pie pops in the oven for 10-12 minutes. The crust should look golden brown. Remove from oven and cool completely, then decorate with personalized tags, like the “Sweetie Pie” tags in photo #1, or a pink or red ribbon.


    CHECK OUT WHAT’S HAPPENING ON OUR HOME PAGE, THENIBBLE.COM.


    Comments off

    Frozen Strawberry Margarita Recipe & Strawberry Vodka Shooters

    Margaritas are America’s favorite cocktail. Tailor them for Valentine’s Day with a homemade Frozen Strawberry Margarita.

    > The history of strawberries.

    > February 27th is National Strawberry Day.

    > February 22nd is National Margarita Day.
     
     
    RECIPE #1: FROZEN STRAWBERRY MARGARITA

    Ingredients For 4 Drinks

  • 6 ounces tequila
  • 2 ounces triple sec
  • 8 ounces frozen sliced strawberries in syrup
  • 4 ounces frozen limeade concentrate (photo #3)
  • Ice cubes
  • Coarse salt for rim
  • Garnish: 4 fresh strawberries
  •  
    Preparation

    1. FILL a blender with ice and crush. Pour in the tequila and triple sec. Add the strawberries and limeade.

    2. BLEND for 30 seconds or until smooth. Pour and serve.
     
     
    Want something different? Here’s a recipe from Polar Seltzer.
     
     
    RECIPE #2: STRAWBERRY SHOOTERS

    Ingredients For 1 Drink

  • 1 oz Smirnoff Whipped Cream Vodka or vanilla vodka
  • 1/2 ounce maraschino liqueur
  • 2-3 strawberries, chopped
  • Strawberry flavored seltzer
  • 1-2 whole strawberries
  • Ice cubes
  • Garnish: whipped cream
  •  
    Preparation

    1. MUDDLE the chopped strawberries and vodka in a cocktail shaker. Add ice and maraschino liqueur and shake.

    2. STRAIN into a glass, filling half way and then add additional strawberries. Top with Polar Seltzer and whipped cream.

      strawberry-margarita-haru-230
    [1] Who needs Champagne? We’d rather have a Frozen Strawberry Margarita (photo © Haru Sushi | NYC).

    A Frozen Strawberry Margarita with a salt-and-lovage rim
    [2] A Frozen Strawberry Margarita with a salt rim mixed with minced lovage–you can substitute basil (photo © Quinciple).

    A Can Of Minute Maid Limeade Concentrate
    [3] A can of frozen limeade concentrate (photo © Minute Maid | Coca-Cola).


    CHECK OUT WHAT’S HAPPENING ON OUR HOME PAGE, THENIBBLE.COM.


    Comments off

    TIP OF THE DAY: Truffle Salt

    black_truffle-salt-fusion-230sq
    The more flecks of truffle, the tastier the
    salt. Black truffle salt from Fusion.
      The winter truffle season is nearing its end. But if you didn’t get enough (or couldn’t afford any), there’s a way to enjoy truffle flavor all year round: truffle salt.

    BLACK & WHITE TRUFFLE SALT

    To make truffle salt, small chips and bits that break off from whole truffles during handling are mixed with sea salt. Truffle salt is sea salt that has been laced with fragrant pieces of black or white truffle.

    Black truffles have earthier aroma and flavor; white truffles are lighter. Depending on the origin of the white truffles, they can have garlicky notes. Most people have a personal preference for one or the other where fresh truffles are concerned; but once salt is produced, the variations become more subtle.

    Unlike truffle oil, the flavor of which is usually synthesized*, truffle salt typically has pieces of real truffle—although the flavor may be enhanced with truffle oil.

     
    *Given the high cost of good truffles, most truffle oils are not made by infusing actual truffles but from synthetic flavors that approximate the flavors and aromas of natural truffles. Some of these truffle oils are excellent, and provide truffle flavor and aroma at an accessible price. There is nothing wrong with using synthetics; without them, there would be no truffle oil, truffle fries, most truffle risotto, etc. As a comparison, most perfumes these days are not made with distilled flower petals, but from synthetic aromas.
     

    USES FOR TRUFFLE SALT

  • Butter: sprinkle atop of a bar of butter or a ramekin of butter for the table (you can also buy ready-made truffle butter, a terrific product [read our review]
  • Cheese: on a grilled cheese sandwich, goat cheese, queso asado
  • Dessert: with anything chocolate (brownies, cookies, candies, ice cream), crème brûlée—sprinkle on top instead of sea salt
  • Eggs: in scrambled, omelet or deviled eggs, or a sprinkle on simple hard-boiled eggs
  • Fish: atop grilled fish, seared scallops
  • Meat & Tofu: atop steaks, chops or deluxe burgers
  • Olive Oil: in a dip for bread and crudités; use a pinch in a Champagne or wine vinaigrette
  • Pasta: use with any white sauce, butter or oil dressing; with mushroom ravioli
  • Pâté & Foie Gras: a natural pairing, even with chicken liver mousse
  • Potatoes & Rice: baked, fries, mashed and roasted potatoes; risotto
  • Vegetables: roasted, sautéed, steamed
  • Snacks: homemade pretzels (including cheese pretzels—recipe), hummus, popcorn
  •  

    HOW TO BUY TRUFFLE SALT

    First: truffle salt is pricey, but you only need a pinch. A jar may cost $20 or $25 but will last a long time. Don’t let the sticker shock discourage you.

    Different brands use different truffles, with varying intensities of truffle salt. Your retailer may only have one brand. A good brand of truffle salt will state the percentage of truffles on the label. Look for 5% or more.

    One brand of black truffle salt you can rely on is Cassina Rossa, imported from Italy. Urbani sells a quality white truffle salt, also imported from Italy.

    We typically bring jars as host/hostess gifts. They are much appreciated.

      white-black-truffle-salt-ddl-230
    Truffle salt is a great gift for a gourmet cook or foodie. Photo courtesy Dean & Deluca.
     

    EVERYTHING YOU NEED TO KNOW ABOUT TRUFFLES
      

    Comments off

    The Nibble Webzine Of Food Adventures
    RSS
    Follow by Email


    © Copyright 2005-2024 Lifestyle Direct, Inc. All rights reserved. All images are copyrighted to their respective owners.