THE NIBBLE BLOG: Products, Recipes & Trends In Specialty Foods


Also visit our main website, TheNibble.com.


PRODUCT: Fries In A Cone

french-fries-metal-cup-gibsontablecompliments-230
French fry fun at home. Photo courtesy Gibson Table Compliments.
 

If you love eating fries from a metal cone, the way some restaurants serve them, here’s a fun item from Gibson Table Compliments.

The four-piece French Fry Serving Set has metal coned with ceramic inserts, a drip-proof alternative to the paper liners used at restaurants. There are two dipping cups that attach to each cone as an optional way to serve condiments.

Beyond French fries, you can use the cones to serve other veggie fries and fried foods like mozzarella sticks. In fact, you can serve anything in them, from breakfast cereal to an ice cream sundae.

A set of four is $25.00 at Amazon.com. All parts are dishwasher safe.

If you prefer butcher paper in your cone instead of ceramic, here’s a similar cone-only product.

The white tissue liners are sold in packs of 2,000. If you’re going to load up, consider this version, printed to look like an English, French or Italian newspaper.

Love them!

 
Now for more fun:

How many different types of French fries have you had? There are almost 30!


Comments off

FOOD FUN: Meatball Pot Pie Recipe

For National Meatball Day, March 9th, here are two fun recipes with meatballs, courtesy of Casa Di Bertacchi. Both will be popular with busy moms, because the ingredients are quick to assemble.

We don’t often use recipes that use a can of soup or canned potatoes as an ingredient, but here we make an exception to make it easy to celebrate National Meatball Day.

The meatballs, too, are purchased frozen from Casa di Bertacchi.

Of course, you make it from-scratch, using your favorite homemade pot pie recipe.
 
 
RECIPE #1: MEATBALL POT PIE

Ingredients For 6 Servings

  • 2 cups frozen mixed vegetables, thawed and drained
  • 13 frozen fully cooked meatballs, thawed
  • 2 cans (10.5 ounces each) condensed cream of mushroom soup
  • 1 can (15 ounces) diced potatoes, drained
  • 1 teaspoon chopped dried rosemary
  • 1/3 cup milk
  • 2 frozen or refrigerated pie crusts, at room temperature
  •  
    Preparation

    1. PREHEAT the oven to 400°F.

    2. COMBINE all ingredients except the crusts in a 2-quart bowl. Place one pie crust evenly over the bottom and sides of a deep-dish pie pan, pressing it up over the sides.

    3. FILL the pie crust with the meatball mixture. Cover with the second crust, sealing the edges and cutting slits in the top to vent steam. Bake for 45 minutes or until golden brown. Allow to cool 5 minutes before serving.


    meatball-potpie-casameatballs-230
    [1] Meatball Pot Pie (all photos and recipes © Casa di Bertacchi).


    [2] These frozen meatballs are delicious.


    meatball-kabobs-casameatballs-230
    [3] Fun food: Try meatball kabobs. Recipe and photo courtesy Casa di Bertacchi.

      RECIPE #2: MEATBALL KABOBS

    Spell it kabob, kaboab, kebab or kebap: The word is transliterated from Arabic, so there’s no single definitive spelling.

    Originating in the Eastern Mediterranean, a kabob consists of pieces of meat, fish or vegetables roasted or grilled on a skewer or spit.

    Ingredients For 6 Servings

  • 18 frozen, fully cooked meatballs, thawed
  • 1 medium yellow or green bell pepper, seeded and cut into 12 equal pieces
  • 1 large or 2 small yellow summer squash*, cut into 12 slices, 1-1/2 to 2 inches
  • 12 whole mushrooms
  • 12 cherry tomatoes
  • 1/2 cup Caesar dressing
  • 1-1/4 teaspoon ground black pepper
  • 6 long metal skewers†
  •  
    *Substitute yellow bell pepper.

    †If using bamboo skewers, soak in water for 30 minutes prior to assembling kabobs.
     
    Preparation 

    1. THREAD a meatball, bell pepper slice, yellow squash slice, mushroom and tomato on a long metal skewer. the Repeat pattern ending with a meatball.

    2. REPEAT for the other five skewers.

    3. COMBINE the Caesar dressing and black pepper.

    4. PLACE the meatball skewers directly on a hot grill. Baste the kabobs with the dressing.

    5. GRILL for 6–8 minutes, turning and basting every 2–3 minutes until done. Makes 6 kabobs.


    Comments off

    TIP OF THE DAY: Easy Grasshopper Pie For St. Pat’s

    Grasshopper Pie is a crème de menthe chiffon pie with a chocolate cookie crust. It was invented in the U.S. in the 1950s following the popularity of the Grasshopper Cocktail, a dessert cocktail made from cream, green crème de menthe and white crème de cacao.

    The drink’s name derived from its green color. While it reputedly originated at Tujague’s, a landmark bar and Creole restaurant in the French Quarter of New Orleans, the story is a bit more complicated.
     
    THE HISTORY OF THE GRASSHOPPER COCKTAIL

    The recipe, created by Philibert Guichet Jr., owner of Tujaque’s, began as an entry submitted to a cocktail contest in New York City. It won the second place prize. Of note is that the contest was held in 1928—before the end of Prohibition (1920-1933). [Source]

    The cocktail gained popularity in the South during the 1950s and 1960s.

    In the 1950s, liquor became much more widely available as it filled grocery store shelves across the land. With women doing most of the grocery shopping at this time, the popularity of sweeter, dessert-type drinks increased. By the 1960s, the Grasshopper had become a standard cocktail.

       
    grasshopper-pie-tasteofhome-230r

    Plan ahead for something green and delicious: Make a Grasshopper Pie for St. Patrick’s Day. Photo and recipe courtesy Taste Of Home.

     
    NEXT STOP: GRASSHOPPER PIE

    At the same time the cocktail became a national standard, the pie appeared. Chiffon pies were very popular at that time, and food historians speculate that the recipe was invented by food companies to promote their products.

    In the American Century Cookbook: The Most Popular Recipes For The 20th Century, Jean Anderson writes, “I suspect—but cannot verify—that [Grasshopper Pie] recipes descend from one that appeared in High Spirited Desserts, a recipe flier published jointly by Knox Unflavored Gelatin and Heublein Cordials. [Source]

    Prep time is 30 minutes plus several hours to chill (or overnight).

    An easy frozen version follows the standard version below.

    You can play with the garnishes, using chocolate chips instead of chocolate shavings. If you want a more vivid green for St. Patrick’s day, add food color before you whip the cream.


    ice-cream-grasshopper-pie-tasteofhome-230
    The easiest Grasshopper Pie is made with mint chip ice cream. Photo and recipe courtesy Taste Of Home.
      RECIPE: GRASSHOPPER PIE

    Ingredients For 8 Servings
     
    For The Crust

  • 1-1/2 cups plus 1 tablespoon chocolate wafer crumbs, divided (about 32 wafers)
  • 1/4 cup sugar
  • 1/2 stick (1/4 cup) unsalted butter, melted
  •  
    For The Filling

  • 1-1/2 teaspoons unflavored gelatin
  • 1-1/3 cups well-chilled heavy cream
  • 1/4 cup sugar
  • 1/4 cup green crème de menthe
  • 1/4 cup white crème de cacao
  • 4 large egg yolks
  • Garnish: grated chocolate or mint-flavored chocolate*
  •  
    *Green & Black’s and Lindt are two brands of mint chocolate bar available at many supermarkets.
     
    Preparation

    1. MAKE the crust. Stir together the wafer crumbs, sugar and butter in a bowl to combine. Pat the mixture onto the bottom and up the side of a buttered 9-inch pie plate. Bake the crust in the middle of a preheated 450°F oven for 5 minutes. Set aside to cool.

    2. MAKE the filling. In a heat-proof bowl or the top half of a double boiler, sprinkle the gelatin over 1/3 cup of the cream; let it soften for 5 minutes. Whisk in the sugar, crème de menthe, crème de cacao and egg yolks. Set the bowl over a saucepan of simmering water and cook, whisking constantly, until the mixture registers 160°F on a candy thermometer.

    3. REMOVE the bowl to a larger bowl of ice and cold water. Stir the mixture until it is cooled and thickened.

    4. BEAT the remaining 1 cup cream in a separate bowl until it holds stiff peaks. Fold it into the crème de menthe mixture thoroughly.

    5. POUR the filling into the crust and chill the pie for 4 hours, or until set. Sprinkle the pie with the grated chocolate.
     
    RECIPE: ICE CREAM GRASSHOPPER PIE

    This version is even easier, using store-bought mint chocolate chip ice cream (photo above left). It’s a kid-friendly recipe without the liqueurs; but feel free to add 1/8 cup of crème de menthe to the softened ice cream.

    Ingredients

  • 4 cups mint chocolate chip ice cream, softened
  • 1 chocolate crumb crust (8 inches—store-bought or made with the recipe above)
  • 5 Oreo cookies, chopped
  • 1/3 cup chocolate-covered peppermint candies (e.g. Junior Mints)
  • Chocolate hard-shell ice cream topping
  •  
    Preparation

    1. SPREAD the ice cream into the pie crust. Sprinkle with the cookies and candies.

    2. DRIZZLE with the ice cream topping and freeze until firm. Remove from the freezer 15 minutes before serving.


    Comments off

    What’s A Cherimoya, And How To Serve It This Tropical Fruit

    WHAT’S A CHERIMOYA?

    When our colleague Hannah Kaminsky mentioned that cherimoya was her favorite fruit, we were curious.

    Depending on where you live, you may not come across this heart-shaped subtropical fruit often.

    We had to head to a Latin American supermarket uptown. But seek it out we did, and the trip was worth it.

    The fruit’s blend of banana, mango, passionfruit and pineapple notes is luscious. The ivory-colored flesh is creamy, similar to a ripe peach.

    Also called a custard apple in the U.S., cherimoya is believed to have originated in the Andes Mountains.

    The name originates from the Quechua (Inca) word chirimuya, meaning “cold seeds” (because the seeds germinate at high altitudes). It grows as a shrub or tree.
     
     
    HOW TO BUY & SERVE CHERIMOYA

    The pale green, shingled skin must be handled with care to avoid bruising. Choose unblemished fruit that is firm and allow it to ripen at room temperature.

    As it ripens, the skin will turn a darker green and will yield to gentle pressure. Refrigerate soft fruit and consume it as soon as possible for the best flavor.

    To serve, chill the cherimoya, cut it in half, spoon out the seeds and eat the flesh with a spoon. It can also be turned into desserts, such as crêpes, custard (hence the name “custard apple)”, dessert sauce (purée), fruit salad (as with apples, dip cut fruit in lemon or orange juice to prevent darkening), mousse, pie filling, pudding and sorbet.


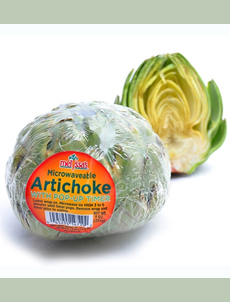
    [1] A cherimoya. Now you know! (photo © specialty produce company Sid Wainer).

    cherimoya-baldorfood-230
    [2] Another perspective (photo © specialty produce company Baldor Food).


    You can freeze the cherimoya and eat it as ice cream, from the shell. Definitely try this!

    And you can drink it. Whip up a shake, smoothie, cherimoya Daiquiri or other fruity cocktail.

    To usher in spring, which began today, make Hannah Kaminsky’s tropical cocktail or smoothie, Cherimoya Lava Flow.


    cherimoya-shake-hannahkaminsky-230
    Celebrate spring with this Cherimoya Lava Flow. Photo and recipe courtesy Hannah Kaminsky.

      RECIPE: CHERIMOYA COCKTAIL OR SMOOTHIE,
    THE CHERIMOYA LAVA FLOW

    From Hawaii, where her local farmers market has plenty of cherimoyas, Hannah writes: “It’s a pricy treat to be sure,” even though grown locally. Her favorite way to enjoy the ripe, custard-like flesh is to dig in with a spoon.

    “With an overripe fruit, though,” she advises, “the only thing one one can do is blend and drink it. That’s where the idea to create a tropical shake came from, playing off the classic umbrella drink, the lava flow.

    “Fiery red rivulets of strawberry ‘lava’ flow throughout a classic coconut-pineapple rendition of this refreshing island staple, finished with a kiss of light rum. The sweet, creamy richness of cherimoya transforms the drink into an exotic new experience, which is just as luscious with or without the booze.

    “In lieu of fresh cherimoya, you can substitute either 1 medium banana or 2/3 cup young coconut meat for a different, yet still delicious, taste.”

    Of course, you can leave out the rum for a tropical smoothie. Substitute an equal amount of pineapple juice.


    RECIPE: CHERIMOYA LAVA FLOW

    Ingredients For 2 Servings

    For The Strawberry Lava Sauce

  • 1 cup strawberries, fresh or frozen/thawed
  • 2 tablespoons coconut sugar or light brown sugar, firmly packed
  • 2 tablespoons fresh lime juice
  •  
    For The Creamy Cherimoya Cocktail

  • 1 medium cherimoya
  • 1 cup diced fresh pineapple
  • 1 cup full-fat coconut milk
  • 1/4-1/2 cup light rum
  • Optional garnish: fresh pineapple wedges
  •  
    Preparation

    1. PREPARE the strawberry sauce first by combining the strawberries, sugar and lime juice in a small saucepan over low heat. Cook gently for about 10 minutes, just until the berries have softened and the sugar dissolved. Transfer to a blender and thoroughly purée so that no chunks of fruit remain. Strain out the seeds if desired and set aside.

    2. RINSE and dry the blender bowl and return it to the base. Slice the cherimoya in half and use a spoon to scoop out the flesh, discarding the black seeds as you encounter them. Add the cherimoya to the blender, along with the pineapple, coconut milk and 1/4 cup of rum. Blend on high speed until completely smooth. Add more rum to taste.

    3. DIVIDE the cocktail between two glasses and drizzle the strawberry “lava” into each one, aiming for the sides of the glass to create the greatest visual impact. Serve with a tall straw and an additional wedge of fresh pineapple for garnish.


    Comments off

    TIP: How To Microwave Artichokes

    The globe artichoke (Cynara cardunculus var. scolymus) is a species of thistle cultivated as a vegetable. It is actually a flower head, a cluster of numerous immature buds of what would be a blossom if not picked before it bloomed. The cardoon (Cynara cardunculus) is a wild variant available in spring.

    The artichoke stem is also delicious. It is an extension of the artichoke heart.

    The thistle family is a group of flowering plants that have leaves with sharp prickles. They, along with the inner choke (more about that in a bit), make eating whole artichokes a labor of love, like eating a whole lobster. But like that lobster, what’s inside is more than worth it.
     
     
    ARTICHOKE HISTORY

    Native to the Mediterranean, the artichoke was popular with the ancient Greeks and Romans. The Greeks called them kaktos and the Romans called them carduus. The English word evolved from the medieval Arabic al-khurshuf, which evolved into alcachofa in Arabic, alcachofa in Spanish, carciofo in Italian, artichaut in French and Artischocke in German.

    Artichoke cultivation spread to Italy and southern France in the late 15th and early 16th centuries. The original artichokes were small, the size of hens’ eggs. Breeding created the globe.


    thistle-Cynara-scolymus-alvesgaspar-wiki

    An artichoke in bloom in Montpellier, France. One the flower blooms, the flesh becomes coarse and barely edible. Photo by Alvesgaspar | Wikimedia.

     
    The Dutch introduced artichokes to England, and they were grown in Henry VIII’s garden by 1530. They arrived in the U.S. in the 19th century, brought to Louisiana by French immigrants and to California by Spanish immigrants. [Source]

    March 16th is National Artichoke Hearts Day.

    And now, let’s eat!
     
     
    HOW TO MICROWAVE ARTICHOKES

    Microwaving is much faster than conventional steaming on the stove top. Prep time is 3 minutes, cook time is 7 minutes.

    While freshly-harvested artichokes are sweet, some cooks add a drizzle of lemon juice before cooking to eliminate any bitterness. (We’ve never had a bitterness problem.)

    Ingredients

  • Globe artichokes, 8-12 ounces (or smaller varieties)
  • Optional: lemon juice
  • Plastic wrap
  • Optional for serving: lemon wedge, melted butter or other dip (see options in Step 6, below)
  •  

    microwave-artichoke-melissas-230ps
    Melissa’s sells artichokes ready to microwave, wrapped in plastic with a red timing device that pops up when it’s ready. Photo courtesy Melissas.com.


    Preparation

    1. RINSE the artichokes, not just to clean them but to provide moisture for microwaving. Tear off any tiny lower leaves or leaves that are blemished.

    2. TRIM any leaves from the stem. You can leave the stem on, or cut it off at the base of the globe and cook it next to it. (NOTE: Some supermarket artichokes have already been trimmed of the stem.)

    3. USING a scissors, slice off the prickly tips of the leaves. Our mother, ever the creative kitchen artist, used a pinking shears to create a decorative edge. Drizzle a tablespoon of lemon juice into the wells of the leaves.

    4. PLACE the artichoke in a microwave safe dish with 1/4 inch of water in the bottom, and over tightly with plastic wrap. Alternatively, you can cook them in a dish with a tight cover that keeps in the steam. Microwave on high for 7 minutes for one artichoke; 10 minutes for two; 15 minutes for four; 19 minutes for six.

    5. CHECK for done-ness by removing a leaf from the center of the leaves. If it pulls out easily, the artichokes are done. If not done, continue to cook at 30-second intervals. After you try this technique, you’ll know what works for your microwave.

     
    6. PLATE and serve. While we love eating them plain, perhaps with a squeeze of fresh lemon or lime juice, others like to dip the artichokes in melted butter or another dip such as aïoli (garlic mayonnaise), rouille (red pepper aïoli), romesco sauce, yogurt dip with your favorite herbs or spices (dill or cumin are popular) or vinaigrette (try this green olive vinaigrette).
     
    You can serve steamed artichokes warm/hot, at room temperature or chilled.
     
     
    HOW TO EAT AN ARTICHOKE

  • Tear off the leaves one by one, as you are ready to eat them. Place the leaf between your teeth, inside up, and use your teeth to scrape out the flesh at the base of each leaf. Discarding the remainder of the leaf on your plate or in a separate bowl.
  • The outer leaves are less tender, but it no flesh is coming off, the artichoke needs further cooking.
  • The leaves become increasingly tender as you work your way to the heart. You know you’re there when you encounter a pale, thistle-like center, the choke. It is not edible, and removing every last tiny piece is the one pain in the process. With a small spoon, scoop out and discard the choke.
  • You’ll then discover the prize, the artichoke heart: a truly delicious treat.
  •  
     
    HOW TO BUY ARTICHOKES

    We look for artichokes with the fewest blemishes and the longest stems.

    As with any produce, don’t buy more than you will use in a few days. Keep them in the fridge until you’re ready to cook them.

    How about a recipe for artichoke hearts-stuffed baked potato?


    Comments off

    The Nibble Webzine Of Food Adventures
    RSS
    Follow by Email


    © Copyright 2005-2024 Lifestyle Direct, Inc. All rights reserved. All images are copyrighted to their respective owners.