THE NIBBLE BLOG: Products, Recipes & Trends In Specialty Foods


Also visit our main website, TheNibble.com.


RECIPE: Cranberry-Orange Mold

Cranberry Orange Mold
[1] Cranberry-orange mold; the recipe is below (photo courtesy Taste Of Home).

Cranberry Sauce
[2] Optional presentation in a glass bowl (photo courtesy Mackenzie Ltd).
Cranberry Orange Sauce In Turkey Shape
[3] Mold the sauce in a turkey pan from Nordicware.


We love cranberry-orange relishes, compotes, molds and sauces. A few years ago we asked: Why do we only make them twice a year, for Thanksgiving and Christmas?

This side is too tasty to save for one or two holiday dinners. So we started to make them as soon as the fresh cranberries arrive in stores (frozen cranberries also work).

Enjoy homemade cranberry sauce as often as you like, at any meal of the day: We serve it:

  • With grilled meats and fish.
  • With burgers and sandwiches.
  • With yogurt or cottage cheese.
  • As a dessert with sorbet.
  • With a red-themed Valentine’s dinner.
  •  
    Here’s a recipe from Taste Of Home, submitted by Carol Mead of Los Alamos, New Mexico.

    RECIPE: CRANBERRY-ORANGE MOLD

    Ingredients For 12 Servings

  • 1 teaspoon unflavored gelatin
  • 1 tablespoon plus 1 cup cold water, divided
  • 1 cup boiling water
  • 1 package (3 ounces) raspberry gelatin
  • 3 cups (12 ounces) fresh or thawed frozen cranberries, divided
  • 2 medium apples, cut into wedges
  • 1 medium navel orange, peeled
  • 1 cup sugar
  • 1/2 cup chopped walnuts
  • 1/2 cup finely chopped celery
  • Optional center garnish: celery curls (or a mix of celery and carrot curls), shredded lettuce
  • Optional side garnish: sour cream, plain or slightly sweetened with an optional dash of cinnamon or nutmeg
  •  
    Preparation

    1. SPRINKLE the unflavored gelatin over 1 tablespoon of cold water; let stand 1 minute. Add boiling water and raspberry gelatin; stir until gelatin is dissolved, about 2 minutes. Stir in the remaining cold water. Refrigerate until thickened, about 45 minutes.

    2. PULSE 2-1/3 cups cranberries, the apples and orange in a food processor until chopped. Transfer to a small bowl; stir in the sugar. Stir the fruit mixture into the thickened gelatin. Fold in the walnuts, celery and the remaining whole cranberries.

     
    3. COAT a 10-in. fluted tube pan, an 8-cup ring mold or two 4-cup molds with cooking spray (you can use a bundt pan in a pinch). Pour in the gelatin mixture. Cover and refrigerate overnight or until firm.

    4. UNMOLD onto a platter and fill the center with celery curls. Serve the sour cream in a side dish or ramekins.
    NOTE: Some people call this type of recipe a salad, or a gelatin salad, because it’s filled with raw fruits and vegetables. If you fill the center with raw vegetables—shredded lettuce, carrot curls, celery curls—it makes the recipe a legitimate salad.


    Comments off

    TIP OF THE DAY: Halloween Party Wines

    For a Halloween party idea—or to augment the gathering you’ve already planned—look for holiday-themed bottles of wine. There are dozens of choices available nationwide—typically the winery’s existing wines with special labels.

    The Church Of Halloween presents 51 different wines with Halloween-theme labels. Some examples:

  • Cabernet Sauvignon: Bat’s Blood, Chateau du Vampire, Freakshow
  • Chardonnay: Bewitched, Ghostly White, Spellbound
  • Grüner Veltliner: Skeleton
  • Malbec: Skeleton, Voodoo Moon
  • Merlot: Bat’s Blood, Black Widow, Dracula
  • Mourvedre: Voodoo Moon
  • Pinot Grigio: Serenya
  • Pinot Noir: The Heretic
  • Riesling: Superstition
  • Rosé: Blackbird, China Doll (no arms or legs), Gothic
  • Shiraz: Kill Bin Bin, Strait Jacket, The Tentacle
  • Syrah/Petite Syrah: Phantom, Sixth Sense, The Tentacle
  • Zinfandel: Boneshaker, Phantom Poizin, 7 Deadly Zins
  •  
    The labels have great graphics. Even if you don’t buy the wines, take a look.

    Elsewhere, we found Evil Demon Bloody Shiraz, Haunting Ghost, Old Witch Cursed Merlot and Slayer Blood Red.

    No doubt there are others, available in a store near you.
     
     
    BONUS TIP

    Save the bottles and refill them next Halloween, without the trouble of tracking them down.

    —Emily Hannah

      Bone Dry Cabernet Halloween Wine
    Halloween Chardonnay

    Spooky bottle of red, spooky bottle of white (photo courtesy Elk Creek Vineyards).


    Comments off

    RECIPE: Pumpkin Cheese Danish & The History Of Viennoiserie

    Cherry Danish - Viennoiserie
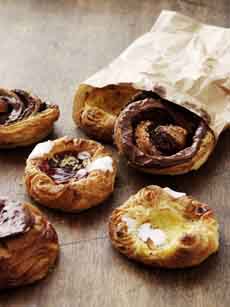
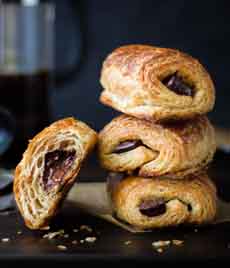
    [1] One of the most popular types of Viennoiserie is Danish pastry, typically round with fruit and/or cheese fillings (photo courtesy Visit Denmark).

    Kouign Amann Viennoiserie
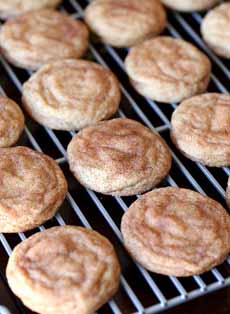
    [2] Kouign amann may look like Danish’s country cousin, but the flavor is as royal as it can be (Here’s the recipe from The Kitchn).
    Croissants & Coffee
    [3] Perhaps the most oft-consumed Viennoiserie choice: the croissant (photo courtesy The French Farm).

    Pain au Chocolat
    [4] Pain au chocolat, often called a chocolate croissant in the U.S. It’s croissant dough with chocolate rolled into the dough, which is shaped in a rectangle instead of a crescent. Here’s the recipe from The Bojon Gourmet.

    Pumpkin Cream Cheese Danish
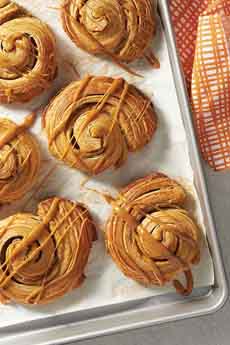
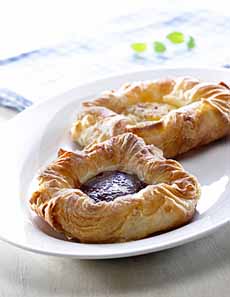
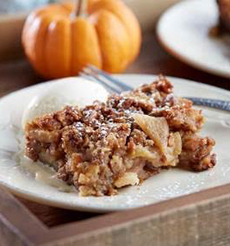
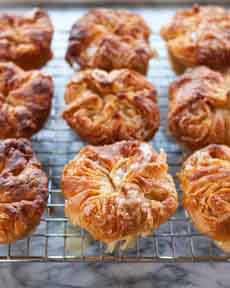
    [5] Today’s recipe: a pumpkin cheese Danish, the breakfast version of pumpkin cheesecake (photo courtesy King Arthur Flour).


    Long before we could say “Viennoiserie” (vee-en-WAH-zuh-ree, meaning “things of Vienna”), we could say “cheese Danish.” We cannot remember a time that cheese Danish was not part of our life.

    Our nana was a big baker of Viennoiserie; and if she didn’t have time, there were bakeries owned by Austrian and German bakers who had immigrated to New York after World War II.
     
     
    WHAT IS VIENNOISERIE?

    Viennoiserie is the category of what is called breakfast pastry in the U.S. It is made with laminated yeast dough or puff pastry. It includes, among other varieties, croissants, pain au chocolat, pain au raisins and Danish pastry.

    It bridges the gap between bread and pastry.

    White flour is combined with ingredients—eggs, butter, sugar, milk, cream—which create a richer, sweeter flavor than brioche, challah or other sweet breads. Active yeast cultures cause the quick rise of the dough, creating the signature flakiness when it is baked.

    While the laminated dough is known as a pâte viennoise (pot vee-yen-NWAZ, meaning Viennese paste) and originated in Vienna, it grew up in Paris,

    Viennoiserie arrived in Paris between 1838 and 1839 with August Zang, a former Austrian military officer who opened a bakery, Boulangerie Viennoise. He introduced the Viennese techniques which would one day lead to the baguette and the croissant.

    The Viennese style of pastry became a passion in Paris, baked almost everywhere.

    You can explore more pastries in our Pie & Pastry Glossary, and the many varieties of bread in our Bread Glossary.
     
     
    RECIPE: PUMPKIN CHEESE DANISH (PHOTO #5)

    This recipe is from the masterful bakers at King Arthur Flour. It may seem like a lot of steps, but this Danish is something you just can’t find elsewhere.

    Prep time is 60 minutes, bake time is 18-20 minutes.

    The dough needs to be made the night before (through step 3, below), so you can pull it together on a lazy Saturday and have warm Danish for Sunday brunch.

    Ingredients For 12 Danish

    For The Sponge

  • 1 large egg
  • 3/4 cup lukewarm water
  • 1 tablespoon sugar
  • 1-1/2 cups unbleached all-purpose Flour
  • 2 teaspoons instant yeast
  •  
    For The Dough

  • 1 tablespoon sugar
  • 1 1/4 to 1-1/2 cups unbleached all-purpose flour
  • 1/4 cup Baker’s Special Dry Milk or nonfat dry milk
  • 1-1/2 teaspoons salt
  • 2 teaspoons pumpkin pie spice
  • 1/2 teaspoon Buttery Sweet Dough Flavor or 1 teaspoon vanilla extract
  • 1 tablespoon butter, melted
  •  
    For Day 2

  • 16 tablespoons (1 cup) cold unsalted butter for laminating
  •  
    For The Filling

  • 1/3 cup sugar
  • 1 1/2 teaspoons pumpkin pie spice
  • 1 tablespoon Instant ClearJel or 2 tablespoons unbleached all-purpose Flour
  • 1/8 teaspoon salt
  • 6 tablespoons cream cheese, at room temperature
  • 1/2 cup pumpkin purée
  • Optional: 1/8 teaspoon cream cheese flavor
  •  
    For The Topping

  • 2 ounces caramel (a scant 1/4 cup, packed, or about 6 individual candies)
  •  
     
    Preparation

    1. PREPARE the sponge: Weigh the flour, or measure it by gently spooning it into a measuring cup and sweeping off the excess. Beat together the egg and water then add the sugar, flour, and yeast. Mix until well blended. Cover and set aside for 30 minutes.

    2. MAKE the dough: Weigh the flour, or measure it by gently spooning it into a measuring cup and sweeping off the excess. When the sponge is ready, combine the sugar, 1-1/4 cups of the flour, dry milk, salt and pumpkin pie spice. Set aside.

    3. STIR the sweet dough flavor and 1 tablespoon melted butter into the sponge mixture, then add the dry ingredients. Mix and knead until a soft, smooth dough forms, adding the additional 1/4 cup of flour if necessary. Pat the dough into a square on a greased baking sheet, wrap it well, and refrigerate overnight.

    4. PREPARE the butter the next day. Place the butter in the center of a lightly floured piece of plastic wrap. If you’re using two sticks of butter, place them side by side. Pound the butter with a rolling pin until you have a rough 6″ square. Use the plastic wrap to make the edges straight and even. Wrap the butter and refrigerate it for 30 minutes.


    5. LAMINATE the dough: Place the chilled dough on a lightly floured work surface. Roll it into a 9″ square; it doesn’t have to be exact. Unwrap the chilled square of butter and place it in the center of the dough at a 45° angle, so it looks like a diamond in the square. Fold the sides of the dough over the edges of the butter until they meet in the middle. Pinch and seal the edges of the dough together; moisten your fingers with a little water, if necessary.

    6. DUST the top of the dough parcel with a little flour, then turn the dough over and tap it gently with the rolling pin into a rectangular shape. Pick up the dough to make sure it isn’t sticking underneath, dusting with more flour if necessary, then roll from the center out until you have a rectangle 14″ long by 7″ wide. Brush off any excess flour with a dry pastry brush then fold the bottom third of the dough up to the center, and the top third over that (like a business letter). Line the edges up on top of each other, and even up the corners so they’re directly on top of each other. Use a dab of water, if necessary, to get the corners to stick together. This is the first “turn.”

    7. ROTATE the dough parcel 90° to the right: It will look like a book ready to be opened. If the dough is still cool and relaxed, roll and turn it as instructed in the previous step, then wrap it loosely and refrigerate for 30 minutes. If the dough is springing back when you try to roll it, wrap it loosely and refrigerate it for 30 minutes. Ultimately the dough should be folded and turned four times, so allow it to rest in the refrigerator as many times as necessary to achieve that. Once the four turns have been completed, wrap the dough loosely and refrigerate it for 60 to 90 minutes.

    8. MAKE the filling: In a small bowl combine the sugar, pumpkin pie spice, ClearJel or flour, and salt. Set aside. In another bowl…

    9. BEAT the cream cheese until smooth. Add the pumpkin and flavor, and beat again until smooth. Mix in the dry ingredients. Set aside.

    10. SHAPE the Danish: Roll the dough into a 14″ x 16″ rectangle; if the dough starts to shrink back, let it rest and relax, loosely covered, in the refrigerator for 15 minutes. Trim the edges of the dough on every side using a ruler and pizza wheel. This cuts off the folded edges that would inhibit the pastry from rising fully.

    11. SPREAD the filling over the surface of the dough, leaving a 1/2″ bare strip along one of the long edges. Brush the bare strip with a little water. Beginning with the covered long edge, roll the dough into a log. Cut the log into 12 slices and place them on two lightly greased or parchment-lined baking sheets.
    Cover the Danish and let them rest/rise for 30 minutes. Meanwhile, preheat the oven to 425°.

    12. BRUSH the Danish with 1 large egg beaten with 1 tablespoon of water. Bake the Danish—one pan at a time, or in two ovens—for 18 to 20 minutes, until they’re a deep golden brown. Remove the Danish from the oven and cool on a rack.

    13. PREPARE the topping: Melt the caramel over low heat in a small saucepan or in the microwave, heating and stirring until smooth. Drizzle some of the warm caramel over each Danish.

    You can store Danish in a plastic bag or an airtight container at room temperature for a day; or wrap well and freeze for longer storage.
     
     
    Making Viennoiserie is a labor of love; but the results are so delicious, you almost forget the labor.

    And, the more you make it, the faster you get.


    Danish Pastry
    [1] Danish pastry gives bakers an opportunity to create different variations on a [round] theme (photo courtesy Fika NYC).

    Danish Pastry
    [2] This well shape is popular for Danish with jam and cream cheese (photo Yuri Arcurs | Dreamstime).

    Cheese Danish

    [3] Another classic shape for cream cheese danish. Here’s the recipe from Alexandra Cooks.


    Comments off

    TIP OF THE DAY: Make A Betty For National Apple Betty Day

    Apple Brown Betty
    [1] David Venable’s Apple Brown Betty. The recipe is below (photo courtesy QVC).

    Apple Brown Betty Recipe
    [2] Have your betty a la mode (photo courtesy Cook Diary).
    Apple Brown Betty
    [3] A pan full of betty.

    Apple Brown Betty

    [4] Photos #2 and #4: Apple brown betty from Curious Cuisiniere (here’s the recipe).

    Hard Sauce Recipe
    [5] For a special occasion, top the betty with hard sauce—perhaps with some real rum? The recipe, below, is from Taste of Home.

      October 5th is National Apple Betty Day, a cooked fruit dessert that we think of as a fruit casserole.

    Betty belongs to that group of fruit desserts that are not a pie, or made in a pie pan:

  • Betty
  • Bird’s eye pudding/crow’s eye pudding
  • Buckle
  • Cobbler
  • Crisp
  • Crumble
  • Grunt
  • Pandowdy
  • Slump
  •  
    Here are the differences among them.
     
     
    APPLE BETTY VS. BROWN BETTY

    You may have heard the term as a brown betty. A brown betty is made with brown sugar instead of white.

    For centuries, American homemakers have been baking bettys with fall fruits.

    The recipe alternates layers of fruit with layers of sweetened buttered bread crumbs. In Colonial times, apples, which stored well, were the fruit most likely to be available into the cold months; and the bread crumbs made use of yesterday’s stale loaf. (Tip: Use challah or brioche for a more luxurious taste, whole wheat bread for an earthier flavor.)

    QVC’s Chef David Venable has added walnuts to the crumb layers of his recipe.

    He’s also added a second fall fruit: pears. You can add any second fruit to your betty, including persimmons, quince; other fresh fruits; even dried fruits.

    We tossed in some extra raspberries we had at hand. Otherwise, we always have a stock of raisins, dried cherries or cranberries (Craisins).

    Want something fancier? Serve the betty with fruit sauce, ice cream or whipped cream; or borrow some hard sauce from British desserts.
     
     
    RECIPE: APPLE-PEAR BROWN BETTY

    Ingredients For 9 Squares

    For The Breadcrumb Base

  • 4 cups French bread, cubed
  • 4 tablespoons butter, melted
  • 1/4 teaspoon cinnamon
  • 3 tablespoons light brown sugar
  • 1/4 cup walnuts, chopped
  • 4 tablespoons chunky applesauce
  •  
    For The Filling

  • 4 apples, peeled and sliced
  • 4 pears, peeled and sliced
  • 1/3 cup sugar
  • 1-1/2 teaspoons cinnamon
  • 1/4 teaspoon nutmeg
  • 1 teaspoon lemon juice
  • 3 teaspoons light brown sugar
  •  
    For The Drizzle

  • 1/2 teaspoon lemon juice
  • 3 tablespoons molasses
  • 3 tablespoons dark brown sugar
  • 2 tablespoons apple cider
  •  
    Preparation

    1. PREHEAT the oven to 350°F. Grease an 8″ x 8″ baking pan with nonstick food spray. Set aside.

    2. PREPARE the breadcrumb base: Pulse the cubed bread in a food processor until crumbly (the pieces do not need to be uniform in size). In a mixing bowl, stir together the breadcrumbs, melted butter, cinnamon, sugar, walnuts and applesauce. Set aside.

    3. PREPARE the filling: Toss together the apple and pear slices with the sugar, cinnamon, nutmeg, lemon juice, and brown sugar in another mixing bowl.

     
    4. ASSEMBLE: Fill the baking pan with a thin layer of the breadcrumb base, followed by a layer of the apple-pear mixture. Repeat this process again, reserving enough of the breadcrumbs to sprinkle on top as the last layer.

    5. PREPARE the drizzle: Combine the lemon juice, molasses, brown sugar and apple cider in a mixing bowl. Drizzle the mixturet back and forth across the filled baking pan. Place the baking pan in the oven for approximately 30–40 minutes, until the top has browned and the fruit is softened. Let cool on a wire rack until set. Portion and serve.

     
    APPLE BETTY HISTORY

    Once apples took root in America—literally, rootstock was brought over from England—they became a major supply of fresh fruit: for snacking, for baking, for sweetening savory dishes.

    The betty originated in colonial times, when apples were often used to sweeten dishes.
    The first known reference to a “brown Betty.” appears in the 1864 Yale Literary Magazine. Brown was written in lowercase and Betty was capitalized. The term was in quotes, implying, per one source, that it was not yet a fully established term. It was mentioned in an article of foods to give up during athletic training [source].

    Was there a real Betty? It’s a safe guess that this variation on the cobblers, crips, grunts and slumps of the world was someone named Betty, who thought to use bread crumbs instead of the dough, oats, streusel, and other toppings used in related desserts.

    In 1890, Brown Betty was part of the winning essay for the $500 American Public health Association Lomb prize on practical, Sanitary, and Economic Cooking Adapted to persons of Moderate and Small Means. This was part of a series of menus to feed a family on thirteen cents a day; it became a book of the same title by Mrs. Mary Hinman Abel.

    Mrs. Abel may have carried the recipe into use the New England Kitchen, an experimental Boston restaurant aimed at “improving” the food choices of the poor.

    Food trivia: Poor no more, Apple Brown Betty was one of the favorite desserts of Ronald and Nancy Reagan in their White House years.
     
     
    RECIPE: HARD SAUCE

    Ingredients For 1-1/3 Cups

  • 1 cup sugar
  • 2 tablespoons all-purpose flour
  • 1/4 teaspoon ground nutmeg
  • Dash ground allspice
  • 1 cup cold water
  • 2 tablespoons butter
  • 1 teaspoon vanilla extract
  • 1/4 to 1/2 teaspoon rum extract (or actual rum)
  •  
    Preparation

    1. COMBINE the sugar, flour, nutmeg, allspice and water in a small saucepan; stir until smooth. Bring to a boil; cook and stir for 2 minutes or until thickened.

    2. REMOVE from the heat; stir in the butter and extracts. Refrigerate any leftovers.
      

    Comments off

    GLUTEN-FREE PRODUCT: Scratch & Grain Baking Kits Are Not Just For Kids

    Gluten-free writer Georgi Page-Smith writes that Scratch & Grain Baking Kits are not “just for kids.” While the line was created so that children could easily make a batch of cookies or brownies, the quality is so fine that households with no kids can just dig in.

    During a recent cornbread jag I requested a sample of Scratch & Grain’s organic and gluten free Honey Cornbread Kit, in order to broaden my horizons and see if there was anything I was missing about the corn arts.

    Little did I know I was about to enter a realm of flavor and texture that was heretofore undiscovered within my experience.

    Scratch & Grain specializes in baking kits—conventional and gluten-free mixes for cookies, cornbread, cupcakes and more—which allow the user to compose, mix and bake their own treats from pre-portioned, labeled and numbered ingredients. This system accomplishes a few things:

  • Your home is infused with the aroma of fresh-baked yumminess.
  • For busy families, Scratch & Grain provides a way to teach kids (or spouses, for that matter) about the art of baking sans drama or anxiety.
  • It’s economical, sparing the need to load up on costly organic flours and ingredients that enhance the recipe but that are unlikely to be used by their sell-by date. (I’m addressing this in part to the circa-1972 can of cream of tartar that my mother has been saving to hand down to her grandchildren.)
  •  
    But all of this convenience and efficiency would be pointless if the goods themselves were not ravishingly delicious.

    The gluten-free Cornbread, Snicker Doodle* and Cheesecake Brownie Kits that I tested produced tender, delicious results that I am confident will apply across the whole line.
     
     
    HONEY CORNBREAD KIT

    Unpacking the Honey Cornbread Kit was in itself a bit of fun. All of the ingredients are neatly packaged in clear sachets, with handy numbers on each one indicating the order in which they should be added. Helpful tips on the back of the box provide for variations and suggest add-ins.

    The Cornbread Kit contains a not-unreasonable level of sugar per serving (13g), but I am ever-wary of sugar and a bit of a purist. Following a tip on the box, I happily left out most of the cane sugar but used all of the honey granules and brown sugar.

    The results were quick to come, making me look like a domestic goddess. They were so deliciously tender, with a buttery, toasty flavor, that my spouse (normally a bit austere in his diet) ate giant pieces of it warm and then stealthily battled me for the last wedges.

    I did not use all the cane sugar provided in the kit, but I believe that would have yielded the sweeter, moister experience that is pleasing to many.

    The beauty of this cornbread is that it is appropriate for breakfast, as a mid-afternoon snack, or with a bowl of greens for dinner. This is a recipe I recommend trying, whether you are a cornbread aficionado or someone who is cornbread-curious.

    EDITOR’S NOTE: You can also add some minced jalapeño to a cornbread mix. It’s our favorite way to enjoy it: less sugar and a bit of heat.
     
     
    SNICKERDOODLE COOKIE KIT

    I will admit I have never been a huge fan of the cinnamon-sugar cookies known as snickerdoodles, though I acknowledge their place in the cookie pantheon.

    But Scratch & Grain’s organic, gluten-free Snicker Doodle Kit* won me over. The robust aromatics of the cinnamon and the addition of flax seeds into the dough delivered a rich, spicy and substantial cookie that would please children and adults.

    The dough again had a buttery, caramelly flavor that made a good vehicle for the cinnamon sugar coating. The baked cookies had an ever-so-delicate frill of crunchy caramelization around the edges, adding a new dimension to the snickerdoodle formula.

    Snickerdoodles tend to be fall cookies, perfect for a with apple cider or warm mulled cider, or with tea—plain black or spiced.

    This is the cookie to offer company for an old-fashioned welcome. It will remind guests of their favorite granny—even if she didn’t bake—it’s that cozy and comforting.

    I also found this kit to be a great base for other add-ins. For me it was ground black sesame seeds, but chocolate chips would create a nice fusion, too.

    See the history of snickerdoodle cookies below.

       
    Gluten Free Cornbread Mix
    [1] Gluten-free cornbread, packaged with honey granules that you can use in the bread dough or to make honey butter.

    Gluten Free Snickerdoodle Cookie Mix
    [2] Snicker Doodle Cookie Kit, one of three gluten-free cookie varieties.
    Scratch & Grain Chocolate Truffle Cookies Gluten Free
    [3] Chocolate Truffle Cookies, the gluten-free line’s best seller (photos #1, #2, and #3 courtesy Scratch & Grain).

    Cheesecake Brownie

    [4] There’s also Cheesecake Brownies Kit. This photo is from The Cozy Cook, who offers her own recipe.


    CHEESECAKE BROWNIE KIT

    While the other kits struck a somewhat virtuous note, the Cheesecake Brownie kit was, in a word, decadent. The quality of the chocolate was elevated and not too cloyingly sweet. Even with my omission of half of the bag of chips, it delivered a rich, luxurious wave of chocolate flavor.

    The cream cheese streaks made a nice counterbalance to the intensity of the chocolate and coaxed me into enjoying a combination that I wouldn’t normally try.

    I do think you could leave the egg yolk out of the cream cheese streak and not miss it. The whole concoction stayed moist into the next day, but they may not last that long in your household!
     
    If I had one reservation about Scratch & Grain it would be the moment that I had to toss the adorable little plastic bags, now emptied of their ingredients, into the trash. I would be quite content to see the company use paper for certain ingredients, or something more recyclable.

    Scratch & Grain’s gluten-free line will keep me happy for quite some time, and I have no hesitation recommending any of their products for superior, wholesome flavor and ease of use.

    Products are available from ScratchandGrain.com and in certain Whole Foods markets. Check the the store locator.

    —Georgi Page-Smith
     
     
    EDITOR’S NOTE: You can buy a sampler of all four gluten-free mixes, for yourself or as a gift for a GF loved one.


    Snickerdoodles

    recipe for a conventional cookie (not gluten-free) from Cookies And Cups.


    THE HISTORY OF SNICKERDOODLE COOKIES

    A snickerdoodle is a drop cookie made with butter, sugar, flour, baking soda and cream of tartar†, and rolled in cinnamon sugar. The classic recipe creates a chewy cookie with grooved lines on the surface.

    “Though some prefer to omit the cream of tartar in snickerdoodles,” says the Huffington Post, “purists will contest that it’s not the classic cookie without it—more like a plain cinnamon sugar cookie.”

    And without leavening, it’s as flat as a gingersnap—which may be what some people are looking for (we prefer the puffiness from the cream of tartar).

    Some recipes use eggs for a richer, moister cookie; some use oil instead of butter. Recipes can produce soft or crisp cookies.

    According to an extensive article on Bakemore | WordPress, the earliest known print reference dates 1889. The cookies became very popular in New England and Pennsylvania during this time.

    What about the name?

  • Some sources say the name is of German origin, derived from Schneckennudeln, referring to cinnamon-dusted sweet rolls. But the snickerdoodle is an American invention.
  • It may make more sense that the Pennsylvania Dutch‡, who spoke German, transposed schneckennudeln to snickerdoodle, a fun-sounding name in the U.S., home of Yankee Doodle.
  •  
     
    CHECK OUT THE DIFFERENT TYPES OF COOKIES IN OUR COOKIE GLOSSARY.
     
    ________________

    *Scratch & Grain uses two words: snicker doodle. The conventional spelling is one word, snickerdoodle.

    †The purpose of cream of tartar, a mild acid, is to react with the baking soda to leaven the cookie (cause the dough to rise).

    ‡ are a cultural group formed by early German-speaking immigrants to Pennsylvania and their descendants. Most emigrated to the U.S. from Germany or Switzerland in the 17th and 18th centuries.
      

    Comments off

    The Nibble Webzine Of Food Adventures
    RSS
    Follow by Email


    © Copyright 2005-2024 Lifestyle Direct, Inc. All rights reserved. All images are copyrighted to their respective owners.