THE NIBBLE BLOG: Products, Recipes & Trends In Specialty Foods
Also visit our main website, TheNibble.com.
|
March 24, 2013 at 8:11 am
· Filed under Recipes, Tip Of The Day, Vegetables-Salads-Herbs
|
|
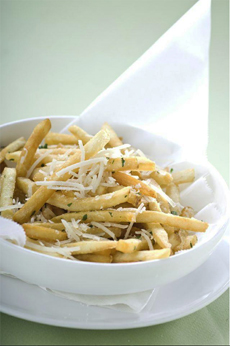
Irresistible truffle fries. Photo courtesy Arch
Rock Fish Restaurant | Santa Barbara.
|
|
There’s a neighborhood restaurant in New York City where steamed mussels are served in 20 different types of broth. Much as we’d like to work our way down the menu, we can never stop ordering our favorite: Thai mussels in a curry coconut broth flavored with lemongrass, kaffir lime, coriander, lime, ginger and garlic.
But the feast doesn’t end there: The must-haves along with this bowl of heaven include a fine craft IPA beer and a cone of truffle fries.
Ah, the truffle fries: so simple, so divine. So today’s tip is: Turn your French fries into truffle fries. All you need is some truffle oil.
The regular hand-cut fries at that restaurant are $6; with a sprinkle of truffle oil and Parmesan cheese the price almost doubles, to $11. At home: less than $1 per serving.
The following recipe is courtesy of a restaurant on the opposite coast: Arch Rock Fish in Santa Barbara, California, and its chef, Scott Leibfried.
|
|
TRUFFLE FRIES RECIPE
Ingredients
4 Idaho or russet potatoes
1 tablespoon black truffle oil or white truffle oil
Peanut oil for frying
1/2 teaspoon salt
Fresh parsley, finely chopped
Optional: grated Parmesan cheese
Preparation
1. CUT potatoes lengthwise into thin strips, about ¼ inch wide. Fry the potatoes in peanut oil until golden brown (see tips below).
2. SEASON with salt and truffle oil.
3. TOSS with parsley.
|
|
POTATO-FRYING TECHNIQUE
We actually used our Actifry for this recipe—it requires only one tablespoon of frying oil! But for making French fries the old-fashioned way:
1. SOAK the potatoes in ice water for an hour, drain, and pat completely dry between paper towels. You can skip this step, but it makes the fries crisper.
2. PREPARE surface for draining by lining two baking sheets or large plates with paper towels.
3. SELECT a large, deep pot and attach a candy thermometer with clip (the tip of the thermometer must not touch the bottom of the pot). Fill with 3 inches of peanut oil and heat over medium heat until temperature reaches 325°F.
4. FRY potatoes (in batches) for 2-3 minutes until golden, stirring occasionally. Remove to paper towels to drain. and heat the oil to 375°F.
6. RE-FRY potatoes For extra crispiness. Raise the temperature of the oil to 365°F and refry potatoes for 1-1/2 to 2 minutes per batch. Drain on fresh paper towels.
|
|

Black truffle oil from La Tourangelle. Photo by Katharine Pollak | THE NIBBLE.
|
7. TRANSFER fries to serving dish. Sprinkle with salt, toss with truffle oil, garnish with parsley and serve.
OTHER USES FOR TRUFFLE OIL
Now that you own a bottle, don’t let it languish on the shelf. Use it up while the truffle flavor and aroma are strong. But don’t heat it: Heat dissipates both flavor and aroma. Drizzle truffle oil on foods or otherwise add to:
Carpaccio or sashimi (with shaved Parmesan cheese)
Finishing oil on duck breast, filet mignon, grilled fish, lamb
Homemade potato chips (recipe)
Pasta and risotto (substitute all or part of the olive oil)
Popcorn (also add grated Parmesan cheese)
Macaroni and cheese (a favorite!)
Mashed potatoes (a favorite!)
Mushroom pizza
Mushroom soup (garnish)
Roasted or grilled vegetables
Sautéed mushrooms
Scrambled eggs
Vinaigrette for a sliced mushroom salad with arugula and shaved fennel
ALL ABOUT TRUFFLES
Here’s everything you need to know about truffles: the types of truffles, how to buy, store and cook truffles, and much more.
HOW MANY TYPES OF POTATOES HAVE YOU HAD?
Check out our Potato Glossary: the history of the potato and the different types of potatoes.
|
|
|
Permalink
|
|
March 23, 2013 at 11:40 am
· Filed under Cookies-Cake-Pastry, Gluten-Free
|
|
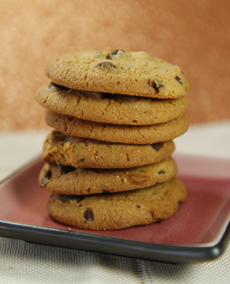
A stack of gluten-free chocolate chip cookies.
Photo by Elvira Kalviste | THE NIBBLE. |
|
Gluten-free artisan bakeries typically pop up when a family member has gluten intolerance. In this case, its husband and co-founder of Lucky Spoon Bakery in Salt Lake City, Jim Schulte.
Both Jim and wife Pam have MBAs and years of business experience; but Pam also had serious baking skills. So she set out to re-invent gluten-free cookies and muffins that were every bit as tasty as their fully glutenized counterparts.
Lucky Spoon Bakery has succeeded in changing the way people think about gluten-free baked goods. The products are moist, fresh and delicious.
“Gluten-free has always been code for ’taste-free’ or ‘you can eat it but you probably won’t like it,’” says Jim. But, as has been proved by other artisan bakers of gluten-free goods, if you spend enough time, money (on the best ingredients) and love, you can produce bread, cakes, cookies, muffins and other products that everybody loves to eat.
|
To us, the compliment we bestow is, “No one would know it’s gluten free.”
|
|
Gluten-Free Cookies
Instead of wheat flour, the cookies are made with a blend of white rice flour, potato flour and almond meal; plus sugar, butter, eggs, quality chocolate or peanut butter, vanilla and other ingredients of good cookies.
Chocolaty Chip Cookies
Perfect Peanut Butter Cookies
Peanut Butter Chocolaty Chip Cookies
Simply Sugar Cookies
Gluten-Free Muffins
?White rice flour and potato flour instead of wheat flour. As with the cookies, sugar, eggs, butter and quality flavorings combine to make moist, tasty muffins:
Cinnamony Streusel Muffins
Lemonlicious Muffins
Totally Maple Pecan Muffins
Utterly Almond Muffins
|
|
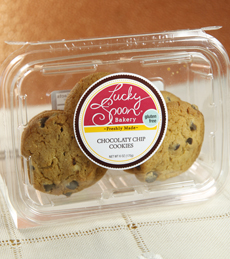
Lucky Spoon Bakery is a find for the gluten-free nibbler.Photo by Elvira Kalviste | THE NIBBLE.
|
|
To find Lucky Spoon products, check the store locator on the company website.
|
|
|
Permalink
|
|
March 23, 2013 at 8:48 am
· Filed under Desserts, Recipes, Tip Of The Day
|
Chocolate whipped cream is a delicious
change of pace. Photo courtesy
VillageInn.com. |
|
Today’s tip is for chocolate lovers: Make chocolate whipped cream. It takes an extra step, but the novelty—and the delectable flavor—are worth it.
Use chocolate whipped cream to garnish a cake or pie, frost a cake or cupcakes or use as a filling for cream puffs and other pastry. Top other desserts, hot chocolate or coffee.
This recipe can be made up to 2 days in advance and kept, tightly covered, in the refrigerator. The recipe makes about 1-1/2 cups of whipped cream.
CHOCOLATE WHIPPED CREAM RECIPE
Ingredients
4 ounces bittersweet chocolate, chopped
1 cup whipping cream
2 tablespoons confectioners’sugar
|
Preparation
1. PLACE chopped chocolate in a medium bowl.
2. COMBINE cream and sugar in a small saucepan. Bring to a boil over medium heat
3. POUR boiling cream over the chocolate; stir until smooth and the chocolate is melted. Cover and refrigerate for 4 hours, until thoroughly chilled.
4. TRANSFER to a large bowl. Beat until the mixture develops soft peaks, or to the desired consistency for spreading or filling. Refrigerate for at least 1 hour before using.
MORE FLAVORED WHIPPED CREAM RECIPES
Try these flavored whipped cream recipes, including Bourbon Whipped Cream, Five Spice Whipped Cream, Lavender Whipped Cream, Holiday Spice Whipped Cream, Salted Caramel Whipped Cream and Savory Whipped Cream.
|
|
|
Permalink
|
© Copyright 2005-2026 Lifestyle Direct, Inc. All rights reserved. All images are copyrighted to their respective owners.