THE NIBBLE BLOG: Products, Recipes & Trends In Specialty Foods


Also visit our main website, TheNibble.com.

JULY 4th: Red Velvet Cupcakes Recipe In Red, White & Blue

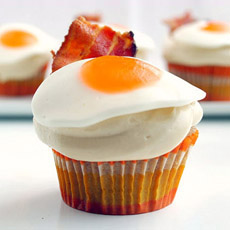
Red velvet, white frosting, blue berries.
Photo courtesy Wholesome Sweeteners.


These festive July 4th cupcakes combine popular red velvet cake with red and blue berries and white frosting (cream cheese!) Thanks to Wholesome Sweeteners, purveyors of organic and Fair Trade sugar, for the recipe. It makes 24 cupcakes.

JULY 4TH CUPCAKES: TAKE A BITE OF RED, WHITE & BLUE

Ingredients

  • ½ cup (1 stick) unsalted butter, room temperature
  • 1½ cups sugar
  • 2 eggs, room temperature
  • 2-1/3 cups all-purpose flour
  • 2 tablespoons cocoa powder
  • 1 teaspoon baking soda
  • 1 teaspoon baking powder
  • ½ teaspoon sea salt
  • 1 cup buttermilk*
  • 1 to 1½ tablespoons red food coloring (depending on how vivid
    you prefer your red)
  • 1 teaspoon vanilla extract
  • Cream cheese frosting (recipe)
  • Berries or chocolate morsels for topping
  •  

    *You can make your own buttermilk by adding a tablespoon of lemon juice or distilled white vinegar to milk and letting it stand for about 10 minutes. If you buy a quart, check the bottom of this article for other ways to use buttermilk.

    Preparation

    1. PREHEAT. Preheat the oven to 350°F. Cream the sugar and butter with an electric mixer on medium speed until light and fluffy, about 3 minutes. Scrape the sides of the bowl frequently throughout this recipe’s preparation.

    2. COMBINE. Add the eggs, one at a time, and beat until each is fully incorporated. Be sure to scrape down the sides of the bowl to ensure even mixing. In a large bowl, sift together the dry ingredients. Resift twice, making sure that the dry ingredients are well blended.

    3. BLEND. In another bowl whisk together the buttermilk, red food coloring and vanilla extract. Add ¼ of the dry ingredients to the creamed mixture and beat on low until just blended; then add a third of the buttermilk mix. Being careful not to overmix. Add another ¼ of the dry mix, then 1/3 of the wet mix, until all are incorporated.

    3. BAKE. Place cupcake papers into a cupcake/muffin tin and fill each about 1/2 to 3/4 full with the batter. Bake for 15 minutes, then rotate the pan and bake for another 3-7 minutes or until a toothpick comes out clean.

    4. COOL. Allow to cool for a minute or two in the pan, then transfer the cupcakes to a wire rack to cool completely.

    5. FROST. Frost with cream cheese frosting. Sprinkle with fresh red and blue berries for July 4th. For Valentine’s Day, dust with cocoa powder or top with a chocolate kiss or other chocolate garnish.

    Makes about 2½ dozen cupcakes–depending on the size of the cupcakes, of course.
     
    OPTION FOR VALENTINE’S DAY

    Use a heart-shaped muffin pan.

    Recioe © 2011 Wholesome Sweeteners.


    Comments off

    TIP OF THE DAY: Cooking Fish

    On Saturday we provided fish-buying tips from chef Scott Leibfried of Arch Rock Fish restaurant in Santa Barbara.

    Today, Chef Scott provides some fish-cooking tips to turn home cooks into chefs de poisson.
    INITIAL DECISIONS FOR COOKING FISH

  • Portion Size. A good portion size for a fish is six to seven ounces.
  • Cooking Method. You can bake/roast, grill, poach, sauté or steam the fish. Once you decide on a preparation and a recipe, check the cooking instructions and make sure you understand them.
  • Skin On Vs. Skin Off. Some people love to eat the skin, some don’t. It’s your choice. But when fish is cooked properly, the skin crisps up in a most delicious way. Cooking with the skin on also keeps the fish moister and enhances the flavor.
  • To Scale Or Not To Scale. Depending on the fish, if you’re cooking skin on, you might need to scale it. Scaling is simple: Place the fillet or whole fish skin side up and use a fish scaler or the back of a knife to remove the scales. Scrape from the tail side towards the head. Wipe the fish with a towel when you’re done.
  •  

    Olive oil poached salmon, skin off. Here‘s the recipe. Photo courtesy Pom Wonderful.


    BREAKING DOWN A FISH

    If you like to wield a knife, you can save money by purchasing a whole fish rather than fillets.

    There are two groups of fish: round fish (bass, salmon, snapper) and flatfish (flounder, halibut, sole). The different shapes mean different skeletal structure. Chef Scott explains how to break down the more popular round fish:

  • Use a knife that is longer than the width of the fish. Chef Scott likes using a chef’s knife, an eight-inch blade.
  • Cut down to the backbone of the fish just behind the gills; don’t remove the head.
  • Turn the knife toward the tail using smooth strokes. You should cut from the head to the tail and be parallel to the backbone. Cut all the way through. Slice into fillets.
  • If there are rib bones in the fillets, use a boning knife and cut them off. Use a tweezers to pull individual bones from the flesh.
  • The finished product should be a clean fillet with skin on.
  •  


    Grilled salmon, skin on, with sautéed black
    olives. Photo courtesy Payard | New York
    City.
      GRILLED SNAPPER VERACRUZ: AN ADVANCED RECIPE

    Ingredients For 4 Servings

  • 4 six-ounce snapper fillets, skin off
  • 6 ounces onion, diced
  • 4 ounces garlic, sliced
  • 1 lemon
  • 1 jalapeño, seeded and minced
  • 1-1/2 pounds tomatos, diced
  • 16 pimento stuffed green olives, halved
  • 1 sprig fresh thyme
  • 3 tablespoons fresh cilantro
  • Salt and pepper
  • Extra virgin olive oil
  •  
    Preparation: Fish

    1. TURN grill on; you want it to be fairly hot, so the fish cooks quickly. Oil the grill with a cloth: This avoids sticking and breaking.

    2. OIL the fillets and season with salt and pepper. Don’t drench the fish with oil, just brush it. Otherwise, the grill may flare up from the excess oil. Place the fillets on the grill and leave them there. Don’t play with the fish; let the grill marks set in.

    3. FLIP fish with a spatula once, halfway through cooking. Be gentle: Fish is delicate, unlike a burger or chicken. If the grill is hot enough and oiled correctly, the fillets should neither stick nor break. This, of course, takes practice!

    4. COVER and let the fish finish grilling. The process shouldn’t take longer then 8 minutes. The fish will continue to cook when taken off the grill. If undercooked you can return it to the grill (in restaurants they finish it in the oven). But try the undercooked fish: The flavor is more elegant and never “fishy.” The greatest sin is dry, overcooked fish.

    5. ADD sauce and serve. Plate it chef-style: Place the fish atop a bed of starch (noodles, potatoes, rice) or green vegetables (kale, spinach, zucchini) and drizzle the sauce around the circumference of the plate.
     
    Preparation: Sauce

    1. COMBINE onion, garlic and jalapeño in a pan with oil; sweat them over medium high heat.

    2. ADD tomatoes, olives, capers, thyme and cilantro.

    3. SEASON with salt and pepper.

    4. GARNISH with cilantro; or for something more special, fried capers.

     
    Chef Scott likes to serve this dish with a sweet potato hash.
     
    FILET VS. FILLET

    Filet (fee-LAY) is French, fillet (FILL-let) is British. They mean the same thing: a boneless cut or slice of fish or meat.


    Comments off

    TIP OF THE DAY: Sorbet Cocktail For Dessert

    How can you make a sophisticated dessert in less than five minutes? Cleanse the palate after a rich dinner? Serve something cool and refreshing? Combine dessert with an “after dinner drink?”

    Serve a sorbet “cocktail” or mocktail, which in its simplest version combines a scoop of sorbet with sparkling wine or ginger ale.
     
    You can use spirits, too, and weight the recipe toward either more sorbet or more alcohol.

    A sorbet cocktail is an ideal use for “sherbet Champagne” glasses.

    Purportedly designed by Marie Antoinette, who had them molded after her breasts, the wide mouth glass is not appropriate for sparkling wine—it lets the bubbles escape that much more quickly.

    But they’re just fine for serving sorbet, fruit cocktail and other foods, or this cocktail.


    A sorbet cocktail is an easy, delicious and refreshing dessert. Photo courtesy Talenti Gelato.

     
    Optionally, use a Martini glass, a Margarita glass or a wide bowl wine glass. If you have room in the freezer, chill the glasses before assembling the drink.

    TIP: Instead of using one flavor of sorbet, you can use mini scoops of two or three different flavors.

    Add the alcohol first, then the sorbet, because pouring liquid over the sorbet balls will make them melt faster and diminish the initial appearance of the drink.
     
     
    RECIPE #1: SORBET COCKTAIL WITH SPARKLING WINE

    Ingredients Per Cocktail

  • 1 scoop sorbet (we like raspberry or passion fruit), size based on glass
  • Chilled Champagne, Prosecco or other sparkling wine
  • Optional garnish(es): berry purée, fresh berry, mint leaf, lime wheel, etc.
  •  
    Preparation

    1. SCOOP balls of sorbet and reserve in freezer until ready to use.

    2. POUR sparkling wine into glass. Gently add sorbet ball. Garnish as desired and serve immediately with a dessert spoon.


    You can use smaller scoops of sorbet in
    different flavors. Photo courtesy
    EverydayCelebrating.com.
      RECIPE #2: SORBET COCKTAIL WITH VODKA OR OTHER SPIRIT

    This recipe uses higher proof spirits (40% A.B.V.) instead of the much lower in alcohol sparkling wine (5% to 7% A.B.V.).

    So unless you’re a liquor-loving crowd, dilute the spirit with juice instead of using it straight. Scroll down for an explanation of A.B.V. versus proof.
     
    Ingredients Per Cocktail

  • 1 scoop lemon or orange sorbet, size based on glass
  • 1 shot or more vodka, tequila or gin
  • 1/2 cup lemonade or orange juice
  • Optional garnish(es): lemon/orange curl and/or zest, berry, mint leaf, lime wheel, etc.
  •  
    Preparation

    1. SCOOP balls of sorbet and reserve in freezer until ready to use. Prepare citrus curls and zest.

     
    2. COMBINE spirit and juice and chill until ready to serve. Assemble (liquid first, then sorbet and garnish) and serve immediately with a dessert spoon.

    Be prepared: Guests may want “seconds.”
     
     
    A.B.V. VERSUS PROOF

    A.B.V., alcohol by volume, is the percentage of alcohol in any product. Wines typically vary from 10% to 14% A.B.V.; fortified wines like port can have 18% A.B.V. Beer can range from 3.5% to 9% or higher, depending on the style and the brewing process. “Proof” is double the A.B.V. Most spirits are distilled to 40% A.B.V., 80 proof (some are higher, some are lower).

    Why is it called “proof?” Beginning in the 1700s until January 1, 1980, the U.K. measured alcohol content in terms of “proof spirit,” defined as a “spirit with a gravity of 12/13 that of water, or 923 kg/m3, and equivalent to 57.15% A.B.V.” The term originated when payments to British sailors included rations of rum.

    To ensure that the rum had not been watered down, it was “proved” by dousing gunpowder with it and then testing to see if the gunpowder would ignite. If it did not, then the rum contained too much water and was considered to be “under proof.” Gunpowder would not burn in rum that contained less than approximately 57.15% ABV. Therefore, rum that contained this percentage of alcohol was defined to have “100° [one hundred degrees] proof.” (Source: Wikipedia.)
     
     
    FIND MORE RECIPES AND INFORMATION IN OUR COCKTAILS & SPIRITS SECTION and by pulling down the drop down menu at the right.


    Comments off


    © Copyright 2005-2026 Lifestyle Direct, Inc. All rights reserved. All images are copyrighted to their respective owners.