THE NIBBLE BLOG: Products, Recipes & Trends In Specialty Foods


Also visit our main website, TheNibble.com.


TIP OF THE DAY: Dessert Tea


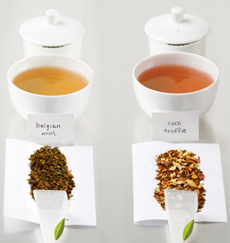
Have some dessert tea: with dessert or
instead of it. Photo courtesy TeaForte.com.


Many people enjoy a cup of tea with dessert. But what exactly is dessert tea?

Dessert tea is a relatively new addition to the tea repertoire. It sprouted up with the green tea and white tea push a decade ago. Many non-tea drinkers wanted the antioxidant benefits of tea but didn’t like the taste of plain green and white tea (which don’t taste great with milk and sugar).

So tea blenders started blending green tea, and then white tea, with any number of ingredients that provided flavor and a hint of sweetness: fruits and nuts; butterscotch, caramel and chocolate extracts; flowers (hibiscus, jasmine, rose, saffron); plus cinnamon, mint, vanilla and other flavorings.

At a certain point, one producer saw these nearly-calorie-free flavored teas as appropriate for dessert or as a guilt-free sweet beverage; and “dessert teas” were born.

 
Dessert teas are made with black, green, oolong, puer and white teas, and rooibos (herbal “red” tea). You can drink them with dessert, instead of dessert, or at any time of day, plain or with milk and/or sugar.

Flavored Teas Are As Old As “Tea”

Dessert teas are seen as expanding the tea-buying market by appealing to the non-tea-drinker with mass-appeal flavors common in soft drinks and flavored lattes. The concept is not new—only the name and the marketing of the tea for “dessert.”

Since the dawn of man-made fire and vessels, teas were steeped from many barks, berries, leaves and roots. Before tea arrived in Europe in the 17th century (coffee also arrived then, in 1615, along with hot chocolate), this is what was drunk.

Today, “tea” refers specifically to brewed leaves of the Camellia sinensis plant, or tea bush. “Herbal tea” is called a tisane in the industry (the word originated with the Greek word ptisane, a drink made from pearl barley).

More about tea.


Comments off

PASSOVER: Gluten-Free Matzo

Millions of Jews will celebrate a week of Passover beginning Friday, April 6th. The holiday commemorates the biblical story of the Exodus, in which the ancient Israelites were freed from slavery in Egypt, after God inflicted the ten plagues upon the Egyptians.

As the story goes, the Jews had to leave Egypt immediately. They gathered up possessions and livestock but could not wait for the bread dough to rise, resulting in matzo, an unleavened flatbread. Thus, during the week of Passover, no leavened bread is eaten; only matzo (also spelled matzoh, matza and other variations).

So what if you want to celebrate Passover with matzo, but have gluten sensitivities?

Two brands are at the ready:

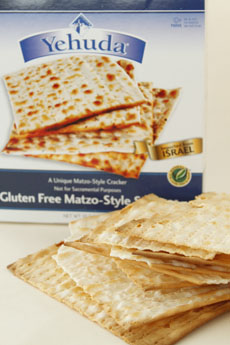
  • Yehuda Matza, imported from Israel, is certified gluten-free. It’s made from tapioca flour, potato starch, potato flour and egg yolks. It looks and crunches like conventional matzo, and the flavor is more than satisfactory. In fact, it has a bit of salt and even more flavor than wheat matzo, which is famously bland. The only nit: It’s more fragile and the boards break too easily. It has a two-year shelf life. Buy it online.
  •  
    Gluten-free matzo. Photo by Elvira Kalviste | THE NIBBLE.
  • Shemura Oat Matzo is made by a London rabbi, from gluten-free oat flour and water. We haven’t tasted it. It too is available online.
  •  
    Seder Idea

    The Passover seder, the ritual feast celebrated on the first two nights of the holiday, is accompanied from beginning to end by a reading of the Haggadah (“telling”).

    This year, participants at our seder are coming as witnesses of the Exodus. Each of us will provide a few minutes of insight into the desires, hopes, frustrations, fears and domestic lives of our characters. Participating will be will be Moses, Pharaoh, a nameless Jewish slave and an Egyptian, along with Rabbi Elazar ben Azariah, a first century scholar who appears giving commentary in the Hagadah.

    We are going as a baker, faced with feeding the exodus masses without the time to leaven the bread. The result: matzo.


    Comments off

    TIP OF THE DAY: Potato Croquettes Turn Ordinary Potatoes Into Treasure-Filled Treats


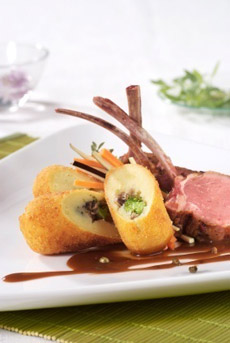
    Stuffed potato croquettes. Photo by AJA
    Photo | IST.
      Last night, Chef Johnny Gnall made potato croquettes for dinner. He liked them so much, he made them a Tip Of The Day. His report follows. If you have questions or suggestions for tips, email Chef Johnny.

    Potatoes are a food known for their versatility, a good staple to have around. They pair well with virtually any protein, from ribeye to halibut, and can be cooked however you like: boiled, braised, fried or roasted.

    But beyond their role as a go-anywhere side, these ubiquitous tubers can be made into a dough.

    You’re probably familiar with gnocchi, the Italian dumplings whose dough is made up of potatoes and flour. But did you know you that can hold the flour (great for those who want to avoid gluten) and create a dough out of just potatoes?

    With a little patience and bit of whatever ingredients you have lying around, you can turn simple boiled potatoes into stuffed potato croquettes, with the crunch of fries, the softness of mashed potatoes and a delicious “surprise.”

     
    They impress when served with a special-occasion main dish such as rack of lamb, and they’re also a treat with everyday meals.

    How To Make Potato Croquettes

    1. Peel the potatoes. Figure that one large russet potato will give you roughly two croquettes. Russets are tried and true for this recipe, but there’s no reason you can’t use whatever potatoes you have lying around (check out the different types of potatoes). Once your potatoes are knife-tender (meaning they are soft enough to stick a knife into with no resistance), run them through a food mill, just as you would if you were going to make mashed potatoes.

    2. Put the mashed potato “fluff” back into a pot. Continue to cook for another few minutes at medium heat to eliminate as much moisture as you can. Stir constantly to prevent the potatoes from burning (lower the heat if you begin to see brown), but the more moisture you can take out now, the easier the next step will be.

    3. Shape the croquettes. Once you’ve dried out the potato fluff, cool it down just enough so that you can handle it without burning yourself (feel free to use gloves if you have sensitive hands). In the palm of a cupped hand, press about a half cup of potato fluff to form an open pocket roughly a half-inch thick. Gently press 2-3 tablespoons of filling into the pocket, then cover with more fluff. Use both hands to gently form the croquette into as even and round a shape as you can (perfect spheres are not necessary, and oblong or somewhat cylindrical shapes work well). Your finished product should be the size of a large egg.

    This technique will probably take a little bit of practice. The key is pressing hard enough to compact the croquette into a stable, solid piece, but not so hard that it cracks or squashes. Pay close attention to how the croquettes behave as you apply pressure, so that you can learn to squeeze them just right. If you ever made snowballs as a child, you’ll have a head start on this process!

    It may also help to work on a floured surface (all-purpose flour is ideal, but if you need to go gluten-free you can use rice flour), and use a bit of flour to keep your hands dry, in case there is excess moisture in the potato fluff. Just don’t go overboard and start smothering them in flour.


    4. Fry the croquettes. Once you have assembled the croquettes, fill a pot with frying oil high enough so that the croquettes can be completely submerged, plus about a half-inch more. (I prefer rice bran oil due to its high smoke point.) Heat the oil to around 375°F, then gently drop in the first croquette.

  • It’s always a good idea to do a tester when deep frying to help give you a sense of how long the process will take.
  • What you’re looking for is golden-brown and crispy all over the surface of your croquette, which will probably take between 3-5 minutes.
  • Once you’ve had a successful tester, fry 3-6 croquettes at a time; overloading the pot will drop your oil temperature, as well as make it hard to move your croquettes around without breaking them apart… so don’t do that.
  • Try to leave the croquettes alone for the most part, stirring gently every minute or so. When they’re golden-brown and crispy delicious, carefully remove them with a slotted spoon or a spider strainer, and rest them on paper towels.
  •  
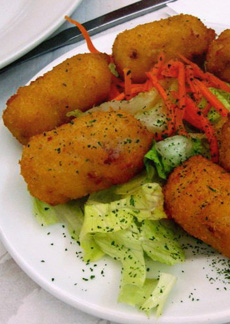
    Photo by Deramaenrama | Wikimedia.
  • Season the croquettes liberally with salt and a little pepper as soon as they’re on the paper towels; doing so while your croquettes are still hot will help the salt and pepper to stick.


    5. Serve immediately.
    Serve the croquettes as soon as possible so that you don’t lose the crispiness; eat carefully, as they’ll be piping hot! If you’re at a loss for filling inspiration, try one of the suggestions below; once you master the technique, however, you can fill your croquettes with whatever you want!

    Fill Your Croquettes

  • American. Start with a nod to the good old US of A! Try diced, cooked bacon, grated Cheddar cheese, sour cream and chopped chives.
  • French. Go French with sautéed mushrooms, caramelized onions, gruyere and fresh thyme.
  • Indian. Go Indian with golden raisins, chopped cashews, paneer (or fresh farmer’s cheese), sautéed spinach and half a teaspoon of curry powder.
  • Mexican. Go Mexican with cooked, crumbled chorizo, diced raw white onion, cojita cheese and fresh cilantro.
  • Spanish. Go Spanish with roasted red pepper, sautéed yellow onion & garlic, chopped almonds, a half teaspoon of paprika and a few drops of sherry vinegar.
  •  
    Find more of our favorite potato recipes.

    And let us know how you enjoy those croquettes.


    Comments off

    FOOD HOLIDAY: World Whisky Day, March 27th


    Enjoy a glass of Scotch: It’s World Whisky
    Day. Photo courtesy Chivas Regal.

      People across the world will raise a dram to Scotland’s national drink on March 27th, thanks to the efforts of a University of Aberdeen Student.

    Blair Bowman, 21, has established the first ever World Whisky Day.

    Unlike other drinks such as beer, tequila and vodka, whisky did not have its own dedicated holiday. When the enterprising young Scot discovered this, he quickly set about creating a “day” and a website, WorldWhiskyDay.com (which is “currently unavailable”). Some 125 events are registered in more than 30 countries.

    To celebrate World Whisky Day, have a shot, a whisky cocktail or this ice cream brownie sundae with Scotch caramel sauce. Here’s the recipe. You can also mix two tablespoons of whisky into a jar of warmed caramel or chocolate sauce.

     
    Can Anyone Establish A Holiday?

    In our free-speech society, anyone can declare anything they want. In order for it to get noticed outside the circle of one’s friends, however, broader awareness is required.

    There’s an official process for a “sanctioned” holiday. Here are the details, along with all the food holidays in the U.S. (To get the daily holiday, sign up at Twitter.com/TheNibble.)

    How Many Types Of Whiskey Have You Had?

    Whiskey is spirit made from a fermented mash of grain or malt, aged in barrels; the brown color comes from barrel aging. There are numerous types of whiskey—American (Bourbon, corn, Tennessee, rye), Canadian, Irish, Scotch and others. Each is distinguished by the type of grain (barley, corn, rye) used in the fermentation process, as well as the distinct distillation and aging process. The color comes from aging in wood barrels.

    Australia, England, Germany, Japan, New Zealand, Switzerland and Thailand, all strong markets for whiskey, now produce their own. Regardless of the variety or country of origin, a general rule of thumb is that all straight whiskeys must be aged at least two years in wood, generally oak. Each nation has its own rules and regulations about what constitutes a true whiskey.
    Check out our Whiskey Glossary for a quick review of whiskey types and terms.

    Whisky Vs. Whiskey

    In Ireland and the U.S., the word whiskey is spelled with an “e.” Brits, Scots and Canadians usually drop it. Interestingly, a 1968 directive of the U.S. Bureau of Alcohol, Tobacco and Firearms specifies “whisky” as the official U.S. spelling, but allows the alternative spelling, “whiskey,” which most U.S. producers (and we) prefer.

    Comments off

    TOP PICK OF THE WEEK: My Dad’s Gluten-Free Cookies

    Can’t have gluten? Or, like a growing number of Americans, are you choosing to avoid it?

    You can still enjoy bakery-style cookies, thanks to My Dad’s gluten-free cookie line.

    A broad selection of tasty cookies awaits—cookies so well crafted that most people will never know they’re gluten-free. We couldn’t tell when we first tasted the cookies!

    Read the full review, and treat yourself or a gluten-free loved one to some lovely nibbles.

    Find more of our favorite gluten-free products.

    How many different types of cookies are there?
    See our Cookie Glossary.

     
    Delicious and gluten-free! Photo by Elvira Kalviste | THE NIBBLE.


    Comments off

    The Nibble Webzine Of Food Adventures
    RSS
    Follow by Email


    © Copyright 2005-2024 Lifestyle Direct, Inc. All rights reserved. All images are copyrighted to their respective owners.