THE NIBBLE BLOG: Products, Recipes & Trends In Specialty Foods


Also visit our main website, TheNibble.com.


FOOD HOLIDAY: The History Of Chopsticks For National Chopsticks Day

January 6th is National Chopsticks Day, a reason to enjoy an Asian meal or two. We’re making homemade dumplings with this easy video recipe.

As we contemplate the history of chopsticks, the eating utensil of choice in Asia, let’s compare them to the history of the forks, knives, and spoons used at tables in the West.

This information is adapted from a wonderful exhibit, The History Of Eating Utensils, at the California Academy Of Sciences, much of which is available online.

No matter what the country of origin, utensils were historically made in costly materials for the wealthy, and humble materials for everyone else. Table utensils have been made from metals (gold, silver, and pewter—and today, stainless steel), bone, crystal, horn, ivory, lacquered wood, porcelain, pottery, shell, and wood. And today, plastic.
 
 
THE HISTORY OF CHOPSTICKS

Chopsticks were developed about 5,000 years ago in China. Long before chopsticks were used for eating, they were used for cooking—reaching into deep pots. Historians believe that people cooked their food in large pots which retained heat well. Hasty eaters then broke twigs off trees to retrieve the food. The twigs evolved into chopsticks.

It wasn’t until a population boom in the 4th century that chopsticks surpassed spoons as the utensil of choice in China.

By 400 B.C.E., a large and growing population taxed the fuel supply. Food was chopped into small pieces that cooked rapidly, requiring less fuel. Small pieces also meant that knives were not needed at the dinner table—a cost savings, among other benefits. By 500 C.E., chopsticks spread to present-day Vietnam, Korea, and Japan.

Chinese chopsticks, called kuai-zi (“quick little fellows”), are 9 to 10 inches long and rectangular with a blunt end. The English word “chopstick” was likely derived from the Chinese Pidgin English words “chop chop,” meaning fast.

In Japan, chopsticks are called hashi (the word means “bridge”). The earliest chopsticks used for eating looked like tweezers; they were made from one piece of bamboo that was joined at the top. Known as tong chopsticks, today they are used as “training chopsticks” for children. See them here. Japanese chopsticks differ in design from Chinese chopsticks: They are rounded and have a pointed end. They are also shorter—8 inches.


singapore-noodles-NewAsianCuisine
[1] Singapore Hokkien noodles (photo © New Asian cuisine [now closed]).

Ramen & Chopsticks
[2] Fresh ramen at Ippudo | NYC (photo © Ippudo).

 
Proper Use Of Chopsticks

  • Chopsticks are traditionally held in the right hand, even by left-handed people. This practice prevents a left-handed user from accidentally elbowing a right-handed seated next to him/her.
  • It is a huge breach of etiquette to impale a piece of food with a chopstick.
  •  
     
    THE HISTORY OF FORKS

    Forks trace their origins back to the time of the Greeks. The original forks were large service forks with two tines, to aid in the carving and serving of meat. That design survives today in carving forks.

    By the seventh century C.E., smaller forks for individual use appeared in royal courts of the Middle East. They spread to use by the wealthy in Byzantine Empire*; in the 11th century, a Byzantine wife of a Doge of Venice brought forks to Italy. The Italians, however, were slow to adopt their use. Forks were not widely adopted until the 16th century.

    In 1533, forks were brought from Italy to France by Catherine de Medici, the bride of the future King Henry II. The French, too, were slow to accept forks, thinking them to be an affectation.

    An Englishman named Thomas Coryate brought the first forks to England from Italy, in 1608. The English ridiculed forks as being effeminate and unnecessary. “Why should a person need a fork when God had given him hands?” was a refrain. Yes, it wasn’t all that long ago that even “civilized” people ate with their hands, spoons, impaled their food on knives, or used bread to scoop it up.

    But by the mid-1600s, eating with forks was considered fashionable among wealthy British.

    Early table forks were modeled after kitchen forks with two tines that ensured that meat would not twist while being cut. However, small pieces of food regularly fell through the tines or slipped off easily. In late 17th century France, larger forks with four curved tines were developed to solve the problem. The curved tines—used today—served as a scoop so people did not have to constantly switch to a spoon while eating. And forks were more efficient for spearing food than the knife.

    But the fork did not become common in northern Europe until the 18th century and was not common in North America until the 19th century.

    See the beautiful forks in the California Academy of Sciences exhibit.
     
    ________________

    *The Byzantine Empire, which existed from approximately 330 C.E. to 1453 C.E., comprised the predominantly Greek-speaking continuation of the Roman Empire. Its capital city was Constantinople (modern-day Istanbul), originally known as Byzantium. During most of its existence, the empire was the most powerful economic, cultural, and military force in Europe.


    beef-wellington-SFA-Allen-230
    [3] Imagine eating without a fork. Yet, it was ridiculed and rejected by the British, French, and Italians (photo © Allen Bros).

    Chobani Blueberry
    [4] How would you eat yogurt without a spoon (photo © The Nibble).

       
    THE HISTORY OF SPOONS

    Spoons are the oldest eating utensils, in use since Paleolithic times. These prehistoric peoples—the first modern humans—probably used shells or chips of wood as eating and serving utensils. In fact, both the Greek and Latin words for spoon are derived from cochlea, a spiral-shaped snail shell (that also gives its name to the spiral-shaped cavity in the inner ear), suggesting that shells were commonly used as spoons in Southern Europe. The Anglo-Saxon word spon, the predecessor of the spoon, refers to a chip or splinter of wood.

    In the first century C.E., the Romans designed two types of spoons:

  • The ligula was used for soups and soft foods. It had a pointed oval bowl and a handle ending in a decorative design.
  • The cochleare was a small spoon with a round bowl for eating shellfish and eggs. As a result of the Roman occupation of Britain (43 to 410 C.E.), the earliest English spoons were likely modeled after these spoons.
  •  
    See the beautiful spoons in the California Academy of Sciences exhibit.
     
     
    HISTORY OF KNIVES

    Knives have been used as weapons, tools, and eating utensils since prehistoric times. Only fairly recently were they adapted for table use.

    In the Middle Ages in Europe, hosts did not provide cutlery for their guests; most people carried their knives in sheaths attached to their belts. These knives were narrow and their sharply pointed ends were used to spear food and then raise it to the mouth.

    The multi-purpose nature of the knife—weapon and eating utensil—always posed a threat of danger at the dinner table. Once forks began to gain popular acceptance, there was no longer any need for a pointed tip at the end of a dinner knife. In 1669, King Louis XIV of France decreed all pointed knives on the street or at the dinner table illegal, and he had all knife points ground down to reduce violence. That’s why today we have blunt-tipped “table knives” and separate “steak knives.”

    At the beginning of the 18th century, very few forks were imported to America. However, knives were imported and their tips became progressively blunter. Because Americans had very few forks and no longer had sharp-tipped knives, they had to use spoons in lieu of forks. They would use the spoon to steady food as they cut and then switch the spoon to the opposite hand in order to scoop up food to eat.

     
    This distinctly American style of eating continued even after forks became commonplace in the United States.


    CHECK OUT WHAT’S HAPPENING ON OUR HOME PAGE, THENIBBLE.COM.


    Comments off

    RECIPE: Chocolate Caramel Turtle Brownies

    In this month’s issue of Ladies’ Home Journal, one reader shares how her “Man-Catcher Brownies” have captured the hearts of more than a few admirers. This caramel, chocolate and nut-filled dessert is reportedly so good, it’s prompted at least two proposals.

    Feminists that we are, we’re calling this brownie by its historic name: Chocolate Turtle Brownies.

    It’s named after the chocolate turtle confection—a caramel-pecan patty enrobed in chocolate, with four almonds, pecans or walnut pieces inserted to represent the legs of the turtle. A bit of head and tail are formed by extra chocolate runoff.

    Call them turtles, man-catchers, caramel-nut brownies or make-your-work-colleagues-happy brownies: anyone who loves sweet, chocolatey snacks will love them.

    The history of chocolate turtles is below.

    For more chocolate caramel deliciousness, check out this Chocolate Caramel Shortbread recipe. National Chocolate Caramel Day is March 18th.
     
     
    RECIPE: CHOCOLATE CARAMEL TURTLE BROWNIES

    Prep time is 20 minutes, total time is 40 minutes.

    Ingredients For 16 Brownies

  • 30 Kraft caramels, unwrapped
  • 2/3 cup evaporated milk
  • 1 package (15.25 ounces) German chocolate cake mix
  • 1/2 cup unsalted butter, melted
  • 3/4 cup semisweet chocolate chips or other chocolate, chopped
  • 1/2 cup chopped pecans or walnuts
  •  

    turtle-brownies-mug-meredith-230
    [1] Sweet, nutty and a bit gooey: turtle brownies (photos #1 and #3 © Meredith Corp).


    [2] Chocolate turtles: chocolate, caramel and pecans (photo © Enstrom Candies).


    turtle-brownies-vertical-meredith-230
    [3] Make a double batch! They freeze well.
     

    Preparation
    1. PREHEAT oven to 350° F. Grease 13 x 9-inch baking pan with parchment paper.

    2. MELT caramels with 1/3 cup of the evaporated milk in a small saucepan, stirring mixture occasionally; set sauce aside.

    3. STIR together cake mix, melted butter and remaining 1/3 cup evaporated milk to form a dough. Press 1-1/3 cups of the dough into an even layer. Bake until puffed but not cooked through, about 7 minutes.

    4. REMOVE from oven and pour caramel sauce evenly over the top. Sprinkle chocolate chips over caramel in an even layer.

    5. TOP with remaining dough, crumbled into bits and scattered. Sprinkle with chopped nuts and return to the oven. Bake until brownies are puffy and set, 10 to 11 minutes more. Cool completely and cut into squares.


    THE HISTORY OF CHOCOLATE TURTLES

    Candy historians trace chocolate-caramel-pecan turtles candies to the 1930s. A caramel nut patty originally made from chocolate, caramel and pecans, it evolved to use a choice of other nuts, including almonds, cashews, macadamias and walnuts.

    Other names for the confection include pecan patties and caramel pecan patties (made without the “feet”) and katydids.

    Turtles can be enrobed in dark, milk or white chocolate, the latter of which can be painted with colored cocoa butter to resemble an actual turtle shell.

    The mix of flavors has been adapted to cakes, cookies and ice cream—and to this brownie recipe.
     
     
    > THE HISTORY OF BROWNIES

    > THE HISTORY OF CARAMELS

    > THE HISTORY OF CHOCOLATE


    Comments off

    VALENTINE GIFT: Moonstruck Chocolates

    Yes, Moonstruck Chocolate has a red heart-shaped box filled with delicious bonbons (10 pieces, $30.00). But the fine chocolatier also has some different offerings for Valentines with special tastes.

  • Sea Salt Caramels (in photo) have been given the Valentine’s Day treatment with Merlot-infused sea salt crystals. The vanilla caramel is cooked in an open copper kettle with pure sea salt, then enrobed in your choice of dark or milk chocolate and hand-decorated with sea salt crystals that have been infused with a robust vintage Merlot. A box of 20 caramels is $45.00. Think purple passion plus a unique taste experience.
  • Heart To Heart Truffles echo the classic Valentine hard candies with messages like Be Mine, Kiss Me and Sweet Talk. These bonbon versions have the same pastel exteriors (tinted white chocolate) but are filled with flavored ganaches: Cointreau, Blackberry Honey, Peanut Butter, Pinot Noir and Strawberry. You can buy a box of mixed flavors or the solo flavor of your choice. A five-piece box is $11.25.
  •  

    caramels-merlot-sea-salt-moonstruck-230sq

    Merlot salt caramels: purple passion. Photo courtesy Moonstruck Chocolates.


    moonstruck-love-bugs-230sq
    Love bugs for kids of all ages. Photo courtesy
    Moonstruck Chocolate.
     
  • Love Bugs are bittersweet dark chocolate ganache flavored with natural strawberry, in the shape of an adorable love bug. Hand-dipped and hand-decorated, a box of 18 truffles is $67.50.
  • Oregon Distillers Collection, for the spirited Valentine, is a nine-piece collection of truffles featuring spirits from five of Oregon’s finest craft distillers. The truffles are beautifully painted “edible art.“ The box is $20.00. The chocolates contain approximately 2.5% alcohol content by weight. The flavors include Bendistillery Crater Lake Pepper Vodka Truffle, Bull Run Temperance Trader Bourbon Whiskey Truffle, House Spirits Distillery Krogstad Aquavit Truffle, Clear Creek Distillery Oregon Apple Brandy Truffle, House Spirits Distillery Coffee Liqueur Truffle, House Spirits Distillery Aviation Gin Truffle, Rogue Ale Dead Guy Whiskey Truffle, Clear Creek Distillery Oregon Pear Brandy Truffle and Bull Run Distillery Pacific Rum and Cola Truffle.
  •  
    These specialties and much more are available at MoonstruckChocolate.com.


    Comments off

    TIP OF THE DAY: Pink Party Food

    We’ve been invited to a “pink party” for Valentine’s Day: All the food and drink are in shades of pink, with some touches of deeper rose and red. If you want to hold your own party, menu options are below.

    There’s also a National Pink Day on June 23rd, so we’ve included some summery dishes.

    You can make anything more pink with beet juice, red food color or rosy accents like pomegranate arils, raspberries and strawberries. You can make sauces and soups pinker with a touch of crème fraîche, mascarpone, sour cream, or plain yogurt.

    You are encouraged to wear something pink to the party. Owning nothing pink, we’re donning pink nail polish.
     
     
    PINK PARTY MENU

    PINK & RED COCKTAILS

  • Champagne cocktail with pink sparkling wine
  • Cosmopolitans
  • Pink Champagne and strawberry punch
  •  
    PINK & RED WINES

  • Pink sparkling wine (Yellowtail and Martini are great values)
  • Red Wine
  • Rosé
  • Cranberry or pomegranate juice spritzers (with white wine) or mocktails
  • Pomegranate Martini
  • Vodka and pink lemonade
  •  
    There are scores and scores of other pink cocktails—just search online.


    lobster-bisque-mackenzieltd-230
    [1] Lobster bisque. You can serve soup shooters on a buffet (photo © Mackenzie Ltd).


    [2] Pink crudités (photo © Sid Wainer & Son).

    RED & PINK APPETIZERS

  • Bruschetta with strawberry-basil or tomato topping
  • Crab cocktail
  • Crudités: red bell peppers, radishes, cherry tomatoes, red Belgian endive, etc., with spicy pink dip (recipe below); you can include some celery, fennel or other pale vegetables for variety
  • Goat cheese log rolled in pink peppercorns
  • Hot dogs in jelly-mustard dip
  • Pink deviled eggs (soak peeled whole eggs in beet juice or food color)
  • Poached shrimp with cocktail sauce
  • Red pepper dip
  • Salume platter
  • Shrimp spread with crackers
  • Shrimp tea sandwiches
  • Smoked salmon or gravlax platter
  • Smoked salmon pinwheels or tea sandwiches
  • Smoked salmon rillettes
  • Strawberry bruschetta (recipe)
  • Taramasalata (Greek caviar dip) with crackers or party breads
  • Tuna sushi and spicy tuna rolls
  •  

    olive-oil-poached-salmon-pomwonderful-230
    [3] Think pink with poached salmon (photo © Pom Wonderful).
      PINK & RED BUFFET
     
    PROTEINS & OTHER MAINS

  • Pasta in pink sauce
  • Poached salmon
  • Rare beef (we’re poaching a filet mignon)
  • Shrimp & strawberry salad (recipe in footnote* below)
  • Steak tartare or tuna tartare
  •  
    PINK & RED SIDES

  • Beet salad or pickled beets
  • Cherry tomato salad
  • Radicchio and radish salad with pickled red onions
  •  
    _______________
    *Combine 3 cups cooked rice, 1/2 pound cooked, sliced shrimp and 3/4 cup thinly sliced celery in a large bowl. Make dressing with 2/3 cup mayonnaise, 1/2 cup strawberry yogurt, 1 teaspoon dry mustard, 1 teaspoon lemon juice and salt to taste. Dress the salad and then fold in 1-1/2 cups sliced fresh strawberries. Chill and serve on a bed of greens.


    PINK & RED SOUPS

  • Borscht (you can turn it from red to pink with sour cream)
  • Cream of tomato soup
  • Lobster or shrimp bisque
  • Red bell pepper purée
  • Red gazpacho
  • Tomato or watermelon gazpacho
  •  
    PINK & RED DESSERTS

  • Cherry cheesecake
  • Fresh strawberries and raspberries
  • Pears poached in red wine
  • Pink frosted cake or cake pops
  • Pink ice pops (freeze your own from cherry or pomegranate juice)
  • Raspberry or strawberry mousse
  • Red velvet cake, cupcakes, donuts, ice cream
  • Cherry cheesecake
  • Strawberry ice cream/cupcakes
  • Strawberry milkshake shooters
  • Strawberry sorbet
  • Watermelon: granita or fruit salad
  •  
     
    RECIPE: SPICY PINK DRESSING OR DIP

    Ingredients

  • 2 cups mayonnaise (full fat)
  • 1 cup sour cream
  • 1/2 cup sherry wine (not cooking sherry)
  • 1 tablespoon dried tarragon, finely crushed or 1-1/2 tablespoons minced fresh tarragon
  • 1 teaspoon garlic powder
  • 1/4 teaspoon hot sauce sauce, or to taste
  • 2-3 drops red food coloring or beet juice
  •  
    Preparation

    1. MIX mayonnaise, sour cream, sherry, tarragon, garlic powder and hot sauce until well blended.

    2. ADD a few drops of food coloring to desired shade of pink. If the dressing is too thick, you can thin it with a small amount of milk. Chill well before serving.

    Recipe courtesy Food.com.
      

    Comments off

    Biscuit Pot Pie: When Pot Pie Isn’t Always A Pie

    Pot pie (also spelled potpie) is a favorite American comfort food. But the name is misappropriated. Originally, “pot pie” referred to a crustless mixture of meat pie ingredients and noodles, stewed in a pot on the stove top.

    Over time, the term became used to designate a meat pie with conventional crusts, baked in the oven in a deep pie plate or casserole dish. There’s more on the history of meat pies below.

    The pot pie can be baked without a bottom crust but with a conventional top crust or a biscuit topping (the dough is dropped onto the top), like a cobbler. Personally, we prefer a crisp biscuit to a crust.

    Here’s a recipe for a “crustless” pot pie using biscuits comes to us from PotatoGoodness.com; the original recipe was sent to them by GoodLifeEats.com. Prep time is 1 hour, cook time is 1 hours, 35 minutes.
     
     
    RECIPE: TWO POTATO BEEF & VEGETABLE POT PIE WITH ROSEMARY BISCUIT CRUST

    Ingredients For 6 Servings

    For The Filling

  • 2 teaspoons olive oil
  • 1-1/4 pound stew beef, cut into bite sized pieces
  • 1 teaspoon salt
  • 1/2 teaspoon pepper
  • 1 large yellow onion, diced
  • 12 ounces sliced mushrooms
  • 1/3 cup red wine
  • 4 carrots, peeled and sliced into rounds
  • 3 stalks celery, chopped
  • 2 parsnips, peeled and sliced into rounds
  • 2/3 cup frozen of fresh shelled peas
  • 1-2 red potatoes, cut into bite sized cubes
  • 2 bay leaves
  • 3 cloves garlic, minced
  • 1-2 teaspoons fresh thyme leaves
  • 1/2-3/4 teaspoon finely minced fresh rosemary
  •  
    For The Sauce

  • 4 tablespoons butter
  • 1/2 cup plus 1-1/2 tablespoons flour
  • 1/3 cup milk
  • 2-1/4 cup beef broth
  •  
    For The Biscuits

  • 1-2 baked russet potatoes
  • 2/3 cup buttermilk
  • 1 cup all purpose flour or freshly ground spelt flour
  • 3/4 cup cake flour
  • 1 teaspoon sugar
  • 2-1/2 teaspoon baking soda
  • 1/2 teaspoon baking soda
  • 1/2 teaspoon salt
  • 8 tablespoons (1 stick) very cold or frozen butter
  • 1-2 teaspoons very finely minced fresh rosemary
  •  
    Preparation: Filling

    1. HEAT the olive oil in a large cast-iron skillet or pan. Add the beef, season with salt and pepper and cook over medium-high heat until it is browned on all sides. Remove and set aside on a plate.

    2. ADD onion to the pan, with additional oil as necessary. Sauté until tender, about 5 minutes. Add the mushrooms and sauté for an additional 5 minutes.

    3. RETURN beef to the pan and add the red wine to deglaze, taking care to scrape up any browned bits on the bottom of the pan as they offer a lot of flavor (see how to deglaze a pan). Cover and cook over low heat for 30-40 minutes, or until beef is tender. (Optional technique: use a pressure cooker on high pressure for 10 minutes.) Meanwhile…

    4. PREHEAT the oven to 400°F and prepare the sauce. In a medium saucepan, add the butter and melt. Whisk in the flour, then the milk and broth. Bring to a boil and simmer until thickened, about 5 minutes. Set aside.

    5. UNCOVER and add the carrots, celery, potatoes and parsnips. Cook for 5 minutes. Add the peas. Stir in the sauce.

    6. POUR the ingredients into a large casserole dish and top with the uncooked biscuits (recipe below). Bake for 35 minutes. Cool 5 minutes before serving.
     
    Preparation: Biscuits

    1. REMOVE the flesh from the baked potatoes. Mash it with a fork or press it through a potato ricer. This will take 1-2 potatoes and should result in a total of 1/2 cup of potato. In a small mixing bowl, combine the 1/2 cup potato with the buttermilk. Whisk until smooth and set aside.

    2. COMBINE in a medium bowl the flours, sugar, baking powder, baking soda and salt. Whisk until well sifted. Cut the butter into the flour mixture either using two knives, a pastry blender, or a cheese grater (to grate frozen butter into the flour mixture). Add the rosemary and stir to combine.

    3. MAKE a well in the center of the flour mixture and add the buttermilk potato mixture. Stir until combined, and then when you can’t stir it anymore, turn it out onto a lightly floured surface and gently knead until you can form a rough ball.

    4. FLATTEN the dough into a circle about 1/2-3/4 inch in thickness. Using a biscuit cutter or a drinking glass (about 2-1/2″ to 3″ in diameter for the listed baking time) turned upside down, cut as many rounds as you can. Using the dough scraps, form another circle of the same thickness. Repeat cutting until you have used all the dough.


    POT PIE HISTORY

    Meat pies likely date back to milling of flour in ancient times—but before the invention of pie plates. Very thick crusts were used as baking vessels, and were popular banquet fare during the Roman Empire.

    By the 16th century, the English gentry revived the ancient custom of meat pies. Venison was the meat of choice. The recipe crossed the pond to America, where it became as American as…pot pie! Chicken, beef and vegetable pot pies are the most common; but if you have venison, by all means, enjoy a historic venison pot pie.


    beef-pot-pie-biscuit-crust-potatogoodness-230
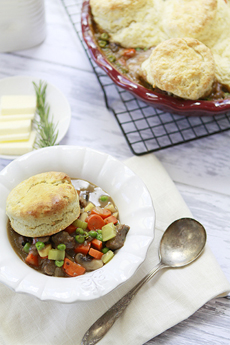
    [1] Pot pie without the pie: Use biscuits instead (photo © Good Life Eats).


    [2] Beef stew cubes (photo © Lobel’s Meats | NYC)


    [3] Fresh thyme adds great flavor notes: earthy, slightly lemony, minty (photo © Good Eggs).


    [4] Parsnips are a very under-appreciated vegetable in the U.S. We put them in chicken soup, too (photo © Barbro Bergfeldt | Fotolia).


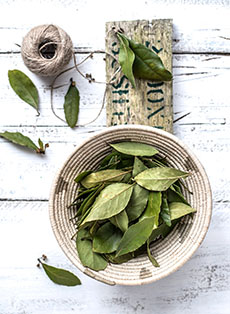
    [5] Bay leaf and beef stew are a natural pairing (photo © Monika Grabkowska | Unsplash).

    rosemary-basket-burpee-230

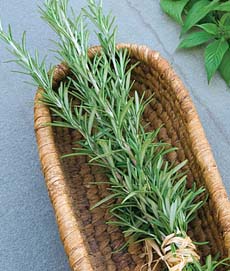
    [6] Fresh rosemary makes a difference (photo © Burpee).


    Comments off

    The Nibble Webzine Of Food Adventures
    RSS
    Follow by Email


    © Copyright 2005-2024 Lifestyle Direct, Inc. All rights reserved. All images are copyrighted to their respective owners.