TIP OF THE DAY: Go Rustic, Make A Crostata Or A Galette
|
Before there were pie pans, there were crostatas and galettes. But let’s start with a brief history of pie, to provide some perspective before we get to a delicious crostata/galette recipe. THE HISTORY OF PIE Culinary historians trace the origin of pie to ancient Egypt, where savory fillings were baked in woven reeds as the vessel. A form of flat, free-form pastry, now called a crostata (Italian) or galette (French), evolved, consisting of a crust of ground grain (barley, oats, rye, wheat) and filled with honey. The concept was brought to Greece, and then to Rome. Ancient Greeks are believed to have created pie pastry, and the trade of pastry cook was distinguished from that of baker. In the millennia before modern bakeware was created, the Romans made an inedible pastry of flour, oil and water to hold meat and poultry as they baked (its main purpose was to keeping in the juices). The Roman Legions brought the technique with them as they forged through Europe. It was the use of lard and butter, in northern Europe, that led to a dough that could be rolled out and molded into what became a tasty modern pie crust. |

A galette is sometimes called a rustic tart. Photo of a pear and apple galette courtesy Waitrose. |
|
|
According to the American Pie Council, “pye” first appears in the written record in England in the 12th century. The crust of the pie was referred to as a “coffyn,” rectangular like its namesake. The walls were thick to hold the shape, and there was more crust than filling. Often, the legs of a fowl were placed to hang outside of the coffyn and used as handles! The predecessor of modern cake and pie pans was a metal hoop that was placed on a baking sheet. Ultimately, bakeware was made from tin or pottery. It is believed that the rounded shape rather than square or rectangular, as well as the shallowness of the pan, were devised to create a smaller space in which to stretch limited ingredients. A crostata or galette was an early way to form a pie crust in the absence of pie pans—and before anyone even realized a pie pan was desirable! The dough was rolled flat, the filling placed in the middle, and the edges turned up and folded (see the photos) to contain the filling. It was used for savory and sweet pies, and could be made free-form or in a rectangle, round or square. And, even after the emergence of tin and ceramic pie pans, for poor folk as well as the itinerant, no purchase of a pie pan was needed. This is a pie made without bakeware (well…a baking sheet helps the modern baker, instead of the older practice of using the floor of the oven or fireplace). Even today, it is simple to make; and we find it a fun undertaking, uniting us with all of those ancestors who baked without pans. No technique to create an even, fluted crust is necessary. There’s no worry about tearing the dough as you lift it into the pie pan. No one cares if the final result isn’t perfectly round or rectangular: The rusticity is the charm. And, the ease of creating a crostata/galette may get you to make pie more often—not just a fruit pie, but savory pies of vegetables, meat, even fish and seafood. Tip: It’s fun to make “leftovers pie,” tossing in everything from pasta, rice or grains to cooked meats and vegetables, cheese, whatever (go on a scavenger hunt through the fridge and pantry). |
||
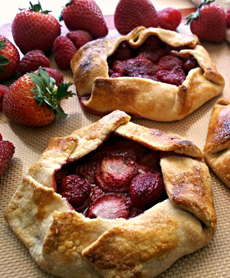 Galettes can also be made in individual sizes. Photo courtesy California Strawberry Commission. |
RECIPE: FRUIT GALETTE (CROSTATA) This recipe below works for any fruit, but for a classic apple galette, this recipe adds cinnamon. You can make the dough up to three days in advance. Ingredients For The Dough |
|
|
For The Filling 1. MAKE the crust: In a food processor fitted with a steel blade, or in a large bowl, pulse or mix together the flour, sugar and salt. Lightly beat the egg in a measuring cup; then add just enough cream to get to 1/3 cup. Lightly whisk the egg and cream together. 2. ADD the butter to the flour mixture and pulse, or use a pastry cutter or your fingers to break up the butter into chickpea-size pieces. If using a food processor, do not over-process the dough or it gets tough. 3. DRIZZLE up to 1/4 cup of the egg mixture over the dough and pulse or stir until it just starts to come together (but is still mostly large crumbs). Mix in the lemon zest. 4. PLACE the dough on a lightly floured surface and pat it into one uniform piece. Flatten it into a disk, wrap in plastic and chill for 2 hours and up to 3 days. When ready to bake… 5. PREHEAT the oven to 400°F. Roll the dough into a 12-inch round—or as close to round as is easy for you. Transfer the dough to a rimmed baking sheet lined with parchment paper and chill while preparing the filling. 6. PREPARE the filling: Toss together the fruit, all but 1 tablespoon of the sugar, the salt, the lemon juice and zest, and the cornstarch. Use more cornstarch for juicy fruits like apples, berries and peaches, and less for drier fruits like figs. 7. SPREAD the optional jam over the center of the dough circle, then place the fruit in the middle, leaving a border of 1½ to 2 inches (some people like the look of an even higher crust). Gently fold the pastry over the fruit, pleating to hold it in. Brush the pastry with the leftover egg and cream mixture. Sprinkle the reserved tablespoon of sugar on the crust. 8. BAKE for 35 to 45 minutes, until the filling bubbles up vigorously and the crust is golden. Cool for at least 20 minutes on a wire rack. Serve warm or at room temperature. This recipe was adapted from one in the New York Times.
|
||

