THE NIBBLE BLOG: Products, Recipes & Trends In Specialty Foods


Also visit our main website, TheNibble.com.


TIP OF THE DAY: Ají Sauce

Hot sauce lovers should take a closer look at ají sauce, a standard in Ecuador and Peru. Aji amarillo is one of the most common types of chiles in the area, and is also one of the most important ingredients in the two countries.

While, like all salsas, there are as many variations as there are cooks, a basic ají criollo is made from the ají amarillo (yellow ají*), along with cilantro, garlic, onion and lime.

Each region and city has its own unique recipe. For example, ají de tomate de árbol—tree tomato or tamarillo ají—uses tamarillo as well as ají amarillo. (A recipe is below.)

Andrés Dávila, executive chef of Casa Gangotena, TripAdvisor Travelers’ Choice Top Ten Hotel, offers tourists a journey through the different types of ají, with a selection of six sauces carefully paired with a dish that heightens the flavors of the local cuisine. He’s also sent us a standard recipe so you can make your own.

Great for sauces and to kick up any meal with a great flavor and medium heat. Chewing on the chiles adds more heat.

  • Ají mixed with passion fruit, which colors the sauce a spectacular yellow, goes well paired with chicken or pork.
  • Ají with sambo squash seeds, a light green cream with a subtle smell and taste that goes well with white meats.
  •    
    aji-amarillo-perudelights-230r

    Ají amarillo, in shades of yellow and orange. Photo courtesy PeruDelights.com.

  • Manaba-style pickled ají, flavored and colored with carrots, is the perfect accompaniment to fish.
  • Orange ají is made with tree tomato (tamarillo) and chochos (lupines).
  • Purple ají, colored with beets, has a complex layering of fruit vinegar, grated carrots and pickle slices, goes well with both seafood and red meats.
  •  
    PICK UP A JAR OF AJÍ AMARILLO (YELLOW AJÍ) PASTE

    You can probably find a jar of ají paste in the Latin foods section of your supermarket. Goya makes it, of course, and you can find specialty brands such as Costa Peruana and Inca’s Food online.

    Aji paste is simply a purée of fresh ajis. “American fusion” uses include:

  • Mix a tablespoon with a cup of Alfredo or other white sauce, red sauce or brown sauce or gravy.
  • Add to soup (including chicken soup).
  • Add to a ceviche marinade.
  • Mix into condiments to add flavor and heat.
  •  
    *While ají is Spanish for chile pepper and amarillo means yellow, the color changes to orange as the chiles mature. You can see the deepening colors in the photo above.


    aji-amarillo-paste-incasfood-230
    Add bold flavor to many dishes with ají
    amarillo (yellow chile) paste. Photo courtesy
    Inca’s Food.
     

    RECIPE: HOMEMADE AJÍ SAUCE

    This classic ají sauce combines tree tomato (tamarillo), ají amarillo and chochos (lupines, or lupin beans). Lupins are a large yellow Italian bean. You can substitute lima beans or fava beans for the lupins.

    Ingredients

  • 4-5 tomatillos
  • 2 ajís (you can substitute serranos or other red chilies, or yellow habaneros for extra heat)
  • 2 tablespoons finely chopped white onion
  • 1 tablespoon finely chopped cilantro
  • 1 tablespoon lime or lemon juice
  • ¼ cup water
  • Salt to taste
  • Optional: cooked and peeled chochos (lupin beans)
  •  
    Preparation

    1. PEEL the tomatillos and boil them for 5 minutes.

    2. BLEND the tomatillos with ají chiles. For a milder sauce, seed and devein the chiles. You can always save a few seeds and add them in if it’s too mild.

    3. TRANSFER the mix to a small sauce pan, add the water (you can add more if you want a more liquid sauce) and cook on medium heat for 5-8 minutes. You can also skip the cooking part; the sauce will be fresher in taste, but will need to be consumed more quickly.

    4. ADD the onion, lime juice, cilantro, optional chochos and salt to taste. Serve warm or cold.

    VARIATION: Replace the water with oil (avocado, light olive oil or a mild flavored oil) for a creamier Cuencano-style ají, and do not cook it after blending.

    Recipe courtesy Laylita.com.
      

    Comments off

    FOOD 101: How To Avoid Salmonella & Other Food Poisoning

    People tend to worry about food poisoning during the summer months, when eating outdoors exposes food to greater bacterial growth from the heat. But you can get food poisoning year round, including in your own kitchen.

    The Partnership for Food Safety Education helps consumers get the facts, deflating common myths about cross-contamination and the growth of harmful pathogens that cause food poisoning. Here are their myth busters for 2014:

    Myth 1: It’s O.K. to wash bagged greens if I want to. It’s even better for them.

    Fact: While intuition says that giving ready to eat, washed or triple washed salad couldn’t possibly hurt, the truth is otherwise. An extra rinse will not enhance safety, but could potentially lead to cross-contamination from pathogens that could be on your hands or on kitchen surfaces. Ready-to-eat greens are just that: ready!
     
    Myth 2: Cross-contamination doesn’t happen in the refrigerator. It’s too cold in there for germs to survive!

    Fact: Some bacteria can survive cold environments like the fridge. In fact, Listeria monocytogenes grows at temperatures as low as 35.6°F. A recent study from NSF International reveals that the refrigerator produce compartment is one of the germiest place in the kitchen, containing salmonella and listeria bacteria.


    Raw_whole_chicken-chicken.ie-230

    Don’t rinse raw chicken before cooking it. Salmonella can contaminate other items in the sink. Photo courtesy Chicken.ie.

     
    To reduce the risk of cross-contamination, clean the bins regularly with hot soap and water; clean the other surfaces of the fridge likewise, including the walls and undersides of shelves; and clean up any food and beverage skills immediately. Be sure to keep fresh produce separate from raw meat, poultry, seafood and eggs.


    salmonella-kosmix.co-230r
    Not fun: the salmonella bacterium. Photo
    courtesy Kosmix.co.
      Myth 3: It’s only important to rinse fresh fruits and vegetables for safety. I don’t need to dry them too.

    Fact: Using a clean cloth or paper towel to blot dry fruits and vegetables after rinsing is more important than you might realize. Research has found that taking a minute to dry the produce reduces the level harmful bacteria that can remain on the surface.

  • Just before use, rinse under running water only that produce that you plan to eat, including those with skins and rinds that are not eaten (like melon or citrus).
  • Dry with a clean cloth or a paper towel.
  •  

    Myth 4: I don’t need to rinse this melon for safety, since the part I eat is on the inside.
    Fact: There are many pathogens on the rind that can contaminate the edible portion. A knife or peeler passing through the rind can carry them from the outside to the inside. The rind also touches the flesh when sliced pieces of melon are stacked on a platter. Play it safe and rinse the melon under running water while rubbing it with your hands or scrubbing it with a clean brush and then dry it before slicing.


    FOOD SAFETY TRIVIA

  • 65% of people don’t wash their hands before starting meal preparation.
  • 1/3 of people only use water to rinse their hands. You need to use soap!
  • 45% of consumers rinse raw chicken. This spread germs and isn’t a food safety step. Don’t rinse it! (Big surprise—we intuitively rinsed the chicken.)
  • Don’t guess: Use a food thermometer. The safe temperature for cooked chicken is 165°F.
  •  
    For more food safety information, visit FoodSafety.gov.


    Comments off

    RECIPE: Date Nut Cookies

    Recently, for National Date Nut Bread Day (September 8th), we whipped up a batch of these date nut cookies. The last one met its maker yesterday, and we just may make another batch this weekend.

    If you like oatmeal raisin cookies, try them for a nice change of pace: Here, sweet dates and salty nuts combine with chocolate and oatmeal for a happy holiday treat.

    Food trivia: Before sugar arrived in Europe* from the Asia, dates were widely used as a sweetener in baked goods.

    RECIPE: DATE NUT COOKIES

    Ingredients For 5 Dozen Cookies

  • 1/2 cup (1 stick) plus 2 tablespoons butter, softened
  • 3/4 cup light brown sugar, packed
  • 1-1/2 cups sugar, divided
  • 1 egg
  • 1 teaspoon almond extract
  • 1-1/2 cups flour
  • 1 teaspoon baking soda
  • 1 teaspoon salt
  • 3 cups quick or old fashioned oats (uncooked)
  • 3/4 cup dates, chopped
  • 3/4 cup salted pistachios
  • 1 cup semi-sweet chocolate chunks or morsels
  •    
    medjool-superior-nut-company-amz-230

    Dates: the world’s first sweetener. Photo courtesy Superior Nut Company.


    date-nut-cookies-horiz-wmmb-230
    Tasty cookies with whole-grain oats. Photo
    and recipe courtesy Wisconsin Milk Marketing
    Board.

      Preparation

    1. PREHEAT the oven to 375°F. Beat together the butter, brown sugar and 1/2 cup sugar in large bowl with electric mixer until light and fluffy. Add egg and almond extract; mix to combine.

    2. COMBINE flour, baking soda and salt in separate bowl. Add to butter mixture, mixing well. Stir in oats until combined. Add dates, pistachios and chocolate; mix well.

    3. SHAPE the dough into 1-inch balls; roll balls in a shallow bowl containing 1 cup sugar.

    4. PLACE on parchment-lined baking sheets. Bake 8 to 10 minutes. Cool cookies on pan for one minute or until set; transfer to wire rack to cool completely.

    Store the cookies in airtight container at room temperature for up to 1 week.

     
    Here’s a recipe for date nut bread.
     
    *Sugar arrived in Europe around 1100, but was in very limited quantity and was not widely available until the 16th century.


    Comments off

    TOP PICK OF THE WEEK: Veggie Fries

    If the only way to get the family to eat more veggies is to feed them fries…well, Veggie Fries should become a very big brand.

    You can make veggie fries, which substitute all or some of the potato for a more nutritious vegetable, from scratch at home.

    Or, you can buy Veggie Fries, a new line that has debuted offering:

  • Broccoli fries (27% broccoli and beans)
  • Carrot fries (32% carrots and beans)
  • Chickpea & Red Pepper fries (25% chickpeas and bell peppers)
  • Tuscan Bean & Herb fries (29% beans and herbs)
  •  
    The all natural line mixes better-for-you vegetables and legumes in with potato, to deliver more fiber and vitamins. The fries are low in sodium and gluten-free.

    The company tried more than 300 recipes to create the perfect veggie fries: extra crispy on the outside, fluffy and tender on the inside. We hope you love them as much as we do.
    Learn more at EatVeggieFries.com.

       
    broccoli-fries-plate-bag-230

    One of the new fries in town: Broccoli Veggie Fries. Photo courtesy Healthy Life Brands.


    chickpea-red-pepper-plate-230sq
    Chickpea & Red Bell Pepper Fries. Photo
    courtesy Healthy Life Brands.
      The fries bake in the oven, and in just 18 to 23 minutes you’ll have crispy fries to enjoy with your favorite foods—or all by themselves as a lower-guilt fry snack.

    Serve them with your favorite condiments, or try a new one, like ponzu sauce—an Asian alternative to the malt vinegar preferred by the Brits instead of ketchup. Or take a look at these more unusual, sophisticated condiments from Chef Johnny Gnall.

    If ketchup is your condiment, take a look at the best ketchup brands. For example, blend your own chili paste and honey or hot sauce, a dip of balsamic vinegar and soy sauce, or flavored mayonnaise.

    And consider creating a signature fries recipe with different toppings.


    Comments off

    RECIPE: Quick Quinoa “Paella”

    quinoa-paella-kaminsky-230

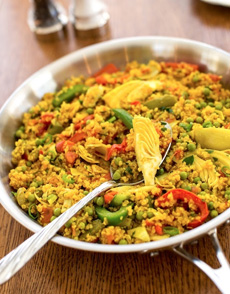
    A delicious vegetable “paella” of quinoa.
    Photo © Hannah Kaminsky.

      Paella is a Spanish pilaf traditionally made with saffron-seasoned white rice and, depending on regional preferences, different combinations of meat and seafood (here’s the history of paella and popular variations).

    Vegetarians can make vegetable paella with tofu. And in this recipe, from Plant Power: Transform Your Kitchen, Plate, and Life with More Than 150 Fresh and Flavorful Vegan Recipes, you can replace the white rice as well with far more nutritious and quick-cooking quinoa.

    “Every last recipe packed into this carefully crafted text are all worth making, not a single bit of fluff or page-filler to be found,” says NIBBLE contributor Hannah Kaminsky.

    “One recipe that stands out is the deceptively simple Quick Quinoa Paella, an excellent example of author Nava Atlas’s skill for presenting a sound foundation that can be adapted, reinterpreted, and recreated a hundred different ways with equal success.”

    You can add a conventional proteins—chicken, duck, fish, seafood. We happened to have leftover roast chicken, and added some fresh scallops and shrimp.

    But quinoa is the most protein-rich grain, a complete protein with more protein per serving than milk (and perhaps the most nutritious food on earth).

    Prep time is 30 minutes.

    RECIPE: QUINOA PAELLA

    Ingredients For 6 Servings

  • 1 tablespoon extra-virgin olive oil or 3 tablespoons vegetable broth or water
  • 3 to 4 cloves garlic, minced
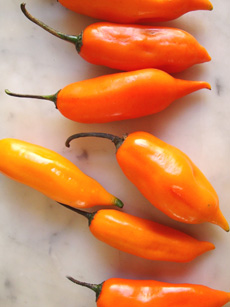
  • 1 green bell pepper, cut into 2-inch strips
  • 1 red bell pepper, cut into 2-inch strips
  • 1 cup sliced baby bella (cremini) mushrooms
  • 2 cups vegetable broth
  • 1-1/2 teaspoons turmeric or saffron (see note below)
  • 1 cup uncooked quinoa, rinsed in a fine sieve
  • 2 teaspoons fresh or 1/2 teaspoon dried thyme
  • 1 can (14-ounces) artichoke hearts, drained and quartered
  • 2 cups frozen green peas, thawed
  • 2 cups diced ripe tomatoes
  • 2 to 3 scallions, thinly sliced (white and green parts)
  • 1/2 cup chopped fresh parsley
  • Salt and freshly ground pepper to taste
  • Optional proteins: poultry, seafood, etc.
  •  

    Preparation

    1. HEAT the oil, broth, or water in a large, deep skillet or stir-fry pan. Add the garlic, bell peppers, and mushrooms, if desired, and sauté over medium-low heat until softened, about 2 to 3 minutes.

    2. ADD the broth, turmeric, and quinoa. Bring to a simmer and cook, covered, for 15 minutes.

    3. STIR in the thyme, artichoke hearts, peas, tomatoes, scallions, and half the parsley. Check if the quinoa is completely done; if not, add 1/2 cup water. Cook, stirring frequently, just until everything is well heated through, about 5 minutes.

    4. SEASON with salt and pepper, then transfer the mixture to a large shallow serving container, or serve straight from the pan. Sprinkle the remaining parsley over the top and serve at once.

      plant-power-230
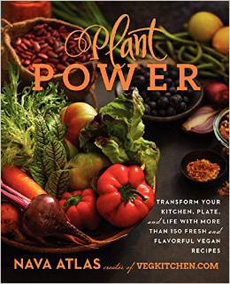
    Plant Power: delicious vegan recipes. Get it
    on Amazon.com. Photo courtesy HarperOne.
     
    Saffron Or Tumeric?

    As another departure from tradition, Hannah says that you can use turmeric rather than the customary saffron of paella. Saffron is harder to obtain and very expensive; but if you have it, by all means, use it. Dissolve the saffron threads in a small amount of hot water before adding to the recipe.
     

    GET THE BOOK

    Plant Power: Transform Your Kitchen, Plate, and Life with More Than 150 Fresh and Flavorful Vegan Recipes,” by bestselling vegan author Nava Atlas, was published last week.

    Pick up a copy and add more plant power to your diet.
      

    Comments off

    The Nibble Webzine Of Food Adventures
    RSS
    Follow by Email


    © Copyright 2005-2024 Lifestyle Direct, Inc. All rights reserved. All images are copyrighted to their respective owners.