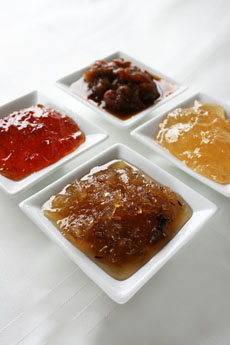
THE NIBBLE BLOG: Products, Recipes & Trends In Specialty Foods


Also visit our main website, TheNibble.com.


TIP OF THE DAY: Pumpkin Layer Cake Instead Of Pumpkin Pie

pumpkin-layer-cake-driscolls-230
An impressive pumpkin layer cake. Photo
and recipe courtesy Driscoll’s.
 

Few desserts are more impressive than a towering triple-layer cake. This beauty is paired with raspberries and brandied whipped cream.

While Thanksgiving menus tend to favor pie (apple, mince, pecan, pumpkin, sweet potato) rather than cake, if you set a fancy table, this cake is a fitting ending to your feast.

Prep time is 30 minutes, bake time is 25 to 30 minutes. Assembly time is 10 minutes.

RECIPE: PUMPKIN LAYER CAKE WITH RASPBERRIES
& BRANDIED CREAM

Ingredients For 10 To 12 Servings

For The Cake

  • Softened butter and flour, for the cake pans
  • 2 cups all-purpose flour
  • 2 teaspoons baking soda
  • 1 teaspoon baking powder
  • 2 teaspoons ground cinnamon
  • 1/2 teaspoon ground ginger
  • 1/2 teaspoon freshly ground nutmeg
  • 1/2 teaspoon salt
  • 2 cups granulated sugar
  • 1 cup canola oil
  • 4 large eggs, room temperature
  • 1 can (15 ounces or 1-3/4 cups) solid pack pumpkin
  •  
    For The Brandied Cream

  • 1-1/4 cups heavy cream
  • 3 tablespoons confectioners’ sugar
  • 1 tablespoon brandy or Cognac (alternative: use vanilla extract)
  • Garnish: 3 packages (6 ounces or 1-1/3 cups) raspberries*
  •  
    *TIP: If the raspberries aren’t sweet enough, roll them in granulated sugar.


    Preparation

    1. PREHEAT the oven to 350°F. Lightly butter three 8-inch round cake pans. Line the pan bottoms with parchment paper (we like these the best—the pre-cut parchment rounds have handles for easy removal of the cake layer). Dust the insides with flour and tap out the excess.

    2. SIFT together the flour, baking soda, baking powder, cinnamon, ginger, nutmeg and salt in a medium bowl.

    3. BEAT until foamy, in a large bowl with an electric mixer—on high speed, the granulated sugar, oil and eggs (about 1 minute). Reduce the mixer speed to low. In thirds, beat in the flour mixture, alternating with two additions of the pumpkin. Mix, scraping down the sides of the bowl as needed, just until smooth. Spread evenly into the cake pans.

    4. BAKE the layers until a wooden toothpick inserted in the center of a cake comes out clean, 25 to 30 minutes. Let cool in the pan on wire cake racks for 10 minutes (check out this three tier cooling rack). Run a knife around the inside of each pan and invert onto a rack to unmold the cake. Remove the parchment paper and turn right side up. Let cool completely. (The cakes can be individually wrapped in plastic wrap and stored at room temperature for up to 2 days.)


    raspberries-cartons-morguefile-230
    Fresh raspberries. Photo by J. Eltovski | Morguefile.


    5. MAKE the brandied cream: Use a medium bowl and an electric mixer on high speed to whip together the cream, confectioners’ sugar and brandy. Whip until the mixture is stiff. The cream can be refrigerated for up to 8 hours. If it separates, beat until stiff.

    6. ASSEMBLE. Set one-third of the raspberries aside to garnish the cake. Using a small knife, split the remaining raspberries down their sides so they can be opened flat. Put one cake layer on a serving plate. Spread with one third of the cream and add one-half of the split berries. Add a second layer and repeat with another third of the cream and the remaining split berries. Top with the last layer of cake and remaining cream, garnish top with the reserved raspberries. The assembled cake can be refrigerated for up to 2 hours (then the whipped cream starts to deflate). Serve chilled.


    Comments off

    PRODUCT: Gingerbread Mustard

    gingerbread-mustard-fallot-230
    Gingerbread mustard. Photo courtesy Fallot.
     

    For the holidays, how about traditional Dijon mustard mixed with gingerbread spices? It’s a French specialty.

    In French it’s called moutarde au pain d’epices; pain d’epices, which translates to spice bread, is the French word for gingerbread.

    Gingerbread is one of the specialties of the Burgundy region of France. So it’s no surprise that creative cooks decided to finely grind and mix it with honey and mustard.

    The subtly flavored mustard is delicious served with white meats or sausages, ham or pork. You can spread it on a sandwich, serve it with an omelet, turn it into a dip, or add it to a stuffing mix for roast chicken in a vinaigrette for for salad and crudités.

    It’s something special for a foodie holiday gift. We found the Fallot brand at BienManger.com and the Pommery brand on another website, website.

    Maille also makes a version with white wine, gingerbread and chestnut honey.


    Comments off

    RECIPE: Baked Potato Nachos – Potato Wedges

    October 6th is National Nachos Day. Here’s a twist on nachos from the United States Potato Board, which uses baked potato wedges instead of tortilla chips.

    Prep time is 25 minutes, cook time is 35 minutes.
     
     
    RECIPE #1: BAKED POTATO NACHOS

    Ingredients For 4 Servings

  • 1-1/2 pounds russet potatoes
  • Olive oil
  • 1/2 teaspoon garlic salt
  • 1 teaspoon Mexican seasoning blend (recipe below)
  • Salt and pepper to taste
  •  
    Toppings

  • 1 cup shredded cheddar cheese, Mexican-flavored cheese (jalapeño, habanero) or pepper jack
  • 1/4 cup canned black beans, rinsed and drained
  • 1/4 cup diced tomatoes
  • 1/4 cup sliced black olives
  • 1/4 cup sliced green onions
  • 3 tablespoons canned diced green chiles
  •   SHORTEN-01
    Nachos with a twist: baked potatoes replace tortilla chips. Photo courtesy PotatoGoodness.com.
     
    Garnishes

  • Chopped avocado
  • Cilantro
  • Guacamole
  • Enchilada sauce for drizzling
  • Salsa
  • Sour cream or plain Greek yogurt
  •  
    Preparation

    1. PREHEAT the oven to 425°F.

    2. WASH the potatoes, peel and slice into 1/2-inch-thick wedges. Toss and coat with olive oil, garlic salt and Mexican seasoning.

    3. PLACE potato wedges in a single layer on a nonstick baking sheet and bake for 25 minutes, stirring several times, until crisp and golden brown.

    4. REMOVE sheet from oven. Top potatoes with cheese, beans, tomatoes, olives, onions and chiles. Bake for 5 minutes more, until the cheese melts.

    5. SERVE with optional guacamole, salsa, sour cream, etc.
     
     
    RECIPE #2: MEXICAN SEASONING BLEND

    Ingredients

  • 2 tablespoons ground cumin
  • 2 tablespoons chili powder
  • 2 tablespoons paprika
  • 2 tablespoons dried oregano
  • 1 tablespoon garlic powder
  • 2 teaspoons cayenne
  •  
    Preparation

    1. BLEND all of the ingredients. Store in an airtight container.


    Comments off

    TIP OF THE DAY: Revisit Nachos For National Nachos Day

    NAKED-NACHOS-230

    [1] Naked Nachos: no cheese (photo © The Better Chip).

      November 6th is National Nachos Day, a snack created on the fly in 1943 at a restaurant in Mexico (the history is below).

    Here are three modern takes on the classic: Naked Nachos (without cheese), Cast Iron Skillet Nachos, and Dessert Nachos.

    The recipes were developed by The Better Chip, whose delicious tortilla chips are round, colorful, and a great platform for snacks, Made from double corn masa, 40% fresh veggies and enhanced with a smidgen of sea salt or natural seasoning for a better tasting and better dipping chip.

    The colorful chips include:

    • Beets: red
    • Chipotle: orange
    • Fresh Corn: yellow
    • Jalapeño: yellow
    • Spinach & Kale: green
     
     
    RECIPE #1: NAKED NACHOS

    This interpretation leaves off the cheese, but adds flavor through roasted tomatoes and corn. If you’re pressed for time, you can substitute a can of roasted tomatoes and a tub of fresh corn salsa.

    Ingredients

    • 1 bag (6.4 ounces) tortilla chips
    • 3-4 tomatoes, roasted
    • Fresh corn on the cob, roasted
    • Fresh basil, oregano rosemary or thyme
    • Olive oil
    •  
      Preparation

      1. ROAST the tomatoes: Preheat the oven to 350°F.

      2. CUT the tomatoes horizontally and remove the stem. Cover the bottom of a glass baking dish with olive oil. Place the tomatoes sliced side down; sprinkle with herbs. Bake for 1 hour. Add salt to taste; slice to serve.

      3. ROAST the corn: Preheat the oven to 450°F. Place the corn on a baking sheet—do not shuck. Roast for 15 minutes, turning occasionally. Remove from the oven and let cool. Shuck corn and cut the kernels from the ear.

      4. HEAT the oil in a large skillet over high heat. Add the corn kernels and sauté until heated through and golden yellow in color.

      5. LINE a baking sheet with the tortilla chips. Layer with the sliced roasted tomato and sprinkle on the corn. Garnish with fresh herbs. Broil on high for 2 minutes until the edge of the chips start to turn light brown. Serve.
       
       
      RECIPE #2: QUICK & EASY SKILLET NACHOS

      This version of nachos is super easy to make.

      Ingredients

    • 1 bag (6.4 ounces—The Better Chip recommends its Chipotles flavor)
    • 1 can pinto beans
    • Pepperoni, sliced
    • Aged sharp white cheddar cheese, shredded
    •  
      Preparation

      1. PREHEAT the oven to 350°F.

      2. COMBINE the ingredients in a cast iron skillet. Place in the oven and cook for 5-10 minutes until the cheese is melted.


    RECIPE #3: GRANDMA’S CANDY APPLE NACHOS (DESSERT NACHOS)

    Ingredients

  • Tortilla chips (The Better Chip recommends its Fresh Corn or Spinach & Kale flavors)
  • 1 Granny Smith apple, diced
  • Caramel sauce
  • Chocolate sauce
  • Walnuts, chopped
  • Mini marshmallows
  •  
    Preparation

    1. DICE the apple into small pieces. Heat the chocolate and caramel sauces so that they are warm and easy to drizzle over chips.

    2. PLACE the chips on a plate, spoon the diced apples over the chips and drizzle the chocolate and caramel sauces over the chips and apples.

    3. SPRINKLE the walnuts over the nachos and garnish with a few marshmallows.

      Dessert Nachos-230
    [2] Dessert nachos (photo © The Better Chip).
     

    THE HISTORY OF NACHOS

    Nachos are an example of necessity being the mother of invention.

    As the story goes, in 1943 a group of Army wives from Fort Duncan, in Eagle Pass, Texas, had gone over the border to Piedras Negros, Mexico, on a shopping trip. By the time they arrived at the Victory Club restaurant, the kitchen was closed.

    But the accommodating maître d’hôtel, Ignacio “Nacho” Anaya (Nacho is a nickname for Ignacio), threw together a snack for the ladies from what was available in the kitchen: tortillas and cheese. He cut the tortillas into triangles, added shredded Cheddar cheese, quickly heated them, and garnished the dish with sliced jalapeño chiles.

    When asked what the tasty dish was called, he answered, “Nacho’s especiales,” Nacho’s Special.

    In Mexico nachos are also called totopos, the word for tortilla chips. French fries, potato chips and even popcorn are sometimes substituted for the tortilla chips.
     

    CHECK OUT WHAT’S HAPPENING ON OUR HOME PAGE, THENIBBLE.COM.


    Comments off

    RECIPE: Autumn Bundt Cake

    thanksgiving-bundt-biritecreamery-230
    Treat yourself to a slice of autumn. Photo
    courtesy Bi-Rite Market | San Francisco.

      It’s easy to turn a plain bundt cake into a festive holiday dessert. Just top it with caramel sauce or glaze, candied pecans or walnuts and dried cranberries and/or cherries—an idea we snatched from Bi-Rite Market, a specialty food store in San Francisco (with a great ice cream parlor across the street).

    One of the benefits of using the nuts as a garnish instead of mixing them into the batter is that people who are nut-averse can pick them off and still enjoy the delicious dessert.

    1. PICK YOUR BUNDT CAKE FLAVOR

    While chocolate always works, think seasonally and consider:

    • Apple bundt cake (here’s a recipe)
    • Carrot bundt cake
    • Cranberry-orange bundt cake
    • Maple bundt cake
    • Pumpkin bundt cake
    • Rum bundt cake
    • Sticky toffee bundt cake
    It’s easy to find recipes online.
     

    2. PICK YOUR NUTS & FRUITS

    We personally like pecans with cranberries. Then, caramelize (candy) the nuts (here’s how).


    3. MAKE THE CARAMEL SAUCE

    Ingredients For 2 Cups

    This recipe was adapted from WickedGoodKitchen.com. Prep time is five minutes, cook time is 15 minutes.

    You can make a lighter caramel glaze, but the color will be pale and the flavor less deep.

    • 2 cups sugar
    • ¾ cup (1½ sticks) unsalted butter, cut into cubes, softened to room temperature
    • 1 cup heavy cream, room temperature
    • ½ teaspoon pure vanilla extract
    • 2 to 3 teaspoons fleur de sel or other sea salt (types of sea salt)
      salted-caramel-sauce-wickedgoodkitchen-230
    Salted caramel sauce. Photo courtesy WickedGoodKitchen.com.
     

    Preparation
    1. PLACE the sugar in a 2- to 3-quart, heavy-bottomed saucepan. Heat over medium-high heat and whisk as the sugar melts. Continue to whisk as the sugar begins to clump and turn into a light amber liquid. It will be completely melted into light amber caramel in 8 to 10 minutes. Once the sugar is completely melted, stop whisking and swirl the caramel by gently tilting the saucepan from side to side.

    2. COOK without whisking until the caramel reaches a medium or deep amber color (almost dark reddish-brown), about 5 to 7 minutes based on your color preference (the darker the caramel, the deeper the caramel flavor). It is important to pay attention and prevent the caramel from smoking. Use a candy thermometer: a reading of 350°F will deliver a deep amber caramel sauce.

    3. TURN off the heat, the remove saucepan from the heat and wait 20 to 30 seconds. Then add all of the butter at once and whisk vigorously until it is fully melted and combined into the caramel. The addition of the butter will cause the caramel to bubble up vigorously. Just keep whisking.

    4. WHISK in the cream slowly and carefully, along with the vanilla extract. Expect more bubbling, and just keep whisking until the caramel is smooth and the cream is fully incorporated. Add the salt and whisk until completely dissolved.

    5. SET the caramel sauce aside to cool slightly and thicken, about 10 to 15 minutes. Transfer to a glass jar. Cool completely before capping jars and refrigerating.

    6. ASSEMBLE the cake. Use a spatula to transfer the majority of the caramel to the cake. You can then melt the remainder and pour it on top for the “drippy” effect. Top with the nuts and fruits and admire your handiwork (then eat it!).


    Comments off

    The Nibble Webzine Of Food Adventures
    RSS
    Follow by Email


    © Copyright 2005-2024 Lifestyle Direct, Inc. All rights reserved. All images are copyrighted to their respective owners.