THE NIBBLE BLOG: Products, Recipes & Trends In Specialty Foods


Also visit our main website, TheNibble.com.


TIP OF THE DAY: Try New Ingredients, Like Piquillo Peppers


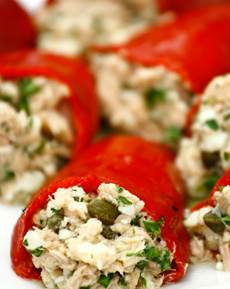
Roasted piquillo chiles stuffed with tuna,
crumbled Manchego cheese, capers, parsley
and a touch of lemon juice. Photo courtesy
DeLallo Foods.

  Today’s tip is an easy way to expand your culinary horizons: Try a new ingredient each month (if you’re ambitious, each week). Work it into different recipes and decide if it deserves a place in your everyday or special-occasion repertoire.

We’ll start you off with a suggestion: piquillo peppers. They’ve been a favorite in Spain for centuries, for tapas, stews and other recipes. We picked up some piquillos from Roland and Delallo.

Delectable and easy to use straight from the jar (DeLallo) or can (Roland), their vibrant color and piquant, roasted flavor make piquillos a welcome ingredient to enliven winter cooking.

Use them instead of roasted red bell peppers—they’ll bring an extra depth of flavor. The wall of a piquillo is much thinner than a bell pepper, with a richer, sweeter flavor and a hint of spiciness. When purchased in cans or jars, they’ve typically been fire roasted, adding a touch of of smokiness.

 
The piquillo originated in Northern Spain and was named for its conical shape, which reminded people of a bird’s beak. Piquillo means “little beak” in Spanish.

Use piquillos on sandwiches and in salads; with drinks, cut and rolled onto a toothpick (you can add an olive, caperberry or cube of cheese to the toothpick); and by all means, stuffed. The shape makes piquillos ideal for stuffing; the Spanish stuff them with everything from seafood to vegetables. We’ve been filling them with everything from leftover rice and other grains to potatoes, goat cheese, feta and tabbouleh, to tuna, egg and potato salads. Delicious! They also add a sweet touch to chili.

TIPS FOR USING PIQUILLO CHILES

Roland Foods suggests:

  • Drain the piquillos and blot them with paper towels; they’ll be easier to slice.
  • Don’t rinse piquillos from a jar or can; you’ll rinse away flavor.
  •  
    RECIPES

  • Here’s an easy recipe for a flavored sandwich spread or dip: Process piquillo chiles until smooth with 1 cup of mayonnaise and 1 grated garlic clove.
  • Try this delicious recipe for Chicken Stew with Piquillo Peppers and White Wine.
  •  

    DO YOU KNOW THE DIFFERENT CHILES?
    Check out our Chile Glossary.


    Comments off

    FOOD HOLIDAY: Hot Buttered Rum Recipe With Caramel

    A hot toddy is a warm cocktail made with boiling water, sugar and spices, plus other ingredients—hot buttered rum is one such variation. (Read the History of Hot Buttered Rum.) Celebrate National Hot Toddy Day on January 11th with a luscious cocktail from Ron Abuelo, a dark oak-aged rum from Panama.

    This Hot Caramel Buttered Rum recipe combines smooth aged (añejo) rum with Van Gogh’s Dutch Caramel Vodka. It’s a fine drink to sip as you relax at the end of the day.

    Or, have it at the end of dinner: It’s a cocktail and a dessert in one.

    HOT CARAMEL BUTTERED RUM RECIPE

    Ingredients Per Cocktail

  • 1/4 stick unsalted butter, softened
  • 2 tablespoons brown sugar
  • 2 tablespoons honey
  • 1 teaspoon ground cinnamon
  • 1/2 teaspoon ground cloves
  • 1/2 teaspoon nutmeg
  • 3 ounces Ron Abuelo Añejo rum
  • 1 ounce Van Gogh Dutch Caramel Vodka
  • Boiling water
  • Cinnamon stick for garnish
  •  
    Mmm, hot buttered rum—with caramel! Photo courtesy Ron Abuelo. Like these glasses? Here’s something similar.
     

    Preparation
    1. Combine first six ingredients—butter, sugar, honey and spices—into a large mug, Irish coffee glass, or other handled vessel. Mix together with a spoon.

    2. Add rum and vodka.

    3. Pour in hot water (1/2 cup to 1 cup, to personal taste) and stir vigorously until the mixture has dissolved. Garnish with cinnamon stick.

    Find more of our favorite winter cocktail recipes.


    Comments off

    TIP OF THE DAY: Consider More Buffets


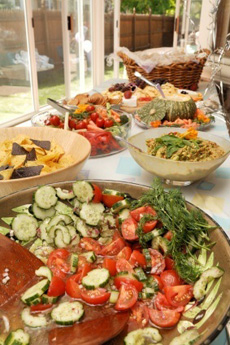
    Even six or eight people can enjoy serving
    themselves buffet-style. Photo by Nancy
    Louie | IST.


    In the catering and restaurant worlds, food serving styles are classified as table service or buffet service. Both styles are used in the home, as well.

    Many of us tend to think as the professionals do: table service for fewer people and buffet service for larger groups. The number of guests is usually the main factor in determining the serving style.

    But think of buffets for smaller groups, whether a small cocktail event or tea party or a small gathering of as few as six friends or family members. Guests enjoy serving themselves. You, the host, can set all the food out at once and spend more time with your guests.
     
     
    A REVIEW OF SERVING STYLES

    Table Service

    With table service, the food is served individually plated or family style, where communal platters and bowls are passed. A variation is when a parent or other adult prepares a plate for each diner from the head of the table.


    The formal variation of this is French service, where dishes are brought to the table to be shown to the diners, and then carved and portioned at tableside by a butler or maitre d’.
     
     
    BUFFET SERVICE

    Buffet service is a self-service style where guests serve themselves from a sideboard or table. It can be a formal setting, a picnic table at a backyard barbecue or something in-between.

    At a formal restaurant or catered buffet, there can be staff on hand to serve guests from behind the table (which takes the fun out of it, in our opinion), or simply to carve and serve roasts.

    As with family-style service, guests have the ability to take only what they really want, and in the quantity they want it. (The down side is that people may also reach for seconds and thirds, “because it’s there.”)

    No matter what the setting, buffet food can be formal or casual—while some people like fancy food, salads and sandwiches are popular buffet items. We like pasta bars for dinner, with guests able to create their own dishes by combining pasta, sauces and garnishes. The same works with burger and hot dog bars, taco bars or any other theme.

    No matter what the food, a buffet is an opportunity to provide more condiments—chutneys, mustards, olives, pickles, relishes, different sauces—than table service. The result: You use up what’s in the fridge and pantry, and provide a larger symphony of flavors for guests.

    For brunch, consider a yogurt bar and a cereal bar, with different types of fruits, nuts, seeds and milks (for example, rice milk and soy milk in addition to cow’s milk). The popularity of chains like Cereality and The Cereal Bowl—where customers top cereals with as many toppings as they like—prove that you don’t have to cook for days to show guests a good time.

    Please share your favorite buffet ideas.
      

    Comments off

    TOP PICK OF THE WEEK: Somersault Snacks ~ Crunchy, Tasty, Healthy

    These crunchy bites somersaulted into being when some active adults sought a tasty, healthy, grab-and-go energy snack. They investigated and formulated and created Somersault Snacks.

    The action ingredient is sunflower seeds, which provide energy as well as 50% more protein (6 g per serving) than many popular nuts, and more fiber than an apple (3 g per serving), among other nutrition.

    Somersaults found popularity in their hometown of San Francisco, and are now available in limited distribution nationwide and online, in individual and six-ounce bags.

    You can have your Somersaults lightly sweetened, in Cinnamon Crunch and Dutch Cocoa, or salty and zesty, in Pacific Sea Salt, Santa Fe Salsa and Salty Pepper.

    If you’re looking for a better-for-you snack, read the full review and try a bag. You may find yourself with the energy for cartwheels and hand stands, as well as somersaults.
    Find more of our favorite gourmet snacks.

     
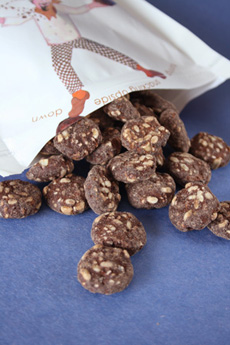
    Dutch Cocoa Somersaults. Photo by Elvira
    Kalviste | THE NIBBLE.


    Comments off

    TIP OF THE DAY: Try Growing Jalapeños Indoors


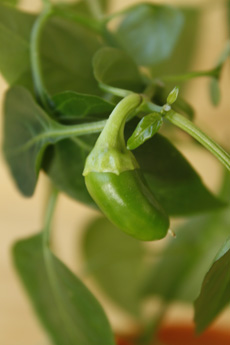
    Our first jalapeño. Photo by Elvira Kalviste |
    THE NIBBLE.

      Do you use fresh jalapeños to spice up recipes? If so, try growing the seeds.

    We grew our first jalapeño plant by accident.

    We had grown a pot of basil on the windowsill over our kitchen sink, from a packet of free seeds. The basil turned out to be a flimsy strain, however, with unsteady stalks and small leaves. We harvested the few leaves and waited for more to grow.

    One day, what looked like a weed sprouted in the basil pot. It grew into some lovely green leaves but we couldn’t identify the plant. Small white buttercup-type flowers appeared, but they turned into more leaves.

    In several weeks we had an attractive houseplant, and pulled the failing basil from the pot. Then one day: surprise! The plant revealed itself with a one-inch-long jalapeño.

    How?


    Through the miracle of nature, a seed from a jalapeño must have landed in the basil pot. Now, we’re having fun growing our own jalapeños indoors. Try it!

    1. Reserve some seeds from a fresh jalapeño. Line the bottom of the plant pot with pebbles to provide drainage and top with a nutrient-rich potting soil.

    2. Lay seeds, spaced about two inches apart, and cover with a final 1/2 inch of soil. Water and place in a window that receives direct sunlight.

    3. Water twice a week. Don’t over-water—jalapeños don’t grow in wet soil. If you have cold winters, remove the plant to somewhere slightly warmer (like the side of the sink) so it doesn’t freeze and stunt the growth of the jalapeños.

    4. Transfer the plants as needed to larger pots. Enjoy your little harvest.


    Comments off

    The Nibble Webzine Of Food Adventures
    RSS
    Follow by Email


    © Copyright 2005-2024 Lifestyle Direct, Inc. All rights reserved. All images are copyrighted to their respective owners.