THE NIBBLE BLOG: Products, Recipes & Trends In Specialty Foods


Also visit our main website, TheNibble.com.


TIP OF THE DAY: The Restaurant Cheese Plate

Fine cheese is sophisticated, luscious…and full of cholesterol and calories.

That’s why passing a cheese board at the dinner table is an invitation to over-indulgence.

So take a tip from top restaurants that offer a cheese plate:

Serve small bites of several cheeses, plus fruit and nut condiments.

Cut half-ounce servings of four different cheeses—a hefty tablespoon of each—with an assortment of healthful fruits and nuts (check out our chart of cheese condiments).

 
An oblong plate with small bites of cheese is a healthier way to enjoy this comfort food. Photo courtesy Payard.
 

You don’t need to serve a basket of bread, either: Eat the cheese with a fork and knife. You can add a slice of walnut bread, raisin bread or baguette; or, as shown in in the photo, a piece of panforte, along with a walnut half and dried fruit (shown, a date and a dried apricot).

Browse through our Cheese Glossary to get some ideas of what you’d like to serve. Half the fun is deciding on a theme for your cheese plate (fresh cheeses, goat’s milk or sheep’s milk cheeses, blue cheeses, country-of-origin cheeses [all French or Italian cheeses, for example], and so forth.)

Then, there’s the “wild card sampler”: Look at the cheeses in the store and pick a broad variety of what appeals to you (a fresh cheese, a smoked cheese, a stinky cheese and an aged cheese, for example).

A conventional round plate is fine. But we have a set of rectangular plates like those in the photo.

They add drama to just about any course, and are perfect for samplings (we like to use them for dessert samplers: a small piece of key lime pie, a small slice of brownie and a meringue or macaron, for example).

If it’s not in the budget to treat yourself to a set or two, put these plates on your birthday or holiday “gift registry.”


Comments off

COOKING VIDEO: How To Cook A Steak On The Stove


If your steaks don’t taste as good as restaurant steaks, it could be the quality of the meat. Or it could be your cooking technique.

Restaurant chefs start with searing the seasoned steak in a cast-iron skillet or grill pan. Sometimes they finish cooking the meat in the oven. In this demonstration, the seared meat is tented—no oven needed.

Check out the technique in this video. And check out the different cuts of beef in our Beef Glossary.


Comments off

RECIPE: Cognac Cocktail–Strip The Lemon Wedge, Save The Strips

We love food garnishing, making each dish or drink special with tasty, edible decor (here’s a basic book to start with).

A lemon or lime wedge, for example, is nothing special. But you can make it so by cutting small grooves, or channels, in the rind.

To do this, you need a small tool call a stripper (a channel knife), which is available by itself or as a combination stripper/zester (and also available in a left-handed version).

For cutting wheels or serving a half-lemon with seafood, first strip the citrus vertically, from top to bottom. For wedges, first, strip the citrus horizontally.

The stripping tool works with any citrus or hard fruit (apples, for example). The peel you strip away can be added to tea, salads, baked goods, and other recipes; or you can wrap it in plastic and save it in the fridge or the freezer to garnish seafood, vegetable dishes, and anything that pairs well with the citrus.

You can use stripped wedges or wheels for everything from drinks to seafood. We’ve already stripped our citrus for this evening’s cocktails.

So we now transition to cocktails:

Have you ever had a Cognac cocktail?

 
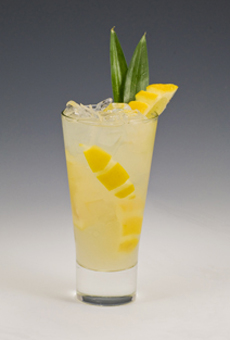
Give your citrus garnishes a glamorous look. Photo courtesy Courvoisier.
 
Here’s a refreshing drink from Courvoisier that combines Cognac with apple juice and ginger, and lime wedges for garnish that look so much better when they’ve been “stripped.” Just run the stripper vertically down from the top to the bottom of the citrus.

After you check out the recipe, take a look at the basics of Cognac, below.
 
 
RECIPE: COGNAC COOLER

Ingredients Per Drink

  • 2 parts Courvoisier VS Cognac (you can use VSOP, but VS is less expensive and fine for mixed drinks)
  • 2 parts ginger beer
  • Apple juice to top
  • 2 lime wedges
  • Cubed ice
  •  
    Preparation

    1. BUILD all ingredients in a highball glass over ice, pouring in the ginger beer last.

    2. GARNISH with squeezed lime wedges.


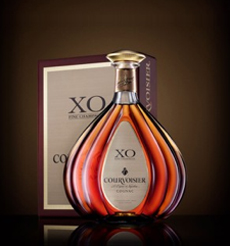
    XO Cognac is costly, but worth the
    experience. Photo courtesy Courvoisier.
      WHAT IS COGNAC

    Brandy is a spirit distilled from grapes. Cognac is a type of brandy made only from white grapes; brandy can use white and/or red grapes.

    Cognac is named after the town of Cognac in France, and only spirits distilled in the region, following strict rules imposed by the Bureau National Interprofessionnel du Cognac (BNIC), can be called Cognac.

    By law, Cognac must be twice distilled in copper pot stills, then aged at least two years (often considerably longer) in French oak barrels from the French forests of Limousin or Tronçais, where it matures in the same way that fine whiskey and wine matures.

    The result is: divine!

     
    THE DIFFERENT TYPES OF COGNAC

    There are official quality grades of Cognac based on age, established by the BNIC. As with all spirits, prices climb along with the length of barrel aging.

    However, in the ongoing game of marketing new products, some Cognac producers release their own expressions (for example, C by Courvoisier and Remy Martin Coeur de Cognac, and the more comprehensible Courvoisier 12 and Courvoisier 21), which have no official designation but can really tax a Cognac buyer to figure out what’s in the bottle.

    Official designations include:

  • V.S. or Very Special, a blend in which the youngest Cognac in the blend has been aged for at least two years in cask.
  • V.S.O.P., or Very Superior Old Pale, is a blend in which the youngest Cognac is stored for at least four years in a cask, although the average age of the blend is much older.
  • Vieux is a grade between the official grades of VSOP and XO.
  • Napoleon is another grade between VSOP and XO, equal to XO in terms of minimum age, but it is generally marketed in-between VSOP and XO in terms of price.
  • XO, Extra Old, is a blend in which the youngest Cognac in the blend is stored for at least six years* but is typically an average of 20 years.
  • Hors d’Âge, “Beyond Age,” refers to high quality Cognac that does not have an official age scale, but is considered equal to XO.
  • Vieille Réserve is, like Hors d´Âge, a grade beyond XO that does not have a specific, legal age minimum.
  • Extra, in which the youngest Cognac in the blend is 6 years of age, this grade is usually older than a Napoleon or an XO.
  •  
    Why are the names of the different grades in English, rather than French?

    Because England was long the primary market for Cognac, and the British importers/merchants named them.

    Fine Champagne does not refer to age, but the provenance of the grapes: a blend of Grande and Petite Champagne Cognacs, with at least half coming from Grande Champagne.

    WHAT IS FINE CHAMPAGNE COGNAC

    More confusion: It has nothing to do with the wine-producing region of Champagne.

    There are six different districts (called cru in French) within Cognac. Each has been graded by the government according to the quality of the grapes and Cognac produced there. The best district is Grande Champagne, followed by Petite Champagne, Borderies, Fins Bois, Bons Bois and Bois Ordinaires.

    A Cognac bottle labeled “Fine Champagne,” is as good as it gets in its age level.

    Time for a drink!

    _________________

    *In 2016, the minimum age of the youngest Cognac used in an XO blend will be increased to 10 years.


    CHECK OUT WHAT’S HAPPENING ON OUR HOME PAGE, THENIBBLE.COM.


    Comments off

    TIP OF THE DAY: How To Dry Salad


    Dry salad in the serving bowl, atop a paper towel. Photo by Elvira Kalviste | THE NIBBLE.
      Here’s a helpful tip for drying salad greens.

    Some people have the luxury of space for a salad spinner or a colander, two favorite salad-drying techniques.

    Others don’t have the space, or simply don’t own these utensils.

    But every kitchen has a bowl and paper towels. So here’s the easy tip:

  • Wash your greens, then lay them on paper towels or a dish towel. Loosely roll up the greens in the towel(s) and shake them to remove moisture.
  • The greens will still have excess moisture, so lay a dry dish towel or double paper towel in your salad bowl. Let the greens continue to drain until ready to serve.
  • Then, simply pull up the towel and you’re ready to go.
  •  
    Find our favorite salad recipes in our Vegetables Section.


    Comments off

    TIP OF THE DAY: How To Ice A Cake

    Frosting a cake seems easy enough, but anyone who’s tried knows just how difficult it is to create a clean and smooth surface.

    Pastry chef and cake artist Marina Sousa of JustCake.com creates exquisite party cakes (check out the portfolio on the website). She shares this trick of the trade: simple steps to a seamlessly iced cake:

    1. BE DILIGENT. “It really starts in the oven,” says Sousa. “Baking the cake to the right consistency is essential for it to stay together.” So, don’t underbake, overbake or take creative license with the recipe!

    2. COOL THE CAKE. Next, it’s important to let a cake properly cool before icing it. If the cake is still warm, the icing not adhere well.

    3. START WITH A CRUMB COAT. Once it’s cooled, ice the cake with a thin layer of the frosting, which is called the “crumb coat.” Spreading this thin layer on and letting it dry will seal in all the little crumbs so they can’t mess up your final layer.

     
    Your cakes may not be this fancy, but your frosting can be just as smooth. Photo courtesy JustCakes.com.
     
    4. ADD THE FINAL FROST. After about 15 minutes, it’s time for a second and final frost. Start with a thick layer on the sides, working from the top toward the bottom, always wiping off your spatula before putting it back in the icing bowl. Finally, spoon a mound of frosting in the center of the top of the cake and spread it out toward the edges. Take long strokes, all in the same direction, until you have a smooth, crumbless finish.

    Watch this video on how to ice a cake.

    THE DIFFERENCE BETWEEN ICING & FROSTING

    The difference between frosting and icing is in the sugar:

    Icing is made with confectioners’ sugar (also called icing sugar), frosting is made with granulated sugar (table sugar). The two words are often used interchangeably, but that doesn’t make it correct!
     
    Find our favorite cakes and cake recipes in our Gourmet Cakes Section.


    Comments off

    The Nibble Webzine Of Food Adventures
    RSS
    Follow by Email


    © Copyright 2005-2024 Lifestyle Direct, Inc. All rights reserved. All images are copyrighted to their respective owners.