THE NIBBLE BLOG: Products, Recipes & Trends In Specialty Foods


Also visit our main website, TheNibble.com.

Boston Cream Cheesecake Recipe & History Of Boston Cream Pie

Got 35 minutes of prep time? Whip up this specialty cheesecake for National Cheesecake Day, July 30th. Boston Cream Cheesecake is a fusion of—you guessed it—Boston Cream Pie and cheesecake.

So we’ll start with some food trivia:

  • Boston Cream Pie is not a pie, but a layer cake with a pastry cream or custard filling.
  • Cheesecake is not a cake, but a cream cheese-flavored custard pie.
  •  
    The recipe is courtesy of Philadelphia Cream Cheese, which published the first recipe for a cream cheese-based cheesecake in 1928.

    Cream cheese itself was invented by a farmer in New York state in 1872, but became mass marketed by the Philadelphia Brand in 1928.

    The package included the recipe for “New York Cheesecake,” which refers to an all-cream-cheese recipe. Prior to then, cheese cakes were made with cottage cheese and ricotta.

    > The history of Boston Cream Pie is below.

    > Check out the year’s 16 cheesecake holidays.

    > October 23rd is National Boston Cream Pie Day (photo #3).
     
     
    RECIPE: BOSTON CREAM CHEESECAKE

    While prep time is 35 minutes, the total ready time, including baking and refrigeration, is 5 hours 20 minutes. Makes 16 servings.

    Ingredients

  • 1 package yellow cake mix or your own from-scratch recipe
  • 3 packages (8 ounces each) cream cheese, softened
  • ¾ cup granulated sugar
  • 1 teaspoon vanilla
  • ¾ cup sour cream
  • 3 eggs
  • 2 cups frozen Cool Whip whipped topping
  • 4 ounces semi-sweet chocolate
  •  
    Preparation

    1. HEAT the oven to 325°F.

    2. PREPARE the cake batter as directed on the package. Pour into a 9-inch springform pan sprayed with cooking spray*. Bake 25 to 30 minutes, or until a toothpick inserted in center comes out clean. Cool.

    *Note: If baking the cheesecake in dark springform pan, reduce the oven temperature to 300°F

    3. BEAT the cream cheese, sugar, and vanilla in large bowl with a mixer until well blended. Add the sour cream; mix well. Add the eggs, one at a time, mixing on low speed after each just until blended. Pour over the cake layer in the pan.

    4. MICROWAVE the Cool Whip and chocolate in microwaveable bowl on HIGH for 1 to 1-1/2 minutes or until the chocolate is completely melted and the mixture is blended, stirring after each minute. Cool for 15 minutes; slowly pour over the cheesecake, using a spatula as needed to distribute the glaze. Refrigerate for 4 hours.


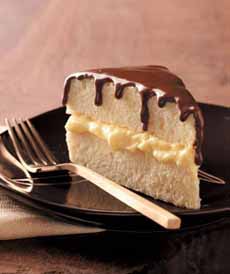
    [1] Chocolate and cheesecake are a great combination, as any cheesecake lover knows (photos #1 and #2 © Kraft Heinz.


    [2] Have a slice! The cheesecake has one layer of yellow cake and one layer of cheesecake, topped with chocolate ganache.

    A slice of Boston Cream Pie
    [3] The namesake Boston Cream Pie has two layers of yellow cake plus a custard filling, topped with chocolate ganache. Here’s a recipe (photo © Taste Of Home).


    BOSTON CREAM PIE HISTORY

    So why is a yellow layer cake that is filled with pastry cream or custard and frosted with chocolate ganache called a pie?

    That answer is most likely that, in the mid-19th century pie tins were more common than cake pans. The distinction between calling something pie or cake was more flexible than it is today. The cake might well have been baked in pie tins.

    Chef M. Sanzian, hired for the opening of Boston’s Parker House Hotel in 1856, created the modern Boston Cream Pie, a sophisticated remake of an early American pudding-cake pie recipe. He sandwiched two layers of sponge cake with crème pâtissière, a vanilla-flavored custard. He topped the cake with a chocolate ganache glaze.

    At the Parker House Hotel, the cake was originally served with the names Chocolate Cream Pie or Parker House Chocolate Cream Pie.

    Beginning in the 20th century, a custard filling often replaces the crème pâtissière.

    In 1996, Boston Cream Pie was declared the official cake of Massachusetts.


    CHECK OUT WHAT’S HAPPENING ON OUR HOME PAGE, THENIBBLE.COM.


    Comments off

    TIP OF THE DAY: Sugar Substitutions


    Try something from this list instead of sugar.
    Photo courtesy Domino Foods.
     

    Don’t want refined sugar in your recipe? Here are substitutes for 1/2 cup sugar:

  • Agave syrup: 1/3 cup
  • Barley malt extract: 1-1/2 cups
  • Carrot juice: 1/2 cup
  • Dried fruit purée: 1-1/4 cups
  • Fruit: 2 cups
  • Fruit juice: 1/2 cup
  • Fruit juice concentrate: 1/2 cup
  • Unsweetened frozen juice concentrate: 1/2 cup
  • Honey: 1/2 cup
  • Maple syrup: 1/2 cup
  • Molasses: 2/3 cup
  • Rice syrup: 1-1/4 cups
  •  
    Remember to decrease or increase the amount of liquid or flour in the recipe, according to the liquid content of the sweetener.


    Comments off

    RECIPE: Dorie Greenspan’s Dimply Plum Cake

    If “Dimply Plum Cake” doesn’t sound sexy to you: Trust us, you will love this cake.

    A robust batter, scented with cardamom, lemon and vanilla, bakes up around halved plums. The fruit creates charming plum “dimples” in the surface. It is a perfect breakfast/brunch cake with a cup of coffee, but also is a delightful dessert.

    Take advantage of the season’s plums, and start mixing!

    If you’re not familiar with Dorie Greenspan’s recipes, treat yourself to one of her cookbooks.

    DORIE GREENSPAN’S DIMPLY PLUM CAKE

  • 1-1/2 cups all purpose four
  • 2 teaspoons baking powder
  • 1/4 teaspoon salt
  • 1/4 teaspoon ground cardamom
  • 5 tablespoons unsalted butter
  • 3/4 cup packed light brown sugar
  • 2 large eggs
  • 1/3 cup canola oil
  • Grated zest of one lemon
  • 1-1/2 teaspoons pure vanilla extract
  • 8 purple or red plums, halved and pitted
  •  
    Simple and spectacular: Dorie Greenspan’s Dimply Plum Cake. Photo courtesy BellaBaker.com.
     
    Preparation
    1. PREHEAT the oven to 350°F. Butter an 8×8 baking dish or a glass pie plate and set aside.

    2. COMBINE the flour, baking powder, salt and ground cardamom.

    3. CREAM the butter with the brown sugar in a stand mixer. Add the eggs, one at a time, beating well after each addition. Beat in the oil, lemon zest and vanilla. Reduce the speed and add the flour mixture. Pour the batter in the prepared dish, smooth the top and arrange the plums on top, cut side up.

    4. BAKE for about 40 minutes or until a knife inserted in the middle comes out clean. Let cool for at least 15 minutes before serving.

    You can serve the cake with crème fraîche, whipped cream or vanilla ice cream, but it’s perfect as is. Enjoy every bite!
     
    FIND MORE OF OUR FAVORITE CAKE RECIPES.
      

    Comments off

    TIP OF THE DAY: Grilling On Planks


    Salmon on a cedar plank. Planks available
    from HomeWetBar.com.
     

    Are you a convert to plank grilling yet?

    Grilling on planks of wood boosts the flavor of grilled fish, meats and vegetables by infusing them with subtle, smoky flavors.

    The Haida natives of the Pacific Northwest are the earliest known people to have used plank grilling, using wood planks to cook the plentiful local salmon over fire.

    Untreated wood planks—typically alder, cedar, hickory, maple, mesquite and oak—are are popular and the planks can be reused. The planks can also be used in the oven. (NOTE: be absolutely sure the planks are untreated; otherwise, they are treated with harmful chemical preservatives for non-culinary uses.)

    Prepare the food as you normally wood—marinating it, for example—prior to plank grilling.

    While planks often come with instructions to use only once, that’s just the manufacturer trying to get you to buy more planks. You can actually reuse grilling planks two or three times, or until there’s enough plank left upon which to place food. (Only enough wood left to hold one burger? Use it and compare the flavor to the non-planked burgers.)

    After that, crumble up what’s left of the charred planks and place the “chips” over the coals for another session of grilling.

    Here are plank grilling tips and a planked grilled salmon recipe from Grand Lux Cafe, which has locations in Florida, Illinois, Nevada, New Jersey, New York and Texas.
    TIPS FOR PLANK GRILLING

  • PICK up a grilling plank from your grocer, culinary specialty store (such as Sur La Table or Williams-Sonoma) or online.
  • SOAK the plank for at least one hour prior to using, to add moisture to the wood and prevent it from burning on the grill. Add a tablespoon of salt or a cup of apple juice, citrus juice or white wine, plus optional garlic or onion, to the soaking water. It will accent the wood aromas.
  • SEASON planks that you are using for the first time by placing them on a preheated grill for 2 minutes, turning once. Lightly toasting a plank on both sides will intensify its smoky flavor and prevent warping. When the plank starts crackling, it’s ready for cooking.
  • PLACE marinated or ready-to-cook foods directly on the plank. Keep the grill lid closed as much as possible to maintain temperatures and maximize the smoke infusion.
  • DON’T flip: Planked food does not have to be turned during grilling.
  • KEEP a spray bottle of water handy if the edges of the plank catch fire. Just lightly spray the area.
  • REUSE: After cooking, the edges of the plank will be charred, brittle, and smoldering. Use oven mitts and a spatula to transfer the empty plank onto a cookie sheet, a fireproof serving platter or a container of water. Clean it with soap and water and let it dry for another use.
  • EXPERIMENT next time. While cedar is the fail-safe standard, you can experiment pairing different types of wood and foods. Maple and pork work well together (maple also works with salmon).
  •  

    RECIPE: CEDAR PLANKED BBQ SALMON

    Ingredients For 2 Servings

  • 1 cedar plank, any size larger than the fish
  • 10-12 ounces salmon filet, bones and skin removed
  • 1/4 teaspoon kosher salt
  • 1/8 teaspoon fresh-ground black pepper
  • Citrus juice, herbs and olive oil for seasoning, or 1/2 cup chipotle-honey BBQ sauce or other flavor
  •  
    Preparation

    1. SOAK the cedar planks in water for a minimum of 30 minutes before using.


    Cedar planks. Photo courtesy All-State Forest Products.


    2. PREHEAT the grill to medium high heat (approximately 400°F or grey coals if using charcoal). Place the cedar plank onto the grill for 2-3 minutes or until it begins to smoke and becomes slightly darker in color. Remove the plank from the grill.

    3. SPREAD 2 tablespoons of the barbecue sauce on the center of the cedar plank. Season both sides of the fish with salt and pepper.

    4. PLACE the salmon onto the cedar plank and set it onto the grill. Place a lid over the fish or close the cover over the grill and allow the fish to cook for 2 minutes.

    5. BASTE the fish three times: Lift the lid and baste the salmon with a little of the sauce; close the lid and cook for 2 more minutes. Repeat two more times. Then continue to cook for another 2 minutes or until the fish is done. When cooked correctly, the fish will be extremely moist, with a deep, rich sheen across the surface.


    Comments off

    RECIPE: Seared Scallop Salad


    Seared scallop salad: a first or main course.
    Photo and recipe courtesy Pom Wonderful.
      Every Saturday morning, we head out to our local farmers market, always stopping at the fishmonger’s booth for fresh scallops. We love them cooked or raw. In fact, we have to restrain ourselves from nibbling up the raw scallops for lunch so we’ll have enough for the evening’s recipe.

    Here’s how we’ll be making them tonight, as a first course. The salad has a sprightly soy-ginger dressing.

    RECIPE: SEARED SCALLOP SALAD

    Ingredients For 4 Main Servings

    For The Scallops

  • 1-1/2 pounds large sea scallops
  • 2 tablespoons olive or vegetable oil
  • 1 clove garlic, crushed
  • 1 teaspoon fresh ginger, grated
  • Salt, pepper and paprika to taste
  • Ingredients For The Salad

  • 1/4 cup arils from 1 pomegranate
  • 6-8 cups mixed greens
  • 1/2 cup cucumber slices
  • 1 cup cherry tomatoes
  •  

    Ingredients For The Soy-Ginger Dressing

  • Juice from 2 pomegranates, or 1/2 cup
    pomegranate juice
  • ¼ cup balsamic vinegar
  • 2 tablespoons honey
  • 1 tablespoon soy sauce
  • 1 tablespoon fresh ginger, grated
  • ½ teaspoon salt
  •  
    Preparation

    1. SCORE 1 fresh pomegranate and place in a bowl of water. Break open the pomegranate under water, to free the arils (seed sacs). The arils will sink to the bottom of the bowl and the membrane will float to the top. Sieve and place the arils in a separate bowl. Reserve 1/4 cup of the arils for the salad; refrigerate or freeze the remaining arils for another use.

    2. PREPARE soy-ginger dressing: Mix all of the dressing ingredients with a whisk or in a blender.


    Soy-ginger salad dressing. Photo courtesy Pom Wonderful.


    3. MIX 1 tablespoon olive or vegetable oil, salt, pepper, paprika, garlic and 1 teaspoon ginger in a bowl; toss with scallops.

    4. HEAT 1 tablespoon olive or vegetable oil in a large skillet. Place scallops in the skillet in a single layer. Cook without turning until the underside is crispy brown and then turn. Sear in batches if necessary.

    5. COVER scallops, set aside and keep warm while preparing the salad.

    6. ARRANGE greens on 4 dinner plates, top with cucumbers and tomatoes. Divide the scallops onto each plate; garnish with arils. Serve with dressing.
     
    FIND MORE OF OUR FAVORITE SALAD RECIPES.


    Comments off

    The Nibble Webzine Of Food Adventures


    © Copyright 2005-2026 Lifestyle Direct, Inc. All rights reserved. All images are copyrighted to their respective owners.