TIP OF THE DAY: Make A Lattice Pie Crust
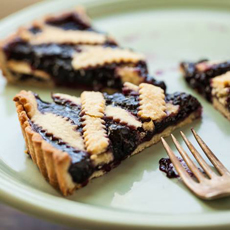 Many people think a lattice is the prettiest pie crust. Photo courtesy Completely Delicious via Go Bold With Butter. |
“A home-baked fruit pie with a lattice crust is a guaranteed crowd pleaser,” says Annalise Sandberg of CompletelyDelicious.com. If you’ve always wanted to make one but haven’t yet, Annalise is here to help with a step-by-step photo tutorial. A lattice crust is a top crust for pies or tarts made from strips of dough woven into a criss-cross pattern. In addition to the eye appeal, the openings between the strips of dough allow steam to escape during baking. Some of the water in the fruit juices evaporates, which can caramelize the filling and makes for a less drippy filling. That’s why you typically find a lattice top on fruit pies. The lattice is made from the top crust dough of a double crust pastry recipe. The dough is cut into strips using a sharp knife or, preferably, a pastry wheel cutter which provides a beautiful crimped edge. If you need to buy a pastry wheel, we like this one which has both crimped and straight cutting blades. You can use the same tool to cut ravioli. |
|
|
LATTICE CRUST TIPS Ingredients |
||
|
Preparation 1. MAKE the fruit filling of your choice. Set aside and make your favorite pie crust recipe, divided into two disks. Chill the dough. 2. ROLL out first disk of dough, place it in the pie pan and fill it with the fruit. 3. ROLL out second disk of dough. Use a plain or decorative pastry wheel cutter (or a very sharp knife) to slice the dough into strips approximately 1-inch wide. Use 10 strips as you first master the technique. Later you can get creative with the width of the lattice and the number of strips you use. 4. PLACE 5 dough strips on top of pie, spaced evenly. The longest strips should be in the center. 5. WEAVE the second group of strips under and over the first five (and if these instructions sound confusing, look at the photo at right, watch the video or this photo layout). |
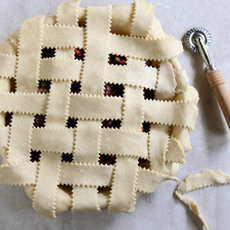 Ready, set, bake! Photo courtesy Annalise Sandberg of CompletelyDelicious.com. Here’s her recipe. |
|
|
> PULL back the second and fourth strips halfway and place another strip down center of the pie, perpendicular to first set. Lay folded strips back down. > FOLD the first, third, and fifth strips back and place another perpendicular dough strip on top of pie. Unfold those strips, and again fold second and fourth strips. Lay one more perpendicular strip. > ROTATE the pie 180 degrees and repeat on the other side until you have finished the lattice. > TRIM the ends of the strips so that they match up with the overhang of the bottom crust. Pinch the top and bottom crusts together to seal, fold under and crimp as desired. 6. BAKE as directed and impress your friends and family! LATTICE TRIVIA Before it was adapted to a pie crust design, a lattice was a structure of crossed wooden or metal strips, often arranged to form a diagonal pattern on trellises (for vines), gazebos, summerhouses, arches and other structures. The word first appears in print as an English noun in the late 13th century, derived from an Old English variant of laett, from the German latte—which is not a beverage but a thin slat of wood. The root can be found in numerous old languages, including Proto-Germanic, Old Norse and Old Saxon. The verb appears in the 1530s. Im Middle English the word was spelled latis; in Middle French, lattis. The French spelling is the same today. |
||

