RECIPE: Christmas Ornament Cookies
|
If our recent article on making Christmas tree ornaments from dehydrated fruit didn’t appeal to you, how about cookie ornaments? Unlike dried citrus, you can eat the cookies when you take down the tree.
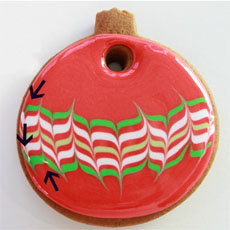
This is a recipe for people who want to hone their decorating techniques. Marian, cookie decorating expert and author of the blog Sweetopia, has created a tutorial to guide you. Follow her easy steps and master the art of marbling (also called feathering or swirling). To marble, you simply add one or more colors of icing to a base coat and then drag a toothpick through the icing to create a marbled effect. Check out the step-by-step decorating instructions If you’ve made cookies like these before you, you know that all you need are time and patience. It gets easier with every batch. Bonus: You can use the marbling technique on cakes, cocktails with foam top layer, and of course, cappuccino and latte. These are gingerbread cookies, but if you prefer, you can make shortbread or chocolate shortbread cookies. Prep time is 25 minutes, and cook time is 15 minutes. Determine in advance how many colors of icing you want to use. |
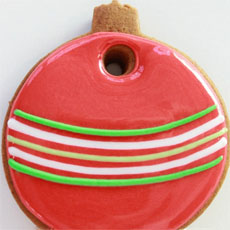
Hang these ornament cookies on the tree, and eat them when the tree comes down (in theory). Photo courtesy GoBoldWithButter.com. |
|
|
Ingredients For 30 Cookies For The Cookies †Clear vanilla extract is a flavoring used when you don’t want vanilla to discolor a light icing. It is not “real” vanilla extract. Rather, it is flavored with vanillin, which is used to make artificial vanilla extract. |
||

|
Preparation 1. PREHEAT the oven to 350°F. Cream the butter and brown sugar in the bowl of an electric mixer fitted with the paddle attachment, on medium speed, until fluffy. Mix in the spices, then the eggs and molasses. Reduce the speed to low. 2. WHISK together in a separate bowl the flour, salt, and baking powder. Add to butter mixture, and mix until just combined. 3. FORM the dough into a disk shape and wrap it in plastic. Refrigerate until cold, about 1 hour. 4. ROLL the out dough on a lightly floured work surface or between 2 sheets of parchment paper to about 1/4-inch thick. Cut out the shapes with cookie cutters and cut a small hole in the top of each cookie for the ribbon. 5. PLACE the cookies approximately 2 inches apart on baking sheets lined with parchment paper. Refrigerate until the dough is firm, at least 15 minutes and up to 1 hour. 6. BAKE the cookies until lightly golden, 12 to 14 minutes. Let them cool on the sheets on wire racks. 7. MAKE the royal icing. In the bowl of an electric mixer fitted with the paddle attachment, add the warm water and meringue powder (and the clear vanilla extract if necessary). Whisk by hand until frothy and thickened, about 30 seconds. Add the cream of tartar and whisk by hand for 30 seconds more. 8. ADD all the powdered sugar at once. Using the lowest speed, mix slowly with the paddle for 10 minutes. The icing will become thick and creamy. 9. DIVIDE into portions to tint with food colorings. As necessary, thin the icing with small amounts of warm water to reach the desired consistency. 1. BEGIN by piping an icing outline around each cookie. Use a piping bag fitted with a coupler and #2 tip. 2. LET the outline dry for a few minutes to create a solid border. You’ll be able to see the border somewhat when the icing dries, so alternately you could fill or flood your cookie in right after piping the outline. Once you’ve filled the whole cookie… 3. SHAKE it gently left to right on your work surface, to help smooth the icing out. |
|
|
4. ADD your second (or more) layer or color of icing. Work as quickly as you can before the icing sets. 5. TAKE a toothpick and drag it through the icing, drawing S-like shapes. Each combination of colors creates another look. Just by changing the way you set up your lines and drag the toothpick, completely different designs emerge. 6. DO as much decorating as you like. Once the marbled icing has set (at least 15 minutes), pipe the icing at the top (crown) of the ornament, representing (use grey or gold). Let that set and pipe a few line details as desired. Don’t be intimidated by the piping. You don’t have to make perfectly marbled cookies like an expert baker. You can make abstract swirls, polka dots or whatever you like. CHECK OUT WHAT’S HAPPENING ON OUR HOME PAGE, THENIBBLE.COM. |
||


