TIP OF THE DAY: Pan De Muerto For El Día De Los Muertos
|
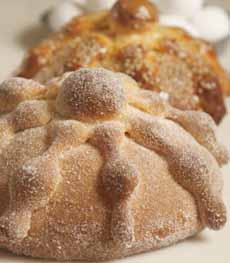
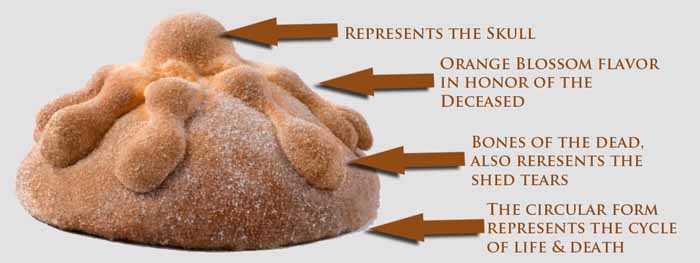
The Mexican holiday, El Día De Los Muertos, is celebrated on November 1st and 2nd. A celebration of the Life and Death of loved ones who have passed over to the other side, it has many festive traditions to honor them. One we rarely see in mainstream U.S. food stores is pan de muerto (also also called pan de los muertos, bread of the dead). Pan de muerto is eaten on the holiday: at gravesite picnics, or in front of the home altar to the deceased. These sweet yeast loaves or rolls are fragrant with anise seed, orange zest (sometimes orange blossom water) and cinnamon, and are topped with sugar. Since the deceased can’t eat the food, the aromatic ingredients enable them to enjoy the scent. In some regions the breads are decorated with bone-shaped pieces of dough, which represent the deceased. They are usually placed in a circle to portray the circle of life. Loaves may also be shaped into skulls, animals or even shaped to resemble the deceased. A tear drop can also be added to represent the Aztec goddess Chimalma’s tears for the living (El Día De Los Muertos derives from an Aztec tradition). Another tradition is for the baker to wear decorated wrist bands, originally worn to protect his/her wrists from the hot stove or oven. Different regions have different traditions, as do individual families. In some regions, pan de muertos is eaten beginning two months or so before the official holiday. During the holiday, everyone eats pan de muerto as well as the deceased’s favorite foods. Today’s tip: Look for the bread in Latin American food stores. If there are none near you, consider baking your own, with your own touches, using the recipe below as a starter. This recipe (photo #1) was developed by Dionne Baldwin of Try Anything Once Culinary for Zulka sugar. The strips of dough that run vertically around the bread resembles the bones. See the illustration below for all significant elements. (A mini-tip: At THE NIBBLE, we use Zulka sugar exclusively. It’s minimally processed; and if you use sugar as a topping (e.g. on cereal or atop baked goods), you can taste the difference.) Prep time is 3 hours 20 minutes, cook time is 35 minutes. 1. ADD the sugar and orange zest to the bowl of a stand mixer add. Mix for 30 seconds using the paddle attachment. Add in the anise seeds, salt and flour. 2. COMBINE the water and milk in a microwave-safe bowl. Microwave for 45 seconds, then test with a thermometer to make sure the temperature is at 90°F or lower. Add the yeast and stir together. Let the mixture rest for 10 minutes. Then pour the milk and yeast mixture into the dry ingredients along with the eggs, butter and orange juice. |
 [1] Pan de muerto, a tradition for El Día De Los Muertos. The recipe is below (photo courtesy Try Anything Once Culinary).
|
|
|
3. MIX everything together on low using the dough hook. Once the ingredients are combined, knead for 8 minutes. Add the flour 1 tablespoon at a time if needed. The dough should be tacky, sticky, but not coming off on your finger when you poke it. The dough should roll on the bottom of the bowl without sticking. 4. LIGHTLY OIL a clean bowl and let the dough rise in a warm place for two hours or until the dough doubles in size. After rising, gently punch down the dough and remove from the bowl. Turn out onto a clean, dry flat surface to form the loaves. 5. DIVIDE the dough into three equal pieces. Pull off a handful of dough from each piece and set the handfuls aside. Form each large piece into a ball by pulling the sides down and pinching together underneath the dough ball. 6. FORM each large piece of dough into a ball by pulling the sides down and pinching together underneath the dough ball. 7. RETURN to the handfuls of dough set aside. Make the pieces that cross over the bread to resemble bones with a ball for the top. Pull off a small piece from each handful and roll into a long strip for each loaf. Cut the strip into 2-3 pieces, long enough to stretch from one side of the loaf to the other, tucking the ends underneath. Lay the pieces on top of the loaf, crossing in the center. Do the same with the last two handfuls. Leave the small dough balls aside for now. 8. PLACE the formed loaves on baking sheets lined with parchment paper or silicone baking mats, and let them rise in a warm place for an hour. Preheat the oven to 350°F. 9. PLACE one of the small balls atop of each loaf. Press down on top of each ball with your palm, pushing it into the loaves. 10. BRUSH room temperature water on top of each loaf. Bake for 35-40 minutes or until the bread is a light brown color. Remove from the oven and let the loaves cool on a wire rack. 11. BRUSH melted butter on top of the cooled loaves and sprinkle sugar on top. |
||


