TIP OF THE DAY: Top 10 Turkey Cooking Tips
|
Have you been blasted with turkey tips this season? If not, these tips, adapted from Whole Foods Market, will help you out:
1. PLAN FOR THAWING If you purchase a frozen bird, plan ahead! Depending on its size, the turkey could take half a day to defrost for small for small birds, or multiple days for large birds. 2. BASTE ONLY ONCE Baste your bird only at the beginning of the roasting process. Basting later, or continuous basting, can make the skin soft instead of crispy. Similarly… 3. KEEP THE DOOR CLOSED Resist the urge to frequently open the oven door and check on the turkey. It causes temperature fluctuations and lengthens the cooking time. 4. CHECK THE TEMPERATURE Check the doneness with a meat thermometer, preferably an instant-read. Test at the thickest part of the thigh, not touching bone. When the thermometer registers 165°F, it’s ready. If you have stuffed the turkey cavity, plan for an extra 5-7 minutes cooking time per pound, and be sure that both the stuffing and the turkey each register 165°F. 5. CHECK THE TIME At 350°F, the bird needs bout 13 minutes per pound. When you plan the time for serving, don’t forget the extra 30 minutes of resting time required before the cooked bird is ready to carve. 6. TENT WITH FOIL If the drumsticks begin to brown too quickly, cover them loosely with foil. 7. FLIP THE BIRD Start roasting the bird with the breast side down. This protects the white meat from overcooking and helps absorb juices as they run downward. Halfway through, flip the bird over with the breast side. This is so the skin crisps and gets golden brown. Consider some turkey flipping tools. Tom needs to rest for about 30 minutes before carving. This redistributes the juices; otherwise, they’ll spurt out at the first slice, taking the moisture with them. If you want the skin to stay crisp, don’t cover the bird “to keep it warm” while it rests. That will hold in moisture and de-crisp the skin. Redistribution of juices also makes for smoother carving. 9. PRESENTATION If don’t want to carve at the table, present the beautiful bird to your guests; then return to the kitchen to carve. 10. PLATTER DECORATIONN Whether you carve at the table or serve a platter of sliced meat, decorate your platter. We prefer fruits and herbs that are decorative—i.e., not the cooked sides like Brussels sprouts and onions. For color and neatness, we like: |
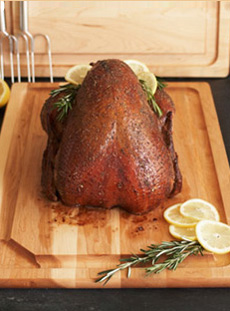
 [1] You can present the turkey to guests during its resting stage. You can set the platter on the table to rest, so people can enjoy looking at the bird until you’re ready to carve. Otherwise, after the “big reveal,” bring the platter back to the kitchen to rest (photo courtesy Whole Foods Market).
|
|
|
|
||