Grapefruit Meringue Pie Recipe For National Grapefruit Month
|
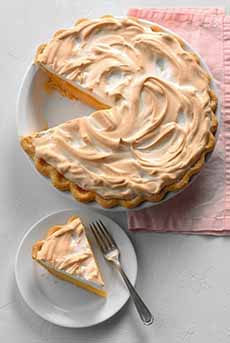
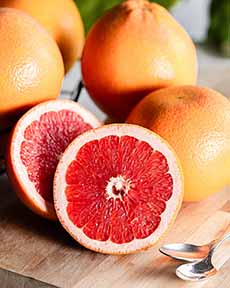
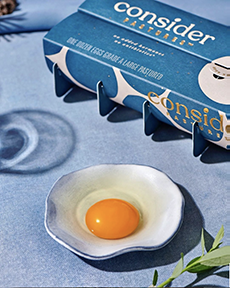
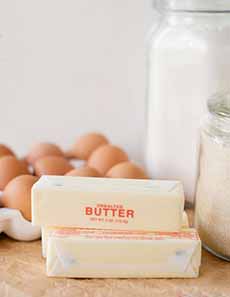
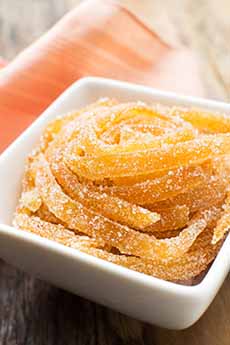
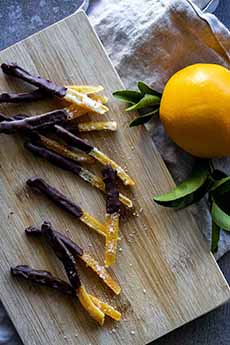
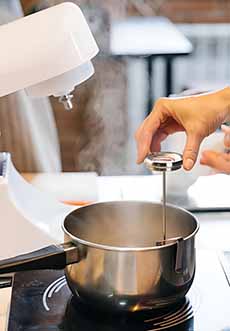
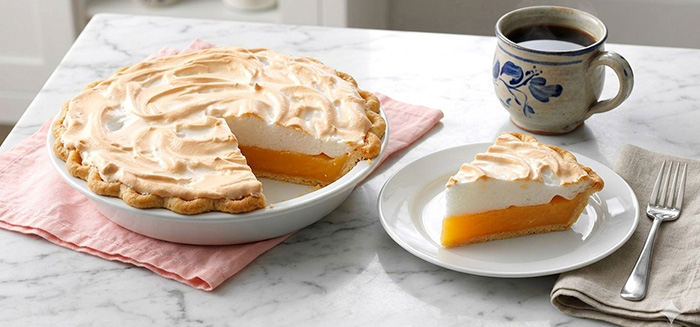
February is National Grapefruit Month. Before the month is out, how about a Grapefruit Meringue Pie recipe? This was our weekend baking project. The flavor profile is different from a lemon meringue pie, but the texture is the same. Thanks to Taste Of Home for sharing this recipe, which was created by Barbara Soliday of Winter Haven, Florida. Barbara has a grapefruit tree in our backyard, so uses fresh grapefruit juice. The rest of us can shop for fresh-squeezed pink grapefruit juice or whole pink or red grapefruits to squeeze. > The recipe for grapefruit meringue pie. > The recipe for candied grapefruit peel. > A hack if you don’t have a candy thermometer. > Why do you need a separate candy thermometer? > The history of the kitchen thermometer. > The history of grapefruit, including pink and red grapefruit. > 20+ more grapefruit recipes: savory, sweet, and cocktails. > World Paloma Day is May 22nd, a delicious grapefruit cocktail. > The year’s 45+ citrus holidays. > The year’s 31 pie holidays. You can bake your favorite pie crust recipe from scratch, or use a purchased crust. After the crust is mixed, prep time is 35 minutes, bake time is 15 minutes, plus chilling. If you want to add a special garnish, how about candied grapefruit peel (photo #5)? The recipe is below. 1. MAKE your pie dough. Then, on a floured surface, roll the dough to a 1/8-inch-thick circle; transfer to a 9-in. pie plate. Trim crust to 1/2 inch beyond the rim of the plate; flute the edge. Refrigerate for 30 minutes. Preheat the oven to 425°F. 2. LINE the pie crust with a double thickness of foil. Fill with pie weights, dried beans or uncooked rice. Bake on a lower oven rack until the edges are golden brown, 20-25 minutes. Remove the foil and weights; bake until the bottom is golden brown, about 4 minutes. Cool on a wire rack. Meanwhile… 3. COMBINE the sugar and cornstarch in a large saucepan. Stir in the grapefruit juice and water until smooth. Cook and stir over medium-high heat until thickened and bubbly. 4. REDUCE the heat; cook and stir for 2 minutes longer. Remove from the heat. 5. STIR 1/2 cup of the hot filling into the egg yolks; return all to the pan, stirring constantly. Bring to a gentle boil; cook and stir for 2 minutes longer. 6. REMOVE from the heat. Gently stir in the butter and lemon extract. Pour the hot filling into crust. 7. MAKE the meringue. In a large bowl, beat the egg whites and cream of tartar on medium speed until soft peaks form. Gradually beat in the sugar, 1 tablespoon at a time, on high until stiff glossy peaks form and the sugar is dissolved. Spread evenly over the hot filling, sealing the edges to out to the crust. 8. BAKE at 350°F until the meringue is golden brown, 12-15 minutes. Cool on a wire rack for 1 hour. Refrigerate for at least 3 hours before serving. Store leftovers in the refrigerator. Ingredients 1. PEEL the skin with a vegetable peeler. Cut into julienne strips 1-1/2 inches long and 1/16 inch wide. 2. SIMMER in water for 10 to 12 minutes, or until just tender when bitten. Drain. 3. REFRESH in cold water and dry on paper towels. 4. BOIL the sugar and water in a small saucepan to the thread stage, 230°F on the candy thermometer. Remove from heat. 5. STIR in the peel and the vanilla and let stand in the syrup for at least 30 minutes. 6. DRAIN when ready to use. Under refrigeration the peel will keep in the syrup for several weeks. To coat in chocolate: 7. MELT a chopped chocolate bar or chocolate chips of choice. Dark chocolate or white chocolate works better than milk chocolate. 8. DIP the individual pieces of peel in the chocolate, and place on wax paper to dry. Below: In fact, it’s what cooks did in the era before kitchen thermometers were invented. The history of the kitchen thermometer is also below. |
|
|
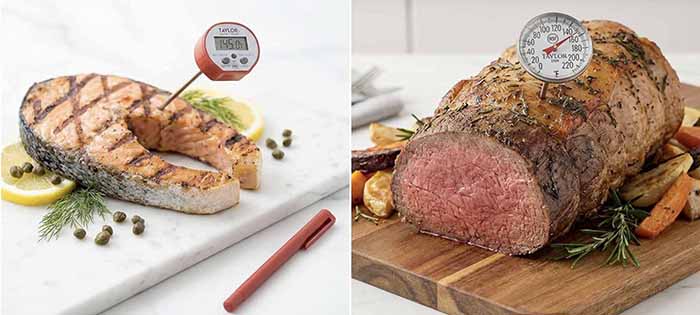
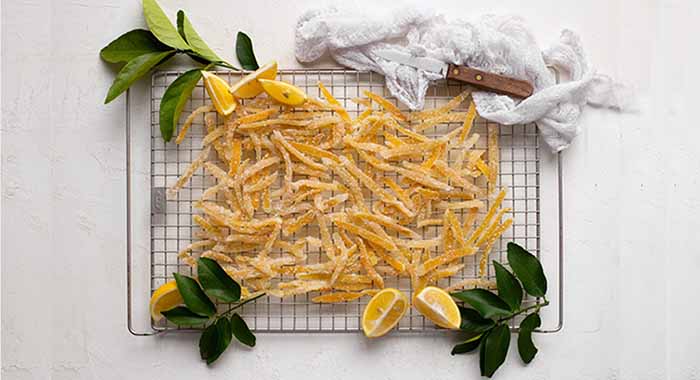 [8] Candied peel is delicious with a sugar coating—or dipped in chocolate, if you prefer. CANDY THERMOMETER SUBSTITUTE If you don’t have a candy thermometer, you can use the Cold Water Test, a classic culinary technique. You drop a small amount of hot syrup into a bowl of very cold water to identify the stage of the sugar: 1. CUT the peel into strips in the size of your choice. 2. BLANCH. To remove the bitter edge from the pith, blanch the lemon strips in boiling water 2–3 times, using fresh water each time, before you start the sugar syrup process. 3. USE a clean, room-temperature spoon for each test to avoid introducing sugar crystals (they could cause the whole batch to seize or grain). Drop a bit of the simmering lemon syrup into a bowl of very cold water. 4. REACH into the water and try to pick up the syrup. 6. COAT. Once the peels are done simmering and have been drained, toss them in granulated sugar while they are still tacky to give them the classic sparkling look. If you prefer, coat them in melted chocolate and set/dry on parchment or wax paper. The peels will keep for several weeks in an airtight container at room temperature, or even longer in the fridge. Traditionally, the reason is that meat is cooked at relatively low temperatures: poultry at 165°F, beef anywhere from 125°F to 160°F, pork around 145°F. A meat thermometer needs to be precise in a fairly narrow, low range. Candy and sugar work, on the other hand, are cooked at significantly higher temperatures, as noted above: from about 230°F all the way up to 310°F. Deep-frying oil, which is also measured with a candy thermometer, spans 325°–375°F. Candy thermometers are also designed to clip onto the side of a pot so they stay submerged in the liquid continuously. A meat thermometer is used for quick spot-checks. Today, a high-quality instant-read thermometer like a Thermapen reads up to around 572°F, which covers both worlds. However, they run more than $100, so many cooks prefer to keep two separate thermometers for less than $15 apiece. The first reliable mercury-in-glass thermometer with a standardized scale, appeared in 1714 created the making temperature truly measurable and repeatable. It was created by Daniel Gabriel Fahrenheit. Anders Celsius followed in 1742 with his centigrade scale. You now know the origin of the Fahrenheit and Celsius scale names. But it was an additional 250 years before the arrival of the thermometer for everyday cooking. Precise temperature measurement in cooking didn’t become a concern until the 19th century, when scientific thinking began to be applied to domestic life. But still, they weren’t for home use. CHECK OUT WHAT’S HAPPENING ON OUR HOME PAGE, THENIBBLE.COM. |
||