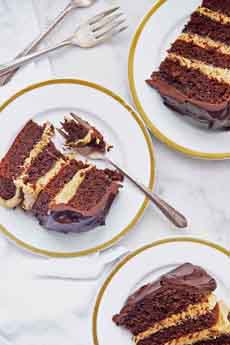
RECIPE: Chocolate-Peanut Butter Layer Cake (Buckeye Chocolate Cake)
 [1] A tempting chocolate peanut butter layer cake. The recipe is below; photo courtesy King Arthur Flour.
|
March 11th is the birthday of our NIBBLE co-founder, Ruth. Ruth loves a good piece of cake, and she loves chocolate and peanut butter.
So in addition to a supply of Justin’s peanut butter cups, we baked her this cake. This recipe was sent to us by King Arthur Flour, with the title Peanut Butter Fudge Buckeye Cake. Since not everyone knows what a buckeye is: The Buckeye is the state tree of Ohio is the buckeye, and the state’s nickname is the Buckeye State. The name “buckeye” stems from Native Americans, who called the nut from the tree “hetuck,” which means buck eye, because the markings on the nut resemble the eye of a deer. The name took hold during William Henry Harrison’s 1840 presidential campaign, and local confectioners soon were making balls of peanut butter fudge mostly enrobed in chocolate (photo #2). The open top of peanut butter makes the candy look like the buckeye nuts, the nuts; and the confections themselves are called buckeyes. Hence the cake. Says King Arthur Flour: “We replicate the flavors of the classic buckeye candy in this towering four-layer cake, highly recommended for your next birthday party.” Hence the cake. Prep time is 20 to 25 minutes, bake time is 35 to 38 minutes. Ingredients For The Cake 1. PREHEAT the oven to 350°F. Lightly grease and flour (or grease, then line with parchment, then grease again) two 8″ x 2″ round cake pans. Note: These pans need to be at least 2″ tall. If you have non-standard, shorter 8″ pans, substitute 9″ round pans. 2. MAKE the cake: Whisk together the dry ingredients. Add the eggs, oil, and vanilla, beating until smooth. Gradually add the water, beating until smooth. Pour the batter into the prepared pans. |
|
|
3. BAKE the cakes for 35 to 38 minutes (a bit less if you use a 9″ pan), or until a cake tester inserted into the center comes out clean. Cool the cakes in the pan for 15 minutes, then turn them out of the pans to cool completely on a rack. 4. MAKE the filling: Mix the sugar, peanut butter, and vanilla until crumbly. Add the milk and mix until smooth, adding more milk if necessary to make a spreadable filling. When ready to serve the cake… 5. DIVIDE the cooled layers in half horizontally, to make four layers. Place one layer on a serving plate and spread with filling. Repeat with the next two layers. Top with the final cake layer. 6. MAKE the icing: Combine the chocolate chips, cream, and corn syrup in a microwave-safe measuring cup. Microwave until the cream is very hot, and the chips are soft. Stir until the chips melt, and the mixture is smooth. Spread the icing atop the cake, letting it drizzle down the sides. 7. SERVE in thin slices; the cake is very rich. Refrigerate any leftovers for several days or freeze for longer storage. CHECK OUT WHAT’S HAPPENING ON OUR HOME PAGE, THENIBBLE.COM. |
||


