THE NIBBLE BLOG: Products, Recipes & Trends In Specialty Foods


Also visit our main website, TheNibble.com.


TIP OF THE DAY: Homemade Lentil Soup

Lentil Soup With Mustard Greens

Lentils
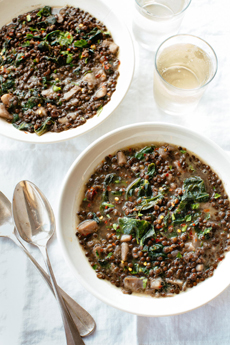
Top: Vegetarian lentil soup with mustard
greens from Good Eggs. Bottom: Black beluga
lentils from InHarvest.com.


Lentil soup is a winter favorite: hearty, nutritious comfort food. Why make your own? Better lentils, more nuanced flavors and the ability to control the salt.

Today’s tip is an easy recipe for homemade vegetarian lentil soup, with a variation if you’d like to add smoky ham hocks.
 
LENTILS: AN ANCIENT CROP

Lentils are an ancient food, found in Mediterranean archaeological sites up to 13,000 years old. As with all foods, it first grew wild and was then cultivated, sometime around 8,500 years ago. It grows well in rainfall-challenged climates like the Middle East.

In the Bible (Genesis 25:30-34), Esau, famished after working the fields, gave up his birthright (the rights of the first-born son to inheritance and position) to his younger brother Jacob in exchange for a pot of Jacob’s red lentil soup. The Greek playwright Aristophanes called lentil soup, the “sweetest of delicacies.” [Source]

Plentiful and inexpensive, through much of history lentils have been considered food for the poor. Marie Antoinette made them fashionable in 18th-century France, although elsewhere, even into the 19th century, they were called “poor man’s meat,” and acceptable during Lent for people who could not afford fish. They became a staple in the Middle East and India.
 
TYPES OF LENTIL SOUP
In modern times, in Europe and the U.S., lentils and lentil soup have moved up, acquiring a position as a hearty and tasty fall and winter comfort food.

  • Lentil soup can be vegetarian or contain meat. Adding ham hocks or other smoked pork is a popular meat version in Europe and the U.S.
  • Whether meat or vegetarian, the soup can include vegetables such as carrots, celery, onions, potatoes, pumpkin, tomatoes, turnips and yellow squash/zucchini.
  • Aromatics and herbs can include bay leaf, cumin, garlic and parsley, plus olive oil and vinegar or lemon juice. Spices popular in Indian recipes include cardamom, cinnamon and fennel seeds.
  •  

  • It can be garnished with butter or olive oil, chopped herbs, cream or yogurt and/or croutons.
  • Any lentils can be used: black beluga, brown, green, red or yellow.
  • The lentils can be cooked with or without the husk. Dehulled red and yellow lentils disintegrate in cooking, losing their shape but making a thick soup. Alternatively, the soup made with husked lentils can be puréed.
  •  
    WHAT ARE BELUGA LENTILS?

    Beluga lentils, also called black beluga lentils and petite beluga lentils, are tiny black lentils that glisten when they’re cooked. Their tiny size and shiny black surface reminded chefs of beluga caviar; hence the name.

    They are preferred by fine chefs for pilafs, salads and sides because they hold their shape when cooked and don’t become mushy. They have the same good nutrition profile as other lentil varieties: protein, dietary fiber, iron, potassium and important minerals.

    If you can’t find beluga lentils, substitute La Puy French green lentils.

    When you cook the lentils, consider making extra lentils to add to a salad or to serve as a side. Start with this recipe for Lentil, Olive & Arugula Salad.
     
    WHAT ARE MUSTARD GREENS?

    Mustard greens comprise the leaves and stems of the mustard plant, Brassica juncea. The seeds are used whole as a spice, pressed into mustard oil or ground into mustard powder, which in turn can be mixed with vinegar or wine to create prepared mustard.

    The greens are much more prevalent in Asian cooking than in Western recipes. While they have not received the media attention of kale, mustard greens are being discovered for their flavor and nutrition. Mizuna, a “designer green,” is a Japanese mustard plant, Brassica juncea var. japonica. Tatsoi, another Japanese specialty green, is mustard-like but from a different species: Brassica narinosa.

    Low in calories, mustard greens are high in vitamins A, C, K and folic acid (also known as vitamin B9 and vitamin M).


    RECIPE: LENTIL SOUP WITH MUSTARD GREENS

    This recipe takes 10 minutes of prep time and 45 minutes of cook time. For another vegetarian lentil soup recipe, check out this Red Lentil & Yogurt Soup.

    If you’d like to add a smoky meat flavor, use chicken stock plus 3 to 4 smoked ham hocks.

     
    Ingredients For 4 Servings

  • 1 celery root or 2 parsnips, peeled and cubed
  • ½ bunch of carrots, diced (about 2 cups)
  • 1 white onion, diced
  • 4 cloves garlic, sliced
  • 1 bunch mustard greens, destemmed and cut into 1” ribbons
  • 2 cups of beluga lentils
  • 8 cups of chicken or vegetable stock*
  • 2 tablespoons fresh lemon juice†
  • For meat version: 3-4 ham hocks‡
  • Optional garnishes: chile flakes; croutons; crumbled feta,
    grated Parmesan or similar cheese**; fresh parsley
  • Optional side: toasted baguette or multigrain, whole grain bread
  •  
    ________________________________
    *You can use any combination of broths, or combine broth with water. You can use all water, but the more broth, the more flavor. For a vegetarian version, of course, use vegetable stock.


    Mustard Greens

    Mustard Greens

    Red Mustard Greens
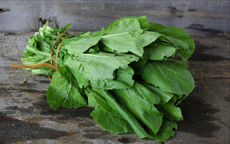
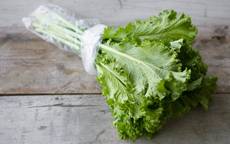
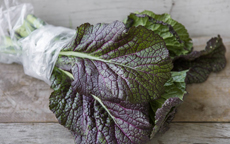
    Conventional and red mustard greens. As with kale and other vegetables, different varieties will have different leaf styles. Photos courtesy GoodEggs.

     
    †A medium lemon will yield 2-3 tablespoons of juice; a larger lemon can provide 4 tablespoons (1/4 cup).

    ‡A ham hock, also called the pork knuckle, is the joint where the foot was attached to the hog’s leg.

    **Substitutes for crumbled feta or Parmesan in this recipe include include cotija, goat cheese (lightly aged, so it crumbles), queso fresco or ricotta salata.
     
    Preparation

    1. PLACE the lentils in a large strainer and rinse them under cold running water. Pick over the lentils and remove any discolored ones, or occasional debris like small pebbles.

    2. HEAT 3 tablespoons of olive oil in a stock pot over high heat. When the oil is hot, add the celery root or parsnips, onions, garlic and carrots and cook over high heat for a few minutes. When the garlic starts to turn golden brown, turn the heat down to medium and continue cooking the mixture for about 7 minutes, until the root vegetables begin to soften.

    3. ADD the lentils and 8 cups of liquid—this can be any combination of water, stock or just one or the other. Bring to a boil over high heat, then reduce heat to a simmer, cover the pot and cook for 25 minutes, until the lentils are tender. When the lentils are fully cooked…

    4. GENTLY STIR stir in the mustard greens and cover the pot. Cook the lentils and greens together for about 5 minutes—just enough for the greens to soften, but still maintain some of their bite. To finish, stir in the lemon juice and salt and pepper to taste. Ladle into bowls and garnish as desired.
     
    Variation With Ham Hocks

    1. FOLLOW steps 1 and 2, above.

    3. Add the ham hocks (instead of the lentils) and chicken stock. Bring the liquid to a boil, reduce the heat to medium-low and cook for 1 hour, or until the hocks are tender. Then add the lentils and continue cook for 25 minutes, or until the lentils are tender.

    4. REMOVE the ham hocks and stir in the mustard greens; allow to cook for 5 minutes, or until the greens soften. While the greens cook, cut the meat from the ham hocks and cube or julienne as desired. Stir the lemon juice into the soup and add the ham. Taste and adjust salt and pepper to taste. Garnish and serve.
      

    Comments off

    TIP OF THE DAY: Make A Savory Galette

    Beet Galette
    Beet and Sweet Potato Galette from Vermont
    Creamery.

      Shoo the winter blues away with a colorful galette.

    In the pastry world, a galette is a rustic, open-face pie, made without a pie pan. It is flat, with a turned-up crust that wraps around the filling to create a “dough pan.” It can be round, square or oblong.

    Galette (gah-LET)—called crostata in Italian and rustic pie or rustic tart in English—hails from the days before people had pie plates, and the days after that when only the kitchens of the wealthy had them.

    Way before then, the precursor of the galette probably dates from the Neolithic Age, a.k.a. the New Stone Age, which lasted from about 10,200 B.C.E.and ending between 4,500 and 2,000 B.C.E. Thick cereal pastes—barley, oats, rye, wheat—were sweetened with honey and spread on hot stones to cook.

    The recipe below, from Vermont Creamery, uses their Spreadable Goat Cheese and Unsalted Cultured Butter.

    It can be served as a light lunch or brunch with salad and soup, or as a first course at dinner.

     
    The Most Exquisite Butter

    Palates, take note: Vermont Creamery’s cultured butter is churned to 86% butterfat. This is higher than most other butters available and creates an especially flaky and delicious pie crust.

    Supermarket butter is 80% butterfat, and most European-style butters are 82%-84%. We’ve only seen the 86% varieties from Vermont Creamery and California’s Straus Family Creamery. If you want the best butter, this is it.

    And, we must note: Our favorite butter for bread is Vermont Creamery’s Cultured Salted Butter. It’s amazing: We never use salted butter unless it’s this one, with the lightest touch of sea salt. It’s irresistible.

    See the different types of butter in our Butter Glossary.


    RECIPE: BEET & SWEET POTATO GALETTE

    Ingredients
     
    For The Crust

  • 8 ounces unsalted butter, softened but still cool
  • 2 cups flour
  • 1 teaspoon salt
  • 1–2 tablespoons ice water
  •  
    For The Filling

  • 8 ounces spreadable goat cheese
  • 1 large sweet potato
  • 1 large red beet
  • Fresh thyme
  • Salt and pepper
  •  
    Preparation

    1. PREHEAT the oven to 375°F.

    2. PEEL the sweet potato and beet, then slice them into 1/8-inch-thick rounds. Set them aside on separate plates, to keep the beets from bleeding onto the sweet potato slices.


    Squash Galette
    For summer, make the galette from zucchini and yellow squash. This example, from Good Eggs, shows an individual-size galette.

     
    3. PLACE the flour in large bowl and add the salt; stir to combine. Add the butter. Using two fork, knives or a hand-held dough blender, cut the butter into the flour, gently mixing to ensure that every crumb of butter is pea size and coated in flour. Once the butter is combined…

    4. ADD the ice water one tablespoon at a time, mixing until the dough begins to take shape. Gently knead with your fingers to help bring the dough together. If needed, add additional water a little at a time. Once the dough is formed…

    5. SHAPE it into a disk and roll it into a rough circle on a piece of parchment, to a uniform thickness of ¼ inch. If you have trouble creating a uniform thickness, consider a pie crust mold for “perfect crusts every time.”

    6. SPREAD the goat cheese onto the dough, leaving an inch border around the edge. Layer rounds of the cut sweet potato and beets on top of goat cheese. Gently fold the bare edge of dough inwards on top of the layered vegetables, working around the entire circle.

    7. SPRINKLE the top of the galette with fresh thyme, salt and pepper and bake for 40–50 minutes, or until vegetables are cooked through and the crust is golden. Serve it hot from the oven, at room temperature or in-between.


    Comments off

    HAPPY VALENTINE’S DAY

    Valentine Beet Soup
    Valentine soup. Photo courtesy Mowie Kay.
      HAPPY VALENTINE’S DAY
    FROM THE NIBBLE


    If you’d like to celebrate with this Valentine soup, the recipe is at Mowielicious.com, a fine-food blog.

    The website has the most beautiful professional food photography, but no “About Us” information.

    So we did a quick search and found that the blogger is Mowie Kay, photographer and food stylist, which led us to find his professional website.

    Mowie, THE NIBBLE wishes you an especially delicious Valentine’s Day.


    Comments off

    TIP OF THE DAY: Soup In A Tea Cup

    It’s zero degrees here right now, with a wind chill below zero—the coldest February day since 1963. It’s a good day to focus on soup.

    We prefer to consume soup in a mug instead of a bowl. It can be easily sipped, and we never drip soup on ourselves. Our ability to avoid spilling some soup as it travels from bowl to spoon to mouth is not exactly enviable.

    Italian chef Stefano Ciotti showed us a more elegant way to sip soup: from a porcelain tea cup.

    All you need is an old-fashioned shallow tea cup (no mugs!), the soup and some beautiful garnishes.

    There are garnish options made from bread, dairy, herbs & spices, seeds, fruits and cooked or raw vegetables.

    Here’s a guide to pairing the right garnish with your soup.

    You still need to serve a spoon for eating the garnish (an espresso spoon works for us). While you can use a spoon to eat the soup, it’s acceptable to drink it from the cup.
     
    A BRIEF HISTORY OF SOUP

    Mankind is some 200,000 years old. For the majority of our existence, we had no soup.

    The earliest humans had no cookware—nothing in which to boil water (or anything else). Boiling was not easy to do until the invention of waterproof containers, probably pouches made of clay or animal skin, about 9,000 years ago. Archaeologists have dated the first soups to about 6,000 B.C.E., some 8,000 years ago.

    You can trace the origin of our modern word soup from the French soupe, which derived from the Vulgar Latin suppa, which in turn came from the post-classical Latin verb suppare, to soak. This referred to bread soaked in broth, or a liquid poured onto a piece of bread. The bread added heft to the meal.

    In Germanic languages, the word sop referred to the piece of bread—often a use for stale bread—used to soak up soup or stew. The word entered the English language in the 17th century exactly as that: soup poured over sops of bread or toast. Eating the soaked bread with one’s fingers often served as an alternative to using a spoon (flatware was costly).

    Today’s soup croutons evolved from sops. Prior to sop/soup, soups were called broth or pottage.

      /home/content/p3pnexwpnas01_data02/07/2891007/html/wp content/uploads/butternut soup in a cup stefanioCiotti italy 230sq

    Soup With Jumbo Crouton
    Top: Croutons, crème fraîche and pumpkin seeds garnish butternut squash soup. We’d add a sprig of green herb for contrast—and fill the cup with more soup! Photo courtesy Stefano Ciotti. Bottom: Soup gets its name from sop, a large piece of bread used to sop (soak) up the soup. It evolved into the modern crouton. Photo courtesy Castello Cheese.

     
    Soups For The Rich, Soups For The Poor

    While the rich enjoyed elaborate soup courses (think of modern bouillabaisse, chicken in the pot, cioppino or pho, Vietnamese beef and noodle soup), a simple bowl of soup might be a poor man’s entire dinner.

    Until recent times, the evening meal was the lighter of the two meals of the day. Soup/sop would be a typical evening dish. The name of the meal evolved to souper, than supper.

    It began to be fashionable to serve the liquid broth without the sop (bread); and in the early 18th century, soup became a first course.
     
    EATING VS. DRINKING SOUP

    Since it’s a liquid, why do we “eat” a bowl of soup? Because it’s served in a dish, not a cup.

    If you consume soup from a mug or cup, then you can be deemed to be drinking your soup.
     
    THE DIFFERENT TYPES OF SOUP

    So many soups, so little time! Check out the photos in our Soup Glossary and pick out a type of soup you haven’t tried yet.


    Comments off

    FOOD FUN: Make Beet Yogurt For Your Valentine

    Beet Yogurt - Samin Nosrat

    pita-wedges-thepioneerwoman-ps
    Top: The secret ingredient is popped
    mustard seeds. Photo courtesy Samin
    Nosrat. Bottom: Serve either recipe with
    homemade pita wedges. Photo courtesy
    The Pioneer Woman
    .


    Our supermarkets are filled with cooked, packaged, ready-to-eat beets brought in for Valentine’s Day. While we love fresh-roasted beets, they’re the most time-consuming root vegetables to prepare.

    We got the message. We’re using the pre-cooked beets to make Valentine dips and spreads. If you want to roast your own, we salute you.

    This recipe, by California chef and author Samin Nosrat, is adapted from one published on BonAppetit.com (and further adapted by us). We received it from Good Eggs in San Francisco, an outstanding grocery delivery service.

    Good Eggs recommends it as an addition to a composed salad, a spread for a cheese board or a tangy addition to a sandwich. “Once you start stirring popped mustard seeds into your savory cooking, you’ll never stop,” they assure us.

    RECIPE #1: MASHED BEETS WITH MUSTARD SEEDS

    Ingredients For 2 Cups

  • 1 pound red beets (you can use other colors for other occasions)
  • Salt
  • Cooking oil of choice
  • 1 teaspoon brown or yellow mustard seeds
  • 2 cloves of garlic, thinly sliced
  • 3 tablespoons whole milk yogurt
  • 1/2 lemon
  •  
    Preparation

    1. HEAT a small pan over medium heat for a minute. Pour in enough oil to coat the bottom of the pan, then add the mustard seeds. Swirl the pan until the mustard seeds begin to pop, cover the pan so the seeds don’t escape, and reduce the heat to low. After about 30 seconds, you’ll hear the popping slow down.


    2. REMOVE the pan from the heat and let the seeds cool, uncovered, for a minute or two. Cut the beets into large chunks and place them in the bowl of a food processor, along with the garlic. Blend until smooth, scraping down the sides as needed. You can use a potato masher if you prefer it to a food processor: The mashed beets will be a much rougher texture (like hand-mashed potatoes) but still fine for all purposes.

    3. ADD the popped mustard seeds, yogurt, a big squeeze of lemon juice, and some salt. Taste and adjust the seasoning as desired.


    RECIPE #2: BEET YOGURT DIP, SPREAD OR TOPPING

    This is the yogurt to whip up for Valentine’s Day. You can make it with any color of beets, but save the orange and yellow for another occasion and use red beets. You can make the recipe a day in advance.

    Use beet yogurt as a dip, a spread, or as a topping—for baked potatoes, cottage cheese, grains, veggies, sandwiches, etc.

    Ingredients For 6 Servings

  • 1 pound beets (about 3 medium)
  • Kosher salt
  • 1-1/2 cups plain Greek yogurt (your choice of 0%, 2% or full fat)
  • 2 tablespoons finely chopped fresh mint plus torn leaves for garnish
  • 1 teaspoon finely chopped fresh tarragon*
  • 1 tablespoon extra-virgin olive oil
  • 2 teaspoons red wine vinegar
  • Crudités: cucumber slices, carrots, anything good for scooping
  •  

    Beet Yogurt Recipe
    A very romantic dish of yogurt. Photo courtesy Good Eggs | San Francisco.

  • Whole wheat pita, cut into triangles and toasted (recipe below, or substitute pita chips)
  • ____________________
    *If you don’t like the licorice notes in tarragon, substitute basil or chervil.
     

    Preparation

    If you want to roast your own beats, follow the first three steps. Otherwise, skip to Step 4.

    1. PREHEAT the oven to 450°F.

    2. SCRUB and trim the beets, but leave the skins on. Place them in a small baking pan or casserole and fill it with 1/2″ hot water. Sprinkle with salt, cover with a piece of parchment paper, and then cover dish tightly with foil.

    3. ROAST the beets until tender, about 1 hour. Remove them from the baking pan and let them cool until they are comfortable to grasp. Then, using a paper towel, rub off the skins.
     
    4. GRATE the beets coarsely with a box grater, Microplane or the grating disc of a food processor. Blend with the yogurt, mint, tarragon, olive oil, and vinegar. Taste and season with salt and vinegar as desired.

    5. COVER and chill the yogurt for 3 hours or overnight for the flavors to meld.
     
    RECIPE: TOASTED PITA WEDGES

    Ingredients

  • Whole wheat pita
  • Olive oil
  • Salt (optional)
  •  
    Preparation

    1. CUT each pita round into 6 wedges and place them on a baking sheet. Brush lightly with olive oil and sprinkle with salt as desired.

    2. BAKE for 5 minutes or until crisp.
      

    Comments off

    The Nibble Webzine Of Food Adventures
    RSS
    Follow by Email


    © Copyright 2005-2024 Lifestyle Direct, Inc. All rights reserved. All images are copyrighted to their respective owners.