THE NIBBLE BLOG: Products, Recipes & Trends In Specialty Foods


Also visit our main website, TheNibble.com.


PRODUCT: Fusion Marinara Sauce

Fusion cuisine combines ingredients from different food cultures for a new take on the ingredients and the recipes themselves.

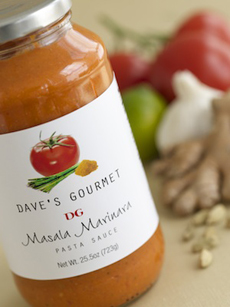
In the case of Dave’s Gourmet Masala Marinara pasta sauce, the result is a delightful fusion of Italy and Southeast Asia.

Marinara is the classic Italian tomato sauce served with spaghetti and meatballs, atop pizza, veal and chicken Parmigiana, and as a dipper with fried zucchini and mozzarella sticks. A good sauce will be made from lush tomatoes, fresh basil, garlic, onions and oregano.

Masala is the Hindi word for a mixture of spices.*
*While “masala” is an Indian word, the predominant flavors are both Indian and Thai.

 
A nifty new pasta sauce, flavored with Indian
spices. Photo courtesy Dave’s Gourmet.
 
Dave’s Gourmet uses a base of tomatoes and tomato paste, seasoned with southern Asian flavors including coconut milk, garlic, ginger, lime leaf, lime juice, lemongrass, onions, Indian spices and vinegar, among other ingredients. Evaporated cane juice is listed as an ingredient, but thankfully, there’s no prominent sugar flavor.

The sauce is versatile, pairing well with chicken, lamb, pasta, pork, rice, seafood and vegetables.

We also tasted Dave’s Butternut Squash Pasta Sauce, the first sauce we’ve come across made from squash. If you’re a butternut squash fan (we are!), try it and let us know what you think.

While it provided an interesting change of pace, THE NIBBLE tasting team wasn’t keen on the change—and we don’t know why. We really enjoy pumpkin ravioli, where the squash is inside of the pasta. So why didn’t we like a purée of squash atop our pasta?

We have no idea. We’re going to get another jar and try it as a sauce for chicken and fish.

You can purchase Dave’s all-natural sauces online at DavesGourmet.com.
  

Comments off

TIP OF THE DAY: Caramelized Onions


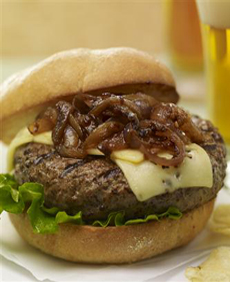
[1] Caramelized onions rock a burger, sandwich, eggs and more (photo © McCormick).

Yellow Onions

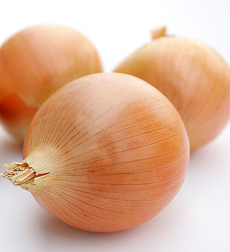
[2] Large yellow onions are best to caramelize (photo © Flagstaff Fotos).


Caramelized onions are a great culinary treat that few people enjoy often enough.

You can caramelize any type of onion. Sautéeing slowly brings out rich, sweet onion flavor as the natural sugars in the onions caramelize. Start with standard yellow onions, then try other varieties to see which you prefer (red onions add more color).

Slather caramelized onions on burgers and sandwiches, on pastas and pizzas, as a condiment with egg, fish and meat dishes or as a garnish for soups. Garnish mashed potatoes and rice. Toss them into a green salad or grilled vegetable plate with some goat cheese.

Try a small batch with oil and another batch with butter. Then, vary the types of onions, to see which recipe you prefer. You can vary the recipe by adding sliced mushrooms.

NOTE: Once sautéed, a large union results in a much smaller amount of cooked onion. If this is your first batch, consider it a trial so you’ll know how many onions to use next time.

FOOD TRIVIA: Standard onions actually have more sugar than the more expensive sweet onion varieties. Sweet onions seem sweeter because they contain fewer acrid sulfur compounds.
 
 
RECIPE: CARAMELIZED ONIONS

Ingredients

  • 1 large onion
  • 3 tablespoons butter, olive oil or other cooking oil
  • Pinch salt
  • Pinch fresh-ground black pepper
  • Optional: pinch sugar
  • Optional: splash of balsamic vinegar
  • Optional: chopped thyme
  •  
    Preparation

    1. SLICE the top off the onion, peel, halve and slice into half rings.

    2. ADD the butter/oil to a large, heavy skillet and turn heat to medium-high until it begins to bubble. If you are using butter, note that it can burn if overheated, so keep an eye on it.

    3. ADD the onions to the skillet and stir to coat with the fat. Add the salt, pepper and optional sugar and/or thyme.

    4. STIR constantly until the onions begin to darken and soften, about 5 minutes. Some slices will stick to the bottom of the pan. If you are having difficulty scraping them up as you stir, deglaze the pan with a tablespoon of water, broth, wine or beer. You can deglaze as often as needed.

    5. CONTINUE stirring until the onions are golden brown, translucent and the texture you desire—from al dente to soft—up to 20 minutes. Remove from the stove and add the splash of balsamic vinegar.
     
    Enjoy them and make another, much larger batch immediately—you’ll definitely want more!

    To make large quantities, take a look at this cooking video.
      

    Comments off

    TIP OF THE DAY: Riesling, The Best Wine For Sushi

    This week we attended a trade event called Riesling & Co. World Tour 2011, sponsored by GermanWineUSA.com, a trade association that aims to heighten awareness of the quality and special nature of German wines. A revelation: the best wine for sushi may be Riesling.

    At most wine tastings, there’s a selection of cheeses, breads, and other foods to go with the wine. At this Riesling tasting, the only food served was sushi—plus dumplings and spring rolls targeted at those who don’t eat sushi.

    It was a perfect pairing. Those who don’t drink beer or saké have a winner in a Riesling, part of a quintet of other white wines that includes crisp, high-acid Riesling and Pinot Blanc, spicy and aromatic Gewürztraminer and Viognier. Champagne and other sparklers go well, too.

    Riesling, Gewürztraminer, and Pinot Blanc are grown in both the Alsace region of France and in Germany. Viognier is largely Alsatian, but Germany has been amping up its production. All four varieties are grown in California, where they are known as “the Rhone clones.”

     
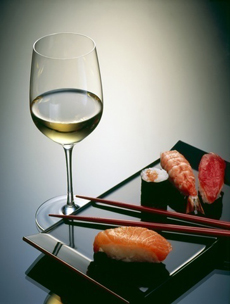
    Riesling is the wine to pair with sushi.
    Photo by Lognetic | Dreamstime.
     
    While wines from the same grape variety taste different based on where they were grown, each region produces delicious wines. It’s a question of finding which producers you prefer.
     
     
    THE NEW RIESLING

    Rieslings have changed substantially over the last 20 years. In an effort to gain more fans worldwide, vintners have moved away from the traditional style of Riesling with its notes of petrol and flowery, sometimes heady aromas. Today, the wines are made to be food-friendly across a rainbow of cuisines. The crispness and acidity are just right for sushi.

    Riesling is vinified into six categories, in order of increasing sugar levels based on the ripeness of the grapes when picked. Don’t let the word “sugar” scare you away: The slight sweetness in Kabinett and Spätlase wines goes very well with sushi.

    Kabinett Rieslings, with the lowest sugar levels, are the best place to start.

  • Kabinett Riesling is a light wine, typically semi-sweet with crisp acidity. It can be vinified to be dry (you’ll see the word Trocken, dry, on the label).
  • Spätlese Riesling, typically semi-sweet or sweet, is made from late harvest (Spätlese) grapes.
  • Auslese Riesling is made from selected very ripe grapes. Auslese means “select harvest.”
  • Beerenauslese Riesling is made from overripe grapes vinified into a rich, sweet dessert wine. Beerenauslese means “select berry harvest.”
  • Eiswein (ice wine) is made from grapes that have been naturally frozen on the vine, resulting in a very concentrated flavor.
  • Trockenbeerenauslese Riesling, nicknamed TBA, is made from overripe, shriveled grapes often affected by noble rot—an extremely rich sweet dessert wine that is a glass of heaven. The name means “select dry berry harvest” or “dry berry selection.”
     
    Our favorite producers: Dr. Loosen, Müller Cattoir and Weingut Robert Weil. But you can start your Riesling voyage with any German—or California—Riesling.

    Now for the bad news: Just try to find Riesling (or a Pinot Blanc, Gewürtztraminer or Viognier) at a Japanese restaurant. You may have to do some lobbying with management. At a minimum, ask if you can bring your own wine for a corkage fee, a charge by the restaurant for every bottle of wine or spirits served that was not bought on the premises. It is usually equal to the price of the most affordable wine that the restaurant carries.


    CHECK OUT WHAT’S HAPPENING ON OUR HOME PAGE, THENIBBLE.COM.


  • Comments off

    COOKING VIDEO: Cornmeal Battered Onion Rings Recipe


    Many people are not neutral on the subject of battered, fried onion rings. There are two main camps: people who don’t like onions and people who’d choose onion rings over fries any day.

    We’re in the latter camp. We could make a meal of onion rings, ketchup and beer. Burgers or other protein only fill us up, so we can’t enjoy as many onion rings.

    Yet, more often than not, we’re disappointed with the onion rings served up at restaurants.

    Unless it’s a very good restaurant, the onion rings are more often than not soggy rather than crispy. We suspect they’re frozen onion rings that have been fried once and then briefly refried to heat them up before delivery to our table. The batter has no crunch; the onions and batter are equally tasteless.

    At the most popular “deluxe” burger restaurant in town, we got crispy onion rings—but not flavorful ones. Doesn’t anyone believe in seasoning? Thank goodness for the ketchup.

    The solution to enjoying delicious, hot and crunchy onion rings is to make them yourself. It’s simple; it’s just a bit time consuming to cut and separate all the rings, dredge them twice and fry them.

    But the weekend is upon us. We’ve got an extra half hour, as well as a fridge full of craft beer and gourmet ketchup. We’ll make buttermilk and cornmeal-battered onion rings (the recipe in the video) on Saturday and substitute panko (Japanese bread crumbs) for the cornmeal on Sunday.

    Here’s a video cooking demonstration showing how easy it is to make onion rings. The seasonings include salt, pepper and cayenne pepper, and if you want more of a kick, optional hot sauce.

    If you want company, ask friends to bring the beer. It’s more than an even exchange for fresh, crisp onion rings.

    For an extra treat, pick up a special ketchup. We’re hooked on the Chipotle Ketchup and Curry Ketchup from Montebello Kitchens.


    Review: Our favorite ketchups (we tasted 50 of them!).

    Comments off

    TIP OF THE DAY: Dessert Tortilla Wraps


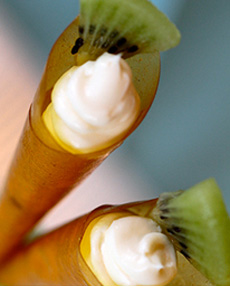
    Novel dessert: cream cheese, marshmallow
    creme and kiwi in a mango wrap. Photo
    courtesy New Gem Foods.


    It’s a wrap—a dessert wrap, that is.

    Sandwich wraps have swept the country by storm. Instead of two slices of bread, many people prefer to roll their favorite sandwich fixings in a large tortilla.

    You can roll dessert fillings in the same manner to make a dessert wrap: sweetened ricotta with chocolate shavings (instead of a cannoli), bananas, fruit salad and yogurt.

    A few years ago we published dessert tortilla recipes made with Tumaro’s dessert-flavored tortillas: Apple Cinnamon, Blueberry, Chocolate and Pineapple. Alas, these flavors have been discontinued. Not enough customers got the message.

    You can use a regular tortilla—a thin, honey-flavored tortilla, if you can find a package. But there’s another option.

    NewGem Foods makes alternative sushi wraps, called Origami Sushi Wraps. Originally intended for people who don’t like the traditional nori (seaweed) wraps, they’re made by dehydrating fresh fruits and vegetables.

     
    In addition to savory flavors such as BBQ, Carrot, Corn, Red Bell Pepper and Tomato Basil, there are sweet flavors: Apple Cinnamon, Mango, Peach and Strawberry. The wraps can be found in Costco, Trader Joe’s, Wegman’s and food retailers worldwide. They can also be purchased from the company website, which has plenty of recipes for you to try.

    Time to make dessert wraps! It couldn’t be easier.

    Marshmallow Mango Cone Recipe
    Makes approximately 100 small cones. Cones can be prepared an hour in advance and refrigerated.

    Ingredients

  • Origami Mango Wraps
  • 24 ounces cream cheese
  • 1 jar marshmallow creme
  • Sliced kiwi
     
    Preparation
    1. Beat cream cheese until smooth.
    2. Add marshmallow creme and beat until smooth.
    3. Fill piping bag with marshmallow filling and pipe into cones. Be sure to fill down into the point of the cone so that the wrapper will soften completely.
    4. Slice Kiwi into rounds, then each round into eight triangles, top each cone with one triangle.


  • Comments off

    The Nibble Webzine Of Food Adventures
    RSS
    Follow by Email


    © Copyright 2005-2024 Lifestyle Direct, Inc. All rights reserved. All images are copyrighted to their respective owners.